 View Video
Overview #
Apsona’s feature set is available with all Salesforce objects, both built-in and custom objects. Apsona automatically detects all the available custom objects and fields, and lets your system administrator choose and configure the ones that should be visible and accessible to each user profile.
Apsona maintains a list of configurations, one for each Salesforce user profile. The configuration for a user profile contains:
- the list of visible objects for users with that profile – objects that the user can see either in a menu bar item, a child tab or a filter or report; and
- the objects appearing in the main menu bar for users with that profile.
- The access permissions for users with that profile: whether the user can delete data records, export data, import data, or use the update-all (mass update) feature. These settings apply to all Salesforce objects; for example, if you uncheck the “Export” box, the user will not be able to export data from any Salesforce object via Apsona.
There is one default configuration that will apply to any user profile that does not have its own configuration. As a system administrator, you can edit any existing configuration or create new ones by cloning and editing existing ones. Using the editing interface, you can control the objects that the user can see via Apsona, and the menu items available to the user in the top menu bar.
Notes:
- When you use Apsona for Salesforce, the full “Settings” menu will only appear if you have the “Manage Users” and “Modify All Data” permissions available to you, either in your Salesforce profile or via permission sets. This usually means you must be an administrator to see the full menu. If you are not an adminitrator, you will see just a few items relevant to your user profile.
- If your installation uses Group Edition or Professional Edition, Salesforce uses only the “Standard User” and “System Administrator” profiles. So in these cases, there is no reason to create configurations for the other profiles, even if Apsona shows them to you.
- You can create no more than one configuration per profile (otherwise there would be ambiguity as to which one to use). Even after you have created and saved a configuration, you can edit its visible objects and menu bar. The only constraint (currently) is that you cannot change the profile to which it applies. This measure is to prevent inadvertent errors.
- It is not necessary to define a configuration for every Salesforce profile in your organization. If Apsona does not find a configuration for the logged-in user’s profile, it uses the default configuration, as noted above.
Why is a configuration needed? #
If your user profile does not have an associated Apsona Configuration, the Default Configuration will apply, and will only show a set of standard objects and fields. Moreover, the Default Configuration cannot be edited, so you will be unable to use any of the objects that are not included in the Default Configuration. So we recommend that you create a Configuration for each Profile that will use Apsona.
Creating a configuration #
To create a configuration, you can use the following steps.
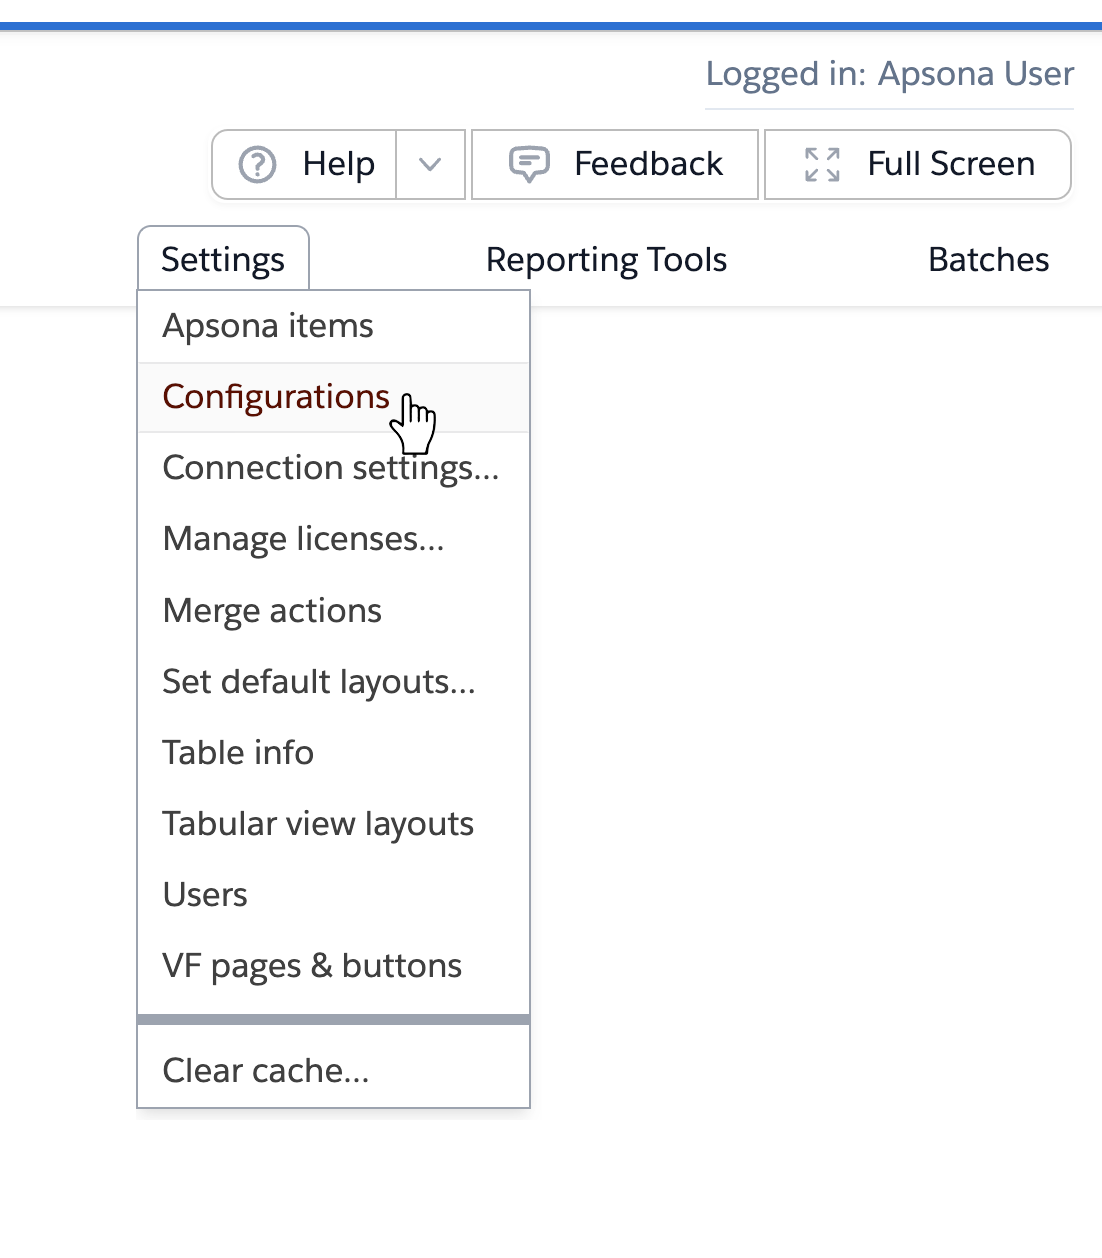
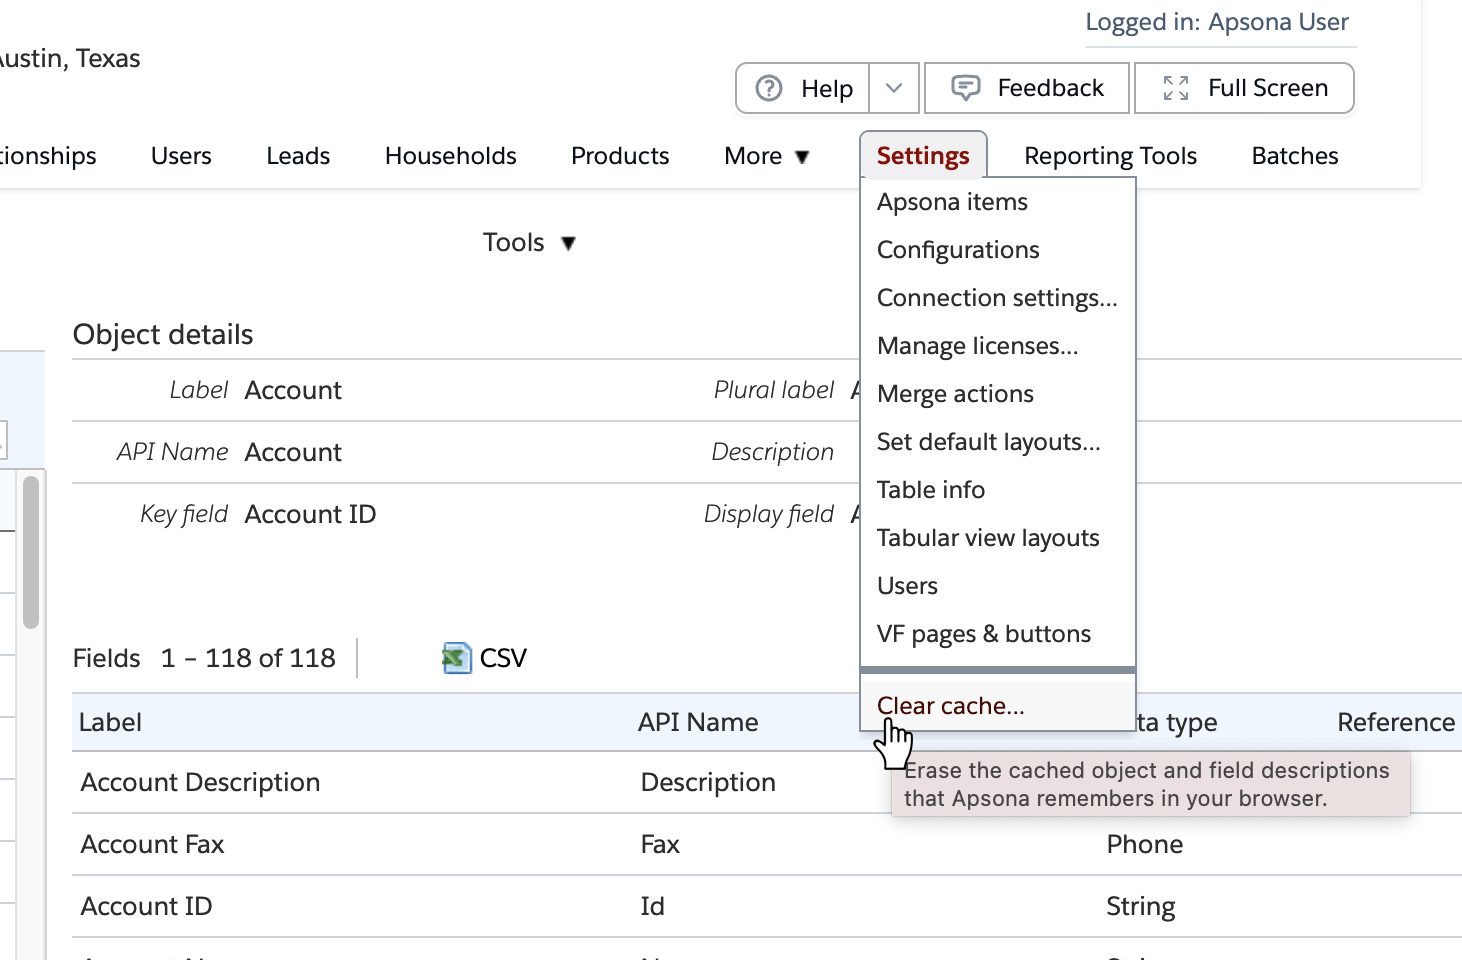
- Click the Configurations item in the Settings menu.3
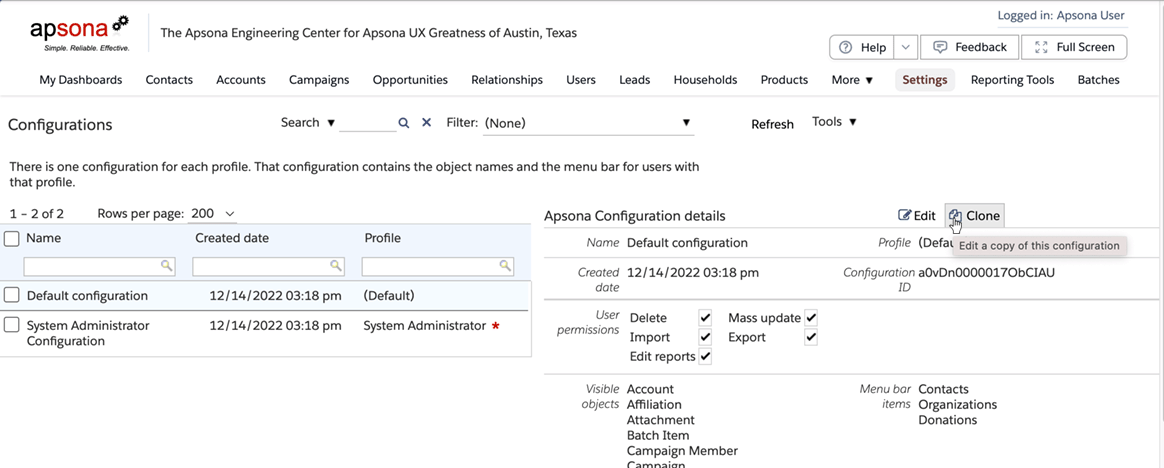
- The list of configurations appears. Click the one you wish to clone, and the details of that configuration appear in the right pane. Click the “Clone” button.
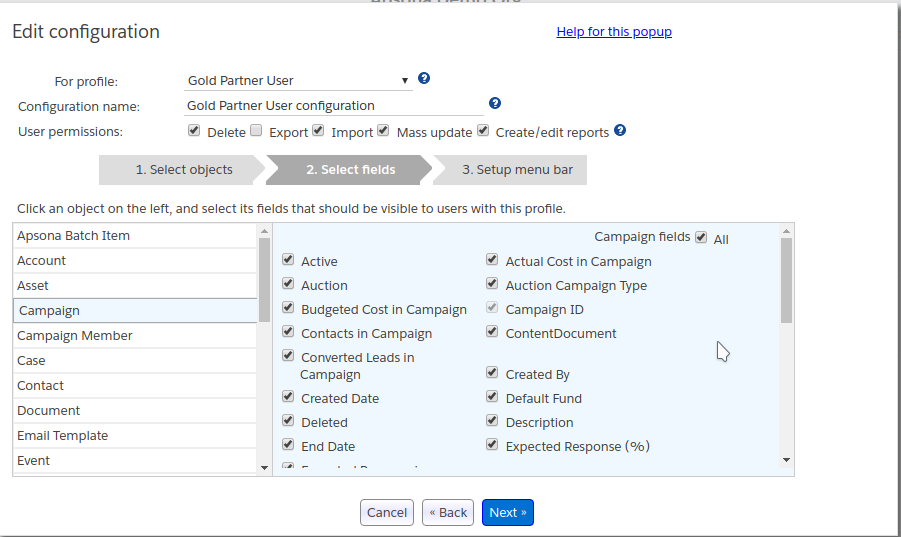
- A popup window appears. Here you can set the configuration name and the profile for which it is to be used. You can also use the check boxes to set the access permissions for the user.
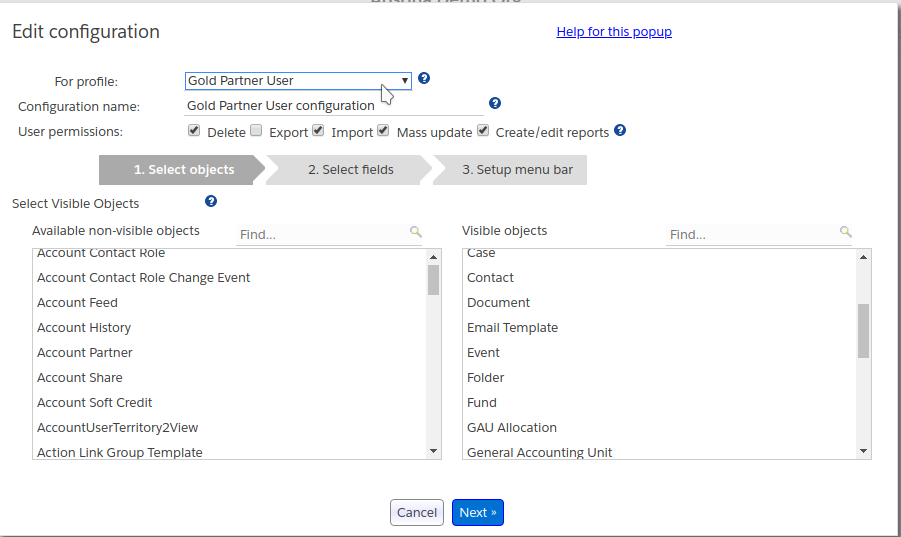
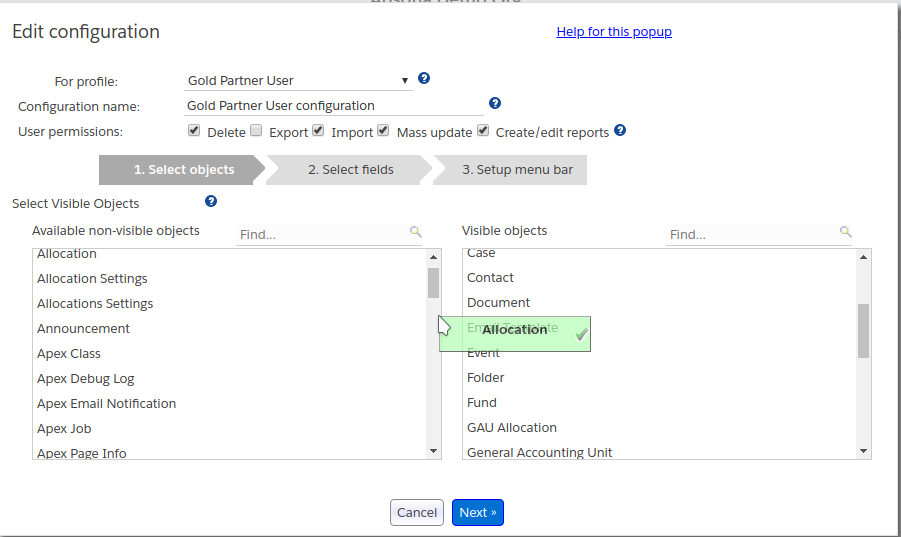
- The popup also contains a list of all available objects on the left side, and the visible objects on the right side. You can drag objects between the two sides to determine the ones you wish to be visible to the user.
- Click the Next button to move to step 2. In step 2, for each of the objects you have selected to be visible for this configuration, you can select the fields of the object that are visible to the user with that configuration’s profile.
- Click Next to move to the step 3, where you can select the fields visible determine the menu bar layout. Here you will see the list of visible objects (that you chose above) in the left pane, and the list of menu bar objects, in order, in the right pane. Here again, you can drag objects between the left and right sides to arrange the menu bar as needed. The top-to-bottom order of objects in the right pane determines the left-to-right order objects that the user will see in their menu bar.
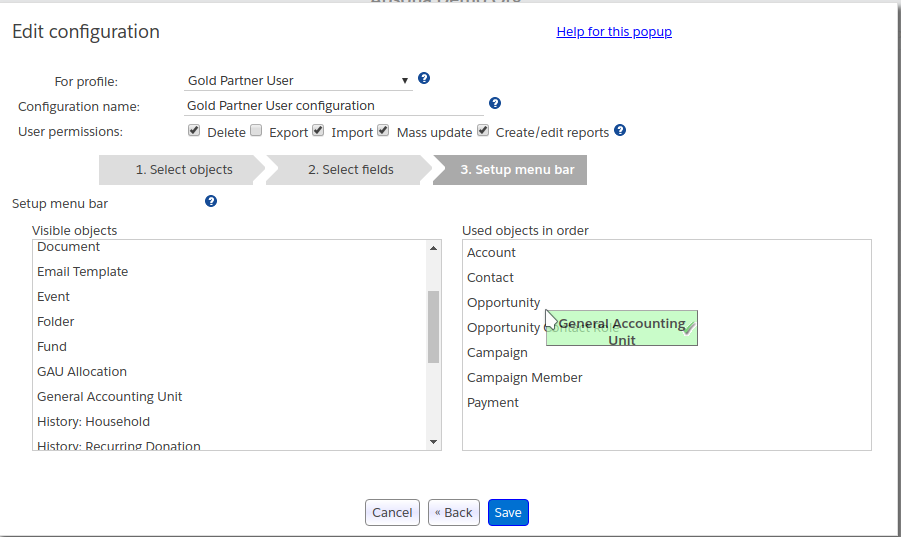
Some notes:- If you chose not to make a particular object visible, you will not see it in the left pane.
- When you are cloning an existing profile, you may see objects on the right (menu bar) pane that are shown in red, indicating that they are not visible and therefore should not be in the menu bar.
- The editor will check that the menu bar is valid, i.e., any object in the menu bar has been marked visible. It will not let you save an invalid configuration.
- Finally, click the Save button to enable the new configuration. It will take effect the next time a user with that profile uses Apsona for Salesforce. If you wish to have the changes take effect immediately, click the Settings – Clear cache menu item.
Notes #
- When creating a configuration for a non-administrator profile, please make sure to include access to the User object. Without this access, Apsona will not function correctly.