Overview #
Apsona for Salesforce includes a wide range of search facilities, available for all Salesforce objects, both native and custom. All searches can be “cross-object” in the sense that you can look for records of one type based on conditions enforced by records of a related type.
- Quick, one-object search on a small number of fields.
- Filtering search, in which you specify match values for fields in either the current object or in objects directly related objects.
- Metric-based search, in which you can use metric functions such as count, sum and average in restricting your search, e.g., finding accounts with at least 3 associated contacts, or finding accounts with total opportunity amount of at least $30,000.
- Exception search, where you seek records of one type based on the absence of records of a related type, e.g., opportunities that have no related tasks.
- Quantified search, where you look for records of one type such that all related records of a related type meet a certain condition, e.g., contact records for which all related tasks have a “completed” status. This search is called quantified because it uses the quantifiers “all” or “none” for related records.
- Nested search, carrying search results across chains of related objects, explained below.
You can also save your search conditions as named filters. Once you have saved a filter for a particular object (e.g., the Opportunity object), you can reuse it in all of the views for that object – the “All records” console view with list and detail, the Tabular view and the Calendar view. In addition, you can apply a filter you have saved for one object when searching for records in a related object. For example, suppose you have created a filter named Key opportunities, which retrieves the opportunities that amount to at least $25,000 and have more than 10 completed tasks in the last week. You can then apply this filter in the Account object and retrieve all account records that have one or more Key opportunities. We use the term nested search to refer to such searches which use filters on related objects.
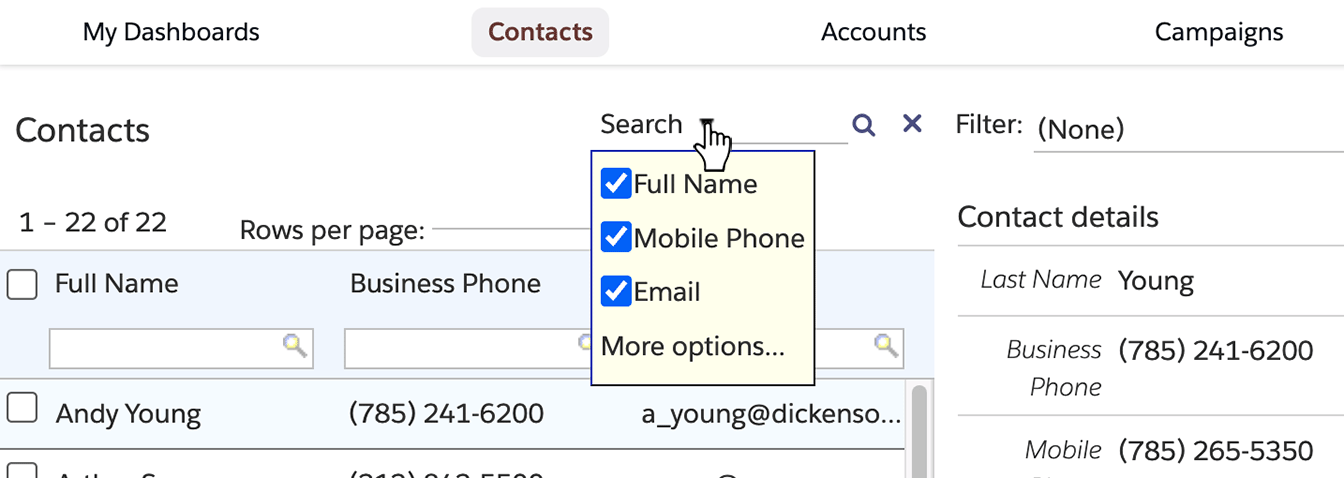
Quick search #
To use the Quick search feature, you simply type a string into the search box at the top of the object’s tab, and type the enter key or click the search icon.
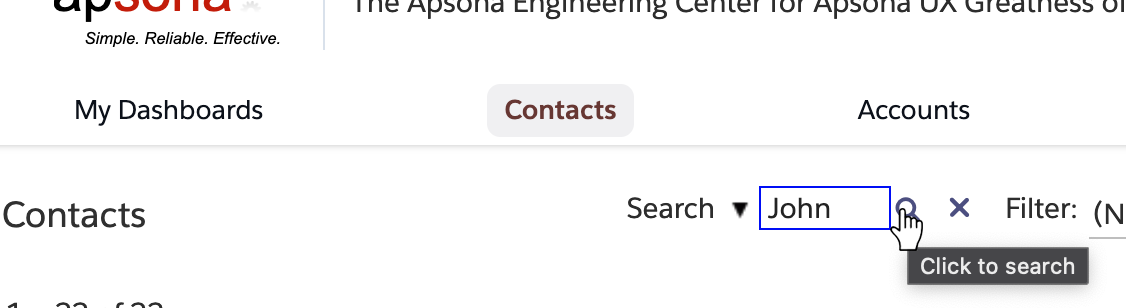
You can also choose the fields in which the search will look for a matching value Clicking the “Search” button displays a small popup window containing checkboxes for the fields to match.
Filtering search #
You can invoke the filtering search by clicking the “Search” button, and then the “More options…” link. This displays a search panel (below) that lets you specify one or more search terms. Each search term consists of a field name or metric function, an operator, and a value. For example, in the search term “Account.Industry equals ‘Pharmacy'”, the field name is Account.Industry, the operator is equals and the value is Pharmacy. To start the search, you simply choose one or more search terms and click the “Search” button.
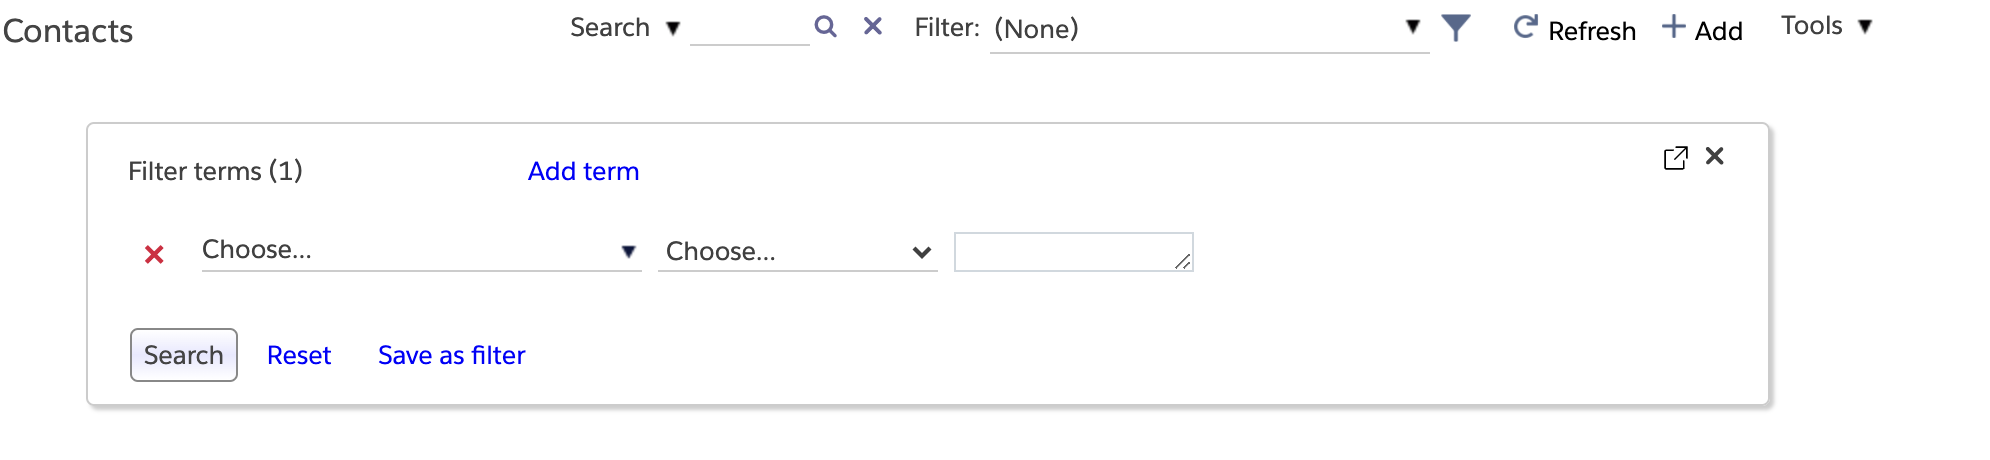
To specify a search term, you choose a field by clicking the field chooser – the leftmost dropdown in the search terms panel. You then choose an operator by clicking the middle dropdown. And finally, you specify a value for the field.

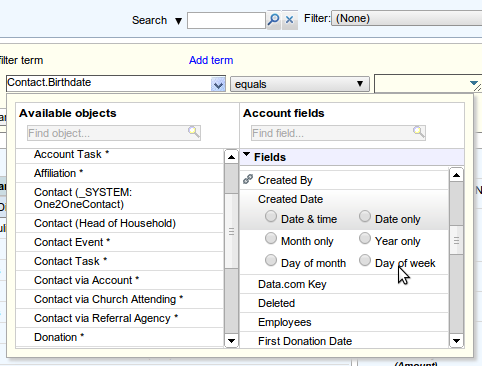
The field chooser (see screen shot above) contains a left-side panel with the list of available objects, and a right-side panel containing the list of fields from the object you select in the left-side panel. The list of objects includes the current object at the top, and below it, all the related objects. By “related object”, we mean any object that (a) either contains a field that refers to the current object via a master-detail or lookup relationship, or is referred to by some field in the current object, and (b) is marked as visible to the current user’s profile (see the access rules documentation for more about visibility). In the above example, the the Contact object refers to the Account object, and is referred to by several other objects. So we see all of these objects in the left panel of the field chooser.
Notice also that both the left and right panels include search boxes at the top, labeled “Find object…” and “Find field…” into which you can type a search string to narrow down the list of items shown in the panel.
When the current object refers to another object – e.g., the Contact object refers to the Account object – there is at most one Account record for a given Contact record. But if some other object refers to the current object, e.g., Campaign Member refers to Contact, there can be many Campaign Member records for a given Contact record. In such a case, the relationship from the current object is one-to-many, and the field chooser depicts this with an asterisk (*) next to the related object’s name.
Object names and field indicators #
As another example, consider the screen shot above, depicting the field chooser that appears when selecting a field for filtering the Account object. In this org, there are three lookup fields from Contact to Account: one is called Account (the built-in one in Salesforce), and the other two are called Church Attending and Referral Agency. So there are three corresponding options in the field chooser, labeled Contact via Account, Contact via Church Attending and Contact via Referral Agency. All three are annotated with an asterisk to indicate that they are one-to-many relationships. This way, you can elect to filter via any of those relationships. This org also contains two lookup fields from Account to Contact, named _SYSTEM:One2OneContact and Head of Household. Therefore, two choices labeled Contact (_SYSTEM:One2OneContact and Contact (Head of Household) also appear, but without asterisks, because those are one-to-one relationships, since the lookups are from Account to Contact.
Salesforce provides each object with a record ID field, which is a field that uniquely identifies each record of the object. The field chooser indicates this field with a key icon next to it, as in the case of the Contact ID field for the Contact object (above left). Also, the field chooser shows date and date/time fields in a special way. When you choose a date field, the field chooser lets you specify either all of it, or just the month, the year, day of month or day of week for matching. For this reason, when you click a date field in the field chooser, it shows radio buttons via which to choose the part of the date to match (above right).
Comparison operators #

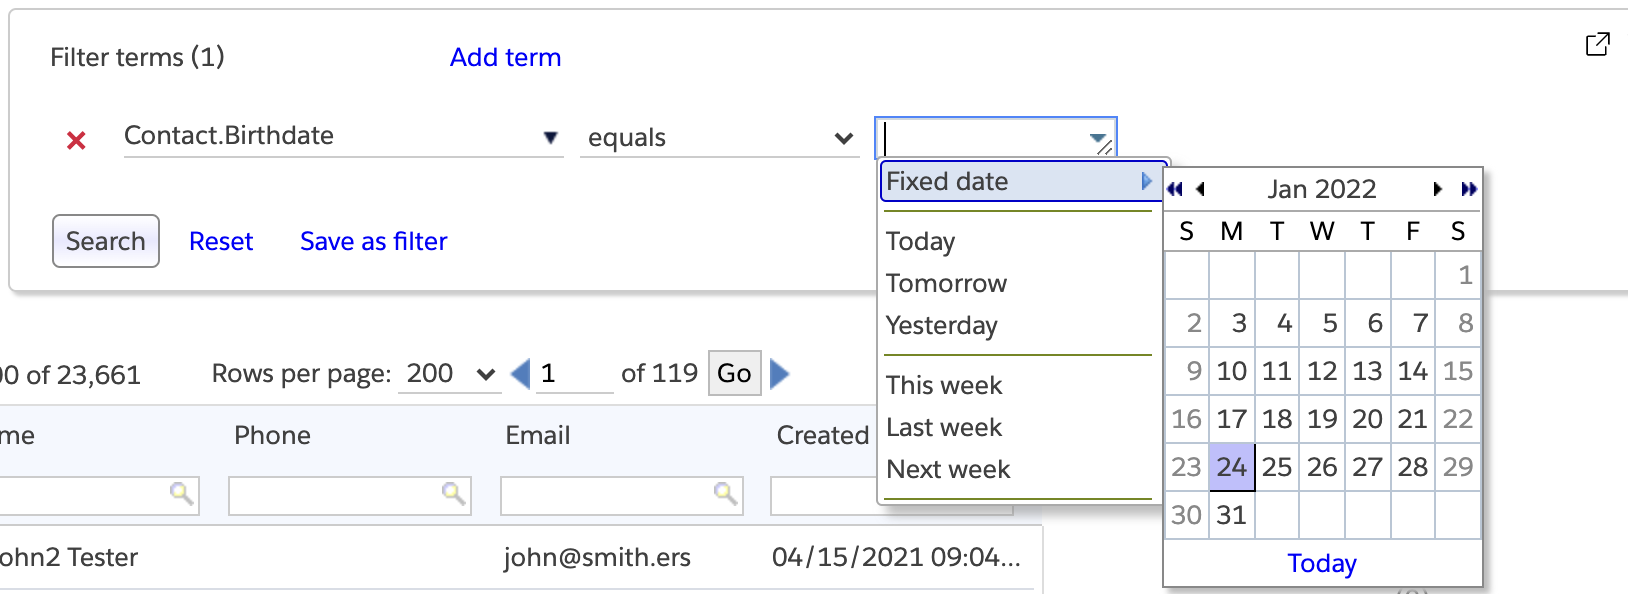
The filter terms panel understands the data types of the fields for matching. For example, if you choose a picklist field, as shown in the screen shot above, the operator dropdown shows just four choices, and the matching value is displayed as a dropdown that contains the range of picklist values for that specific picklist. But if you choose a string field, the operator dropdown shows a number of comparison operators such as “starts with”, “ends with” and “equals”, and a text box appears for the matching value. Similarly, if you choose a date field, the value box comes with an attached popup menu that you can use to specify commonly-used date values such as “today” or “yesterday” or choose a specific date via a date picker widget, as below.
Ordering-related operators #
There are the usual six ordering-related operators: equals, not equal to, less than, at least, at most, and greater than. These operators compare strings in dictionary order. For example, if you ask for Account Name less than Q, you will obtain all records whose Account Name field has a value starting with any of the characters or alphabets up to but not including the letter Q. This includes all names beginning with A through P as well as all names that begin with numerals.
Searching in string fields #
String data deserves special treatment because strings are the most commonly-used data type. Apsona supports several string operators, as illustrated in the screen shot below.
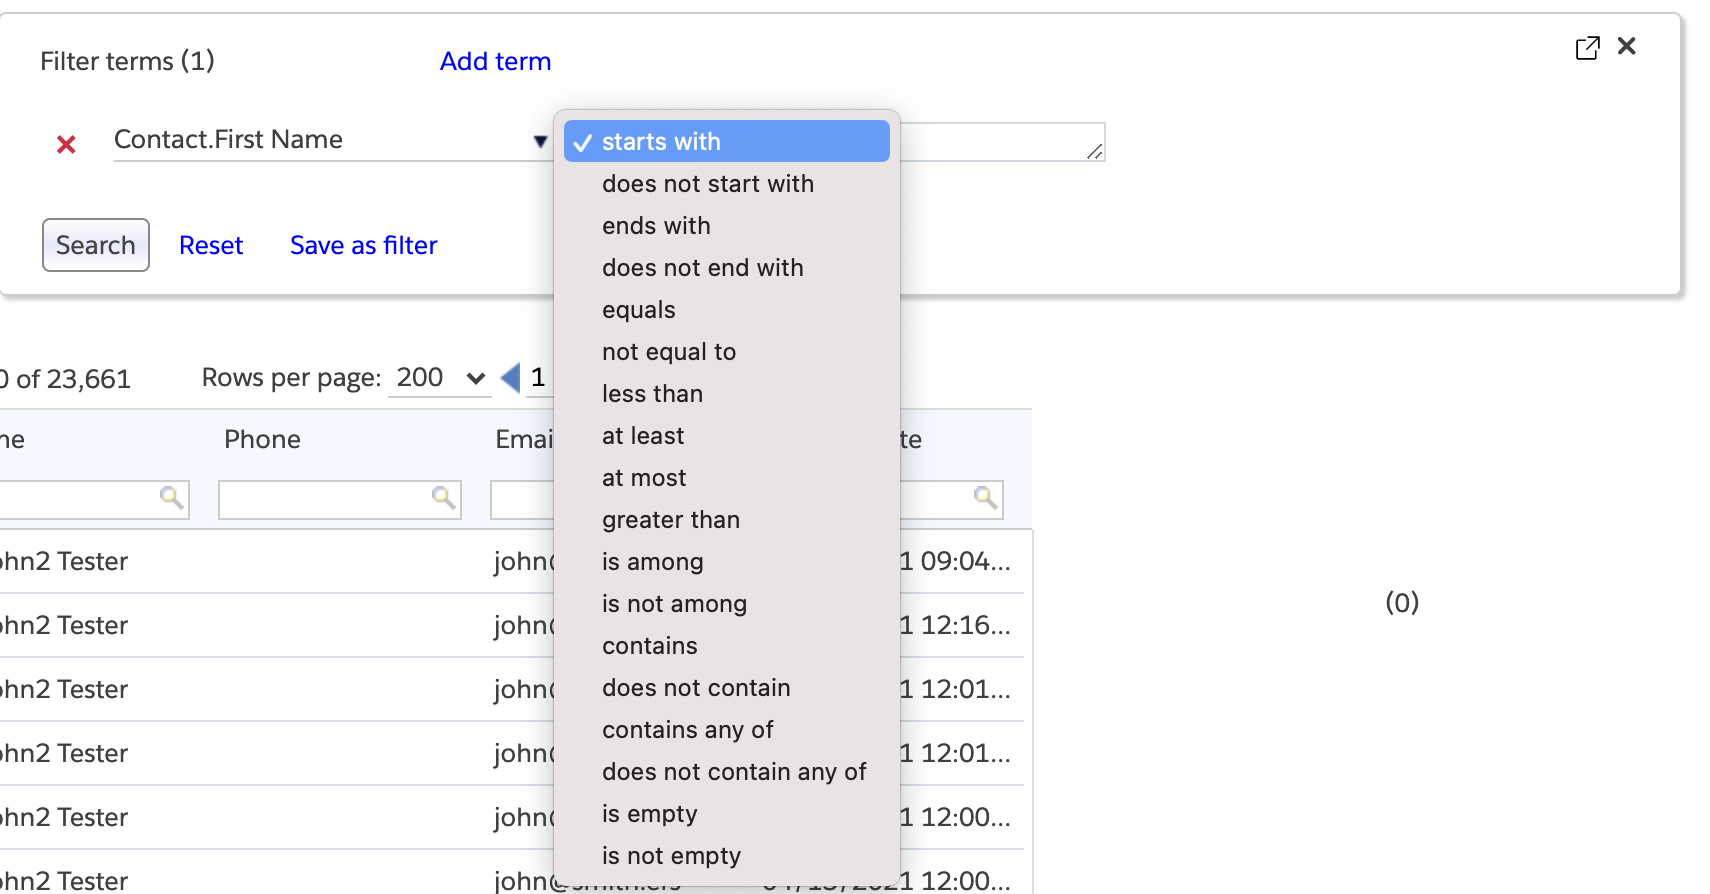
Some of these operators need special mention. The simplest are the is empty and is not empty operators, which check for the availability of a value in the string field. The remaining operators provide other kinds of functionality.
Wild-card search #
When matching against text fields using any of the “starts with”, “ends with” or “contains” operators, you can use the wild-card characters “_” (underscore) to match one single character, or “%” (percent sign) to match any number of (zero or more) characters. These wild-card characters are supported natively by SOQL. For example, suppose you wanted to find a contact whose name you vaguely remember to be either Bob Clements or Robert Clements. You could use a filter term Full Name starts with _ob%Clements, meaning that the matching name should have the letters ob as the second and third letters, followed by any characters and then the string Clements.
Matching multiple pieces of text #
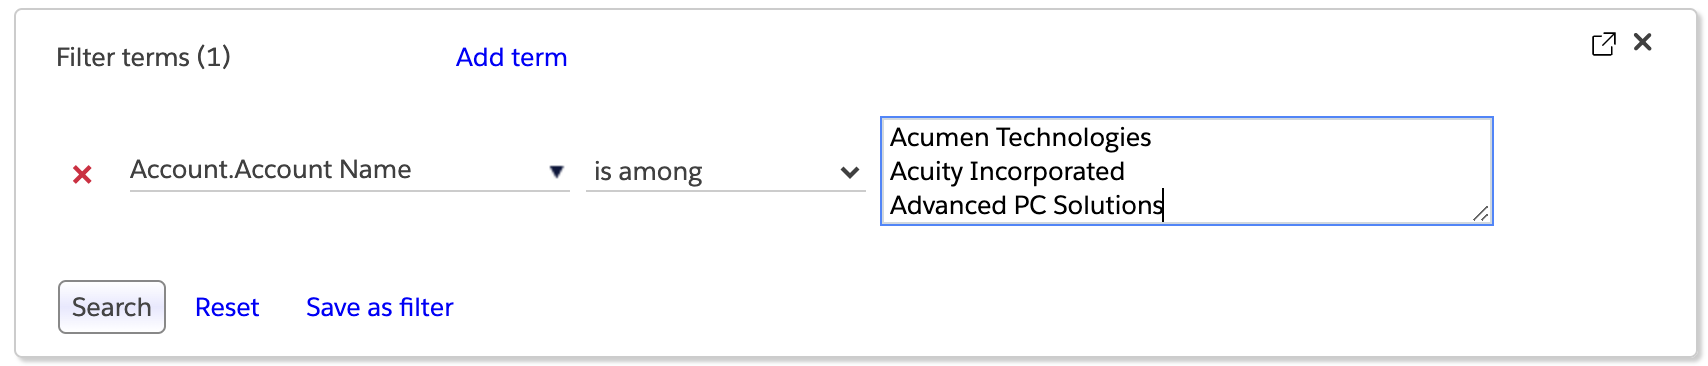
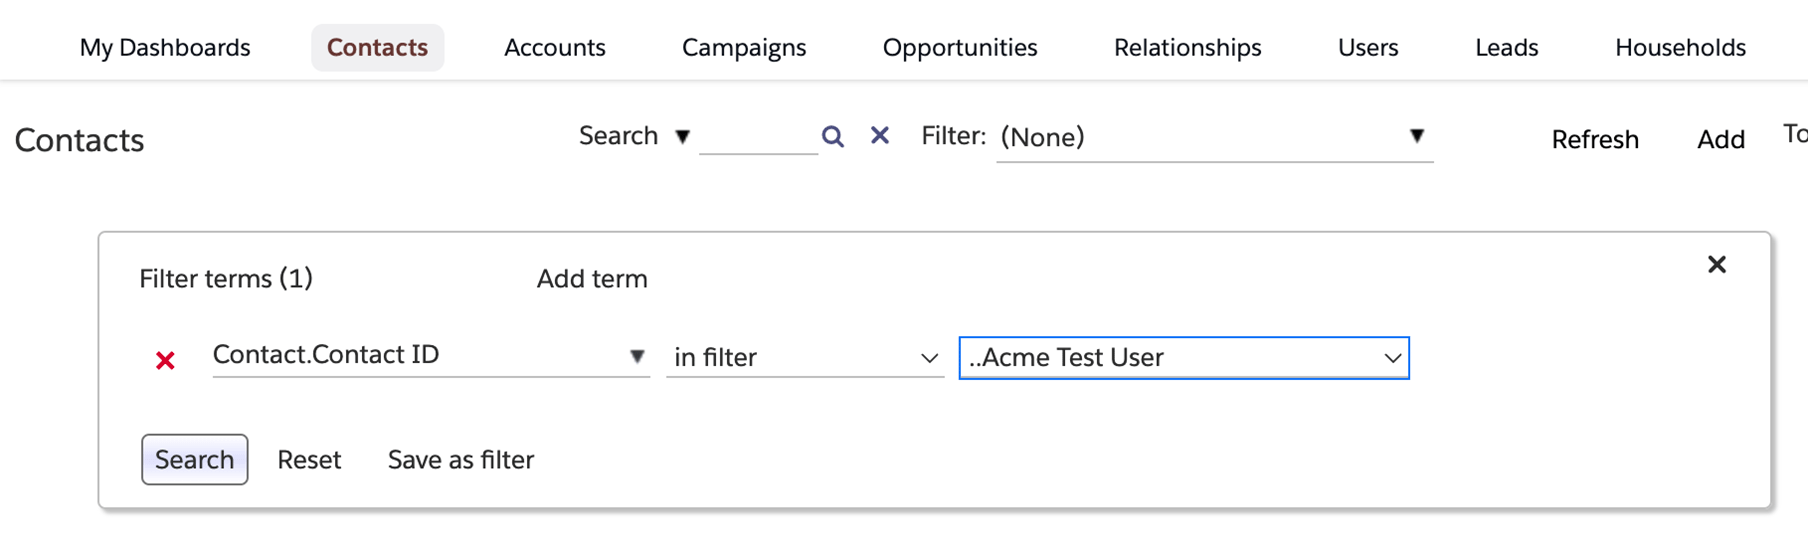
The is among and is not among operators are useful when you want to find records where the field’s value exactly matches or does not match a specific set of strings. These two operators treat the value you provide as a list of strings separated by either commas or line breaks. For example, if you specify a filter term

you are asking for all the records in which the field Account.Billing State fully matches either NV or CA or OR. So if a record contains a value NV,C in that field, it will not match this filter condition.
Similarly, you can use the filter term

to find Contact records whose record ID is one of the three IDs given in the term.
The filtering logic also allows for strings to be separated by line breaks instead of commas. For example, below is a filter term that asks for accounts whose names are one of the given ones:
This way of specifying match values can be particularly useful when you have a list of names in a CSV file, and you wish to find all the records in your Salesforce system that match those names. For example, given a list of email addresses in a CSV file, you can use it to find all the contacts with those email addresses. Simply select the entire column of values (leaving off the header row if there is one), copy it and paste it into the search box to run the search. You can then export the resulting records or update them all, as needed, via the Tools menu.
The contains any of and does not contain any of operators similarly treat the value you provide as a list of strings separated by commas or line breaks. But they look for partial matches rather than full matches. For example, if you specify a filter term
Account.Name contains any of Plumber,Plumbing,Water treatment
you will obtain records in which the Account.Name field contains any one of the three strings Plumber, Plumbing, or Water treatment, regardless of where they occur in the value. For example, field values Joe's Plumbing Hardware and Eagle water treatment chemicals will both match the filter condition. Notice how this partial matching contrasts with the way is among and is not among behave.
Multi-term searches #
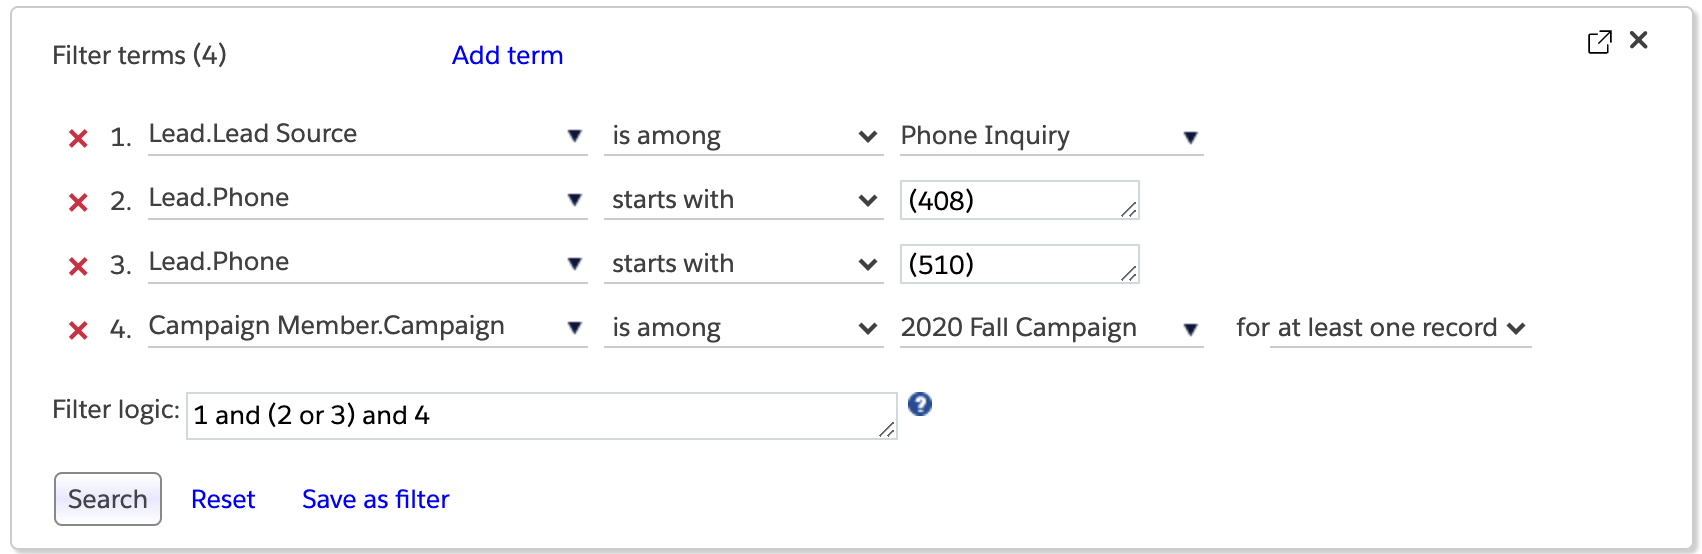
You can narrow your search by adding terms to the condition. Click the “Add term” link to add new terms to the filter. Terms can be composed using the ‘and’ and ‘or’ filter logic connectives. For example, the screen shot below illustrates a search for leads with lead source “Phone inquiry”, resulting from the “2020 Fall Campaign” campaign, with phone numbers from one of two specific area codes. Notice that you can use as many terms as you want, and that terms can be created with fields from any related objects, not just the current object. Notice also that the filter logic box refers to terms by number. The filter logic composition is very similar to the feature supported natively by Salesforce.
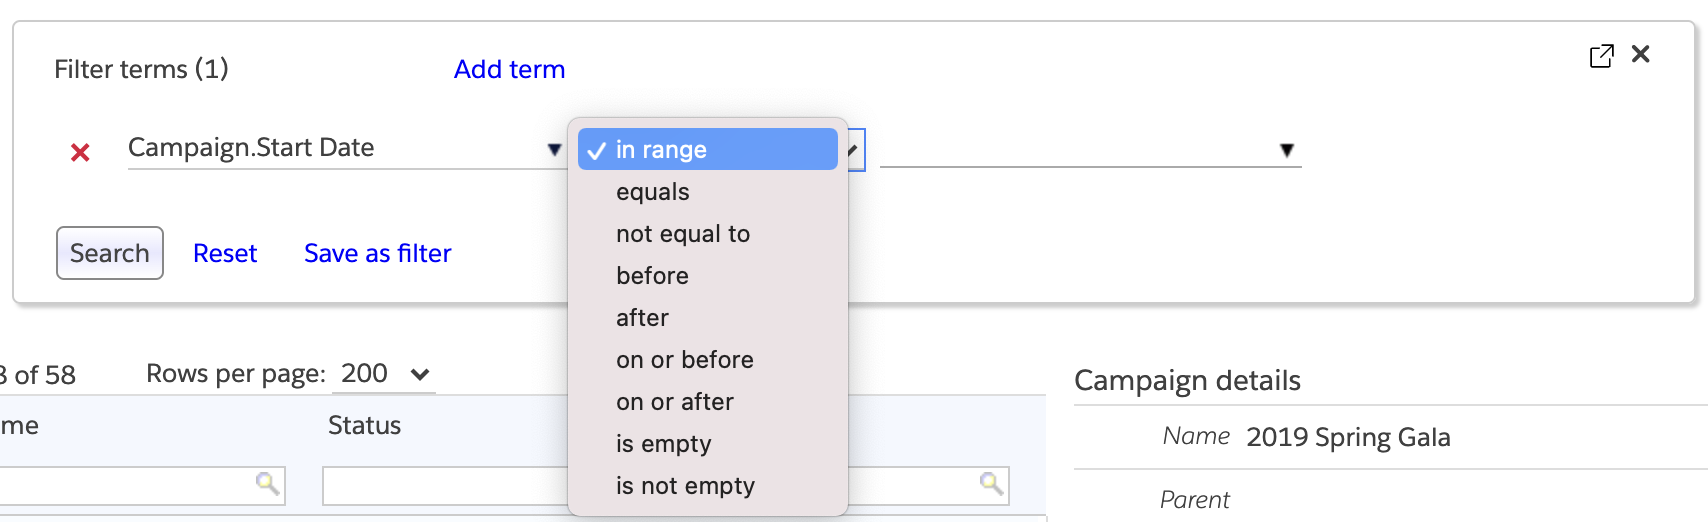
Searching date fields #
You can match values against date and date/time fields in several ways. The list of comparison operators includes the usual equals, less than and the like, as well as an in range operator, as in the screen shot below.
If you select any of the operators other than the in range operator, you will see a popup menu with which you can select either a fixed date using a date picker (e.g., specifying that the Opportunity Close Date is on or after 8/15/2015), or a relative date, such as yesterday, last week and the like.
Relative dates are also referred to as floating or rolling dates. The popup menu shows a range of relative dates. The key benefit of using a relative date is that you don’t need to rebuild a filter each time it is run. For example, if you save a filter which looks for the Opportunity Close Date matching last month, then it uses the current date as the reference for “last month” regardless of when it is invoked. Thus, if you invoke the filter in July 2015, it will match close dates in June 2015, but if you invoke it in January 2016, it will match close dates in December 2015.
Matching a range of dates #
The in range comparison operator adds some more flexibility. In effect, it lets you specify the two end points of a date range, and finds records whose date field value falls within the range you specify. The date range popup includes five tabs, letting you specify a range by days, months, quarters, years and relative dates.
The screen shot below shows how to specify a fixed range of days via the “Days” tab.
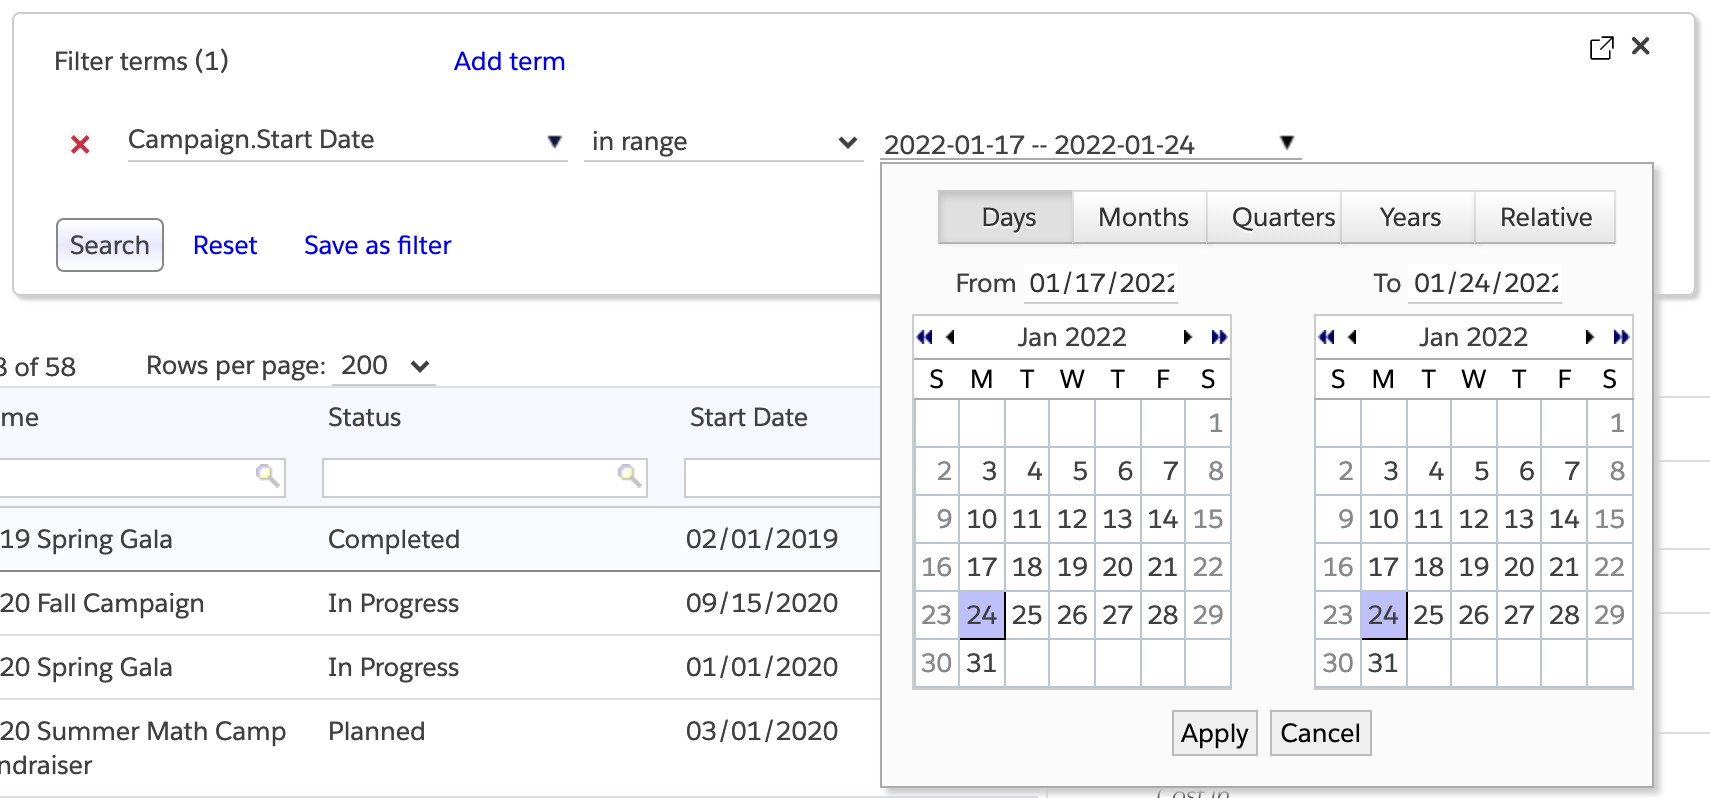
In this tab, you can use the two side-by-side date pickers to select the start and end dates of the range you wish to use. Then click the “Apply” button to copy the date range into the search term, and finally click the Search button in the filter editor to execute the search.
To select a range of months, you use the “Months” tab that presents a grid of months.
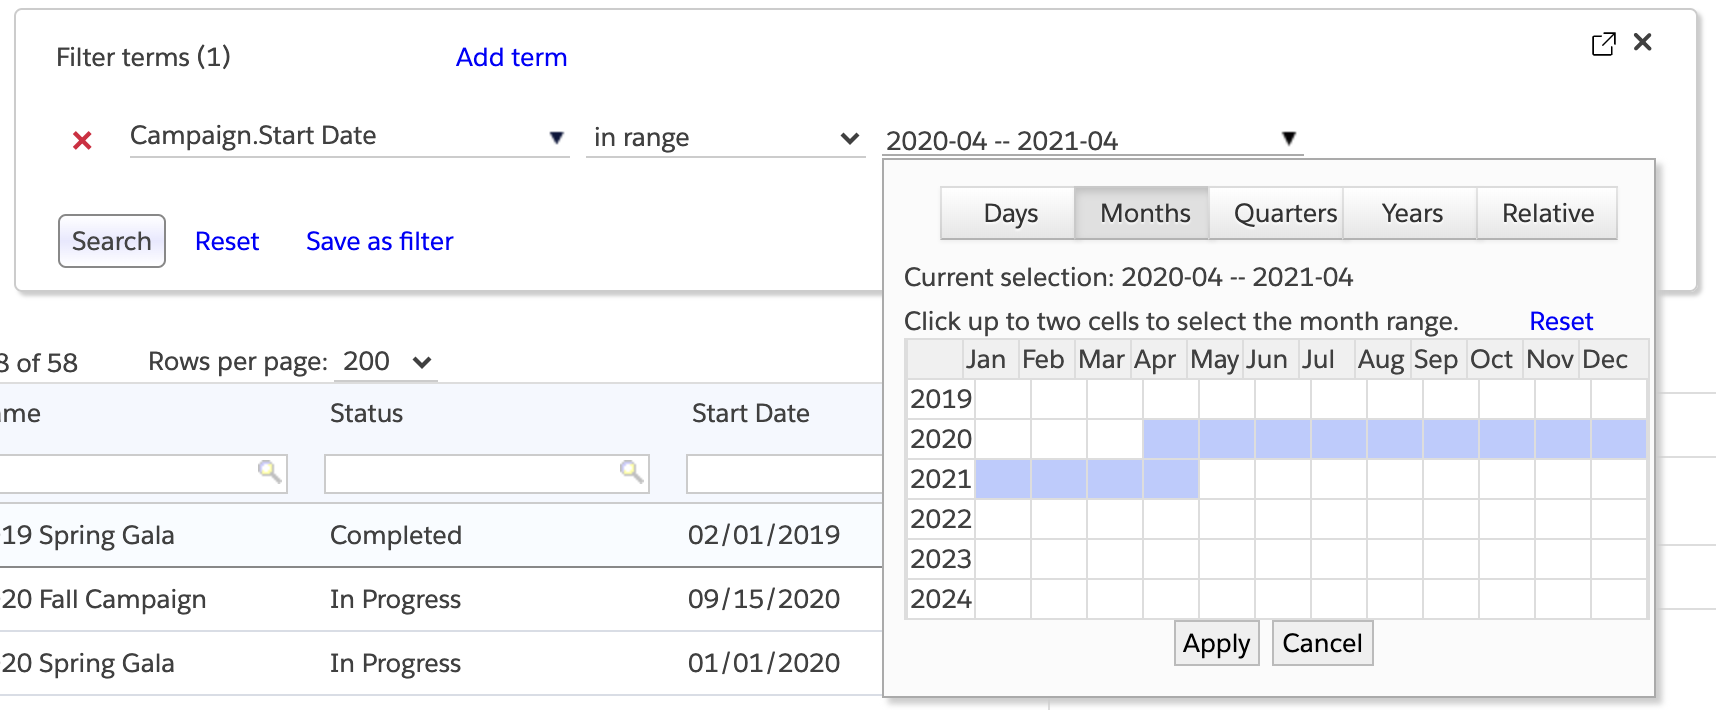
To select a range, you click the cells in the grid corresponding to the starting and ending months in the desired range, and the desired range will be highlighted. If you change your mind about your selection, click the “Reset” button to make the selection disappear. Clicking the “Apply” button will copy the selected range into the filter term.
The “Quarters” and “Years” tabs provide similar grid-like visuals for selecting the range.
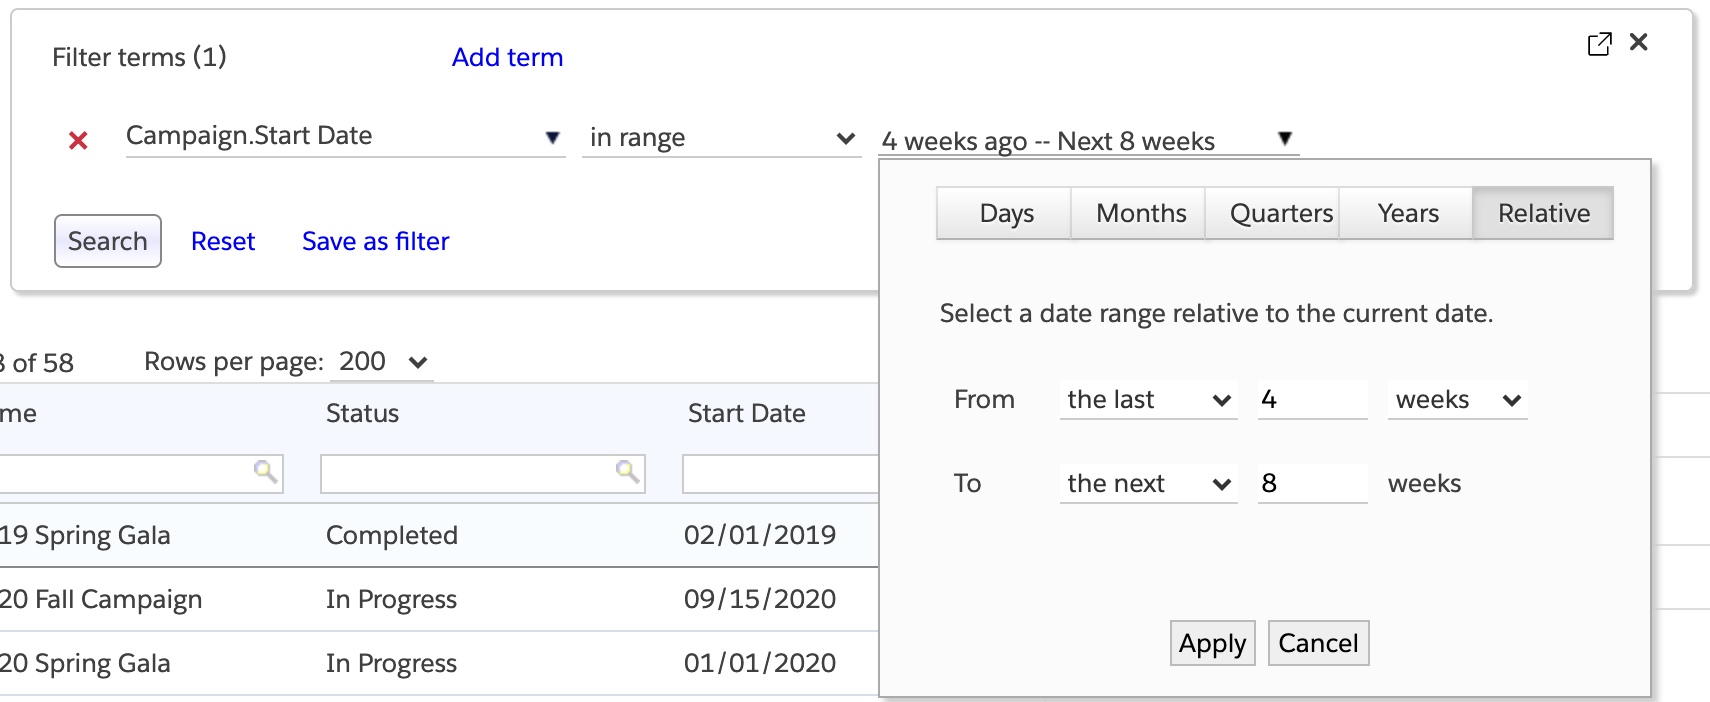
You can also select a range of relative dates using the “Relative” tab of the popup. In the example below, we have selected the range of dates beginning four weeks ago and ending eight weeks from now.
Searching date-time fields #
When trying to find records that match on date-time fields such as Created Date or Last Modified Date, there are some constraints to bear in mind. Salesforce stores the value of a date-time field in UTC (Coordinated Universal Time), and this can cause some issues with query results. For example, suppose you are in the Pacific Time Zone (8 hours behind UTC during Standard Time, and 7 hours behind UTC during Daylight Saving Time). If you create a record at time 2019-01-22 16:00:00 (4 pm Pacific Time), the record stores the UTC value 2019-01-23 00:1:00 (1 am UTC), because UTC is 8 hours ahead of Pacific Standard Time. If you then try to query for records whose Created Date is 1/22/2019, your result set will not include the above record. The only way to reliably obtain records based on date-time fields is to provide exact time ranges bracketing the value of the date-time field.
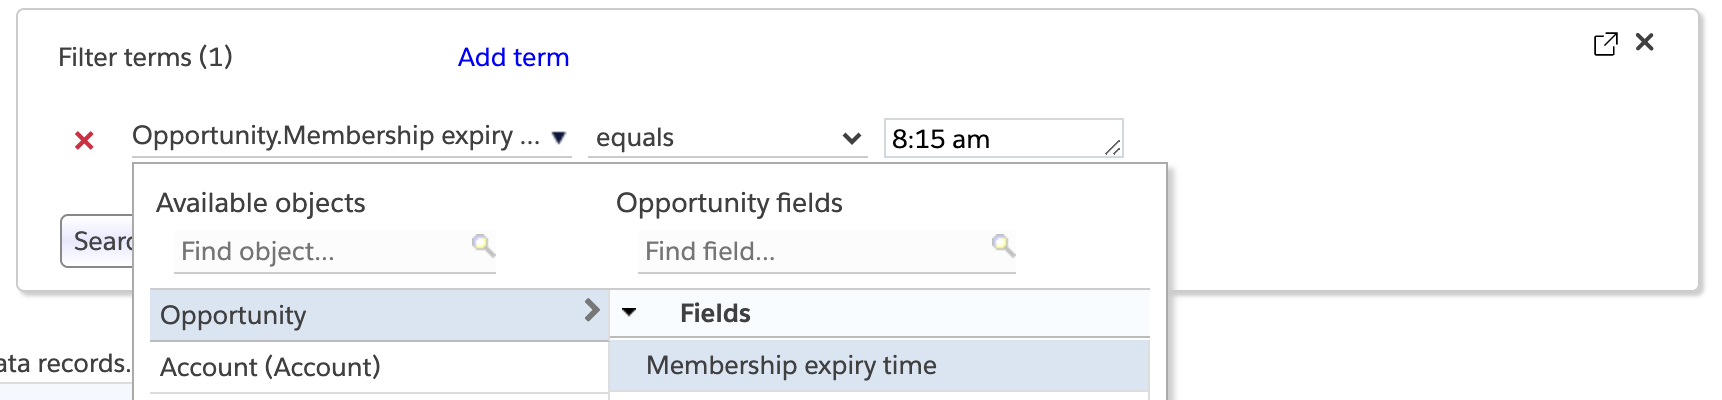
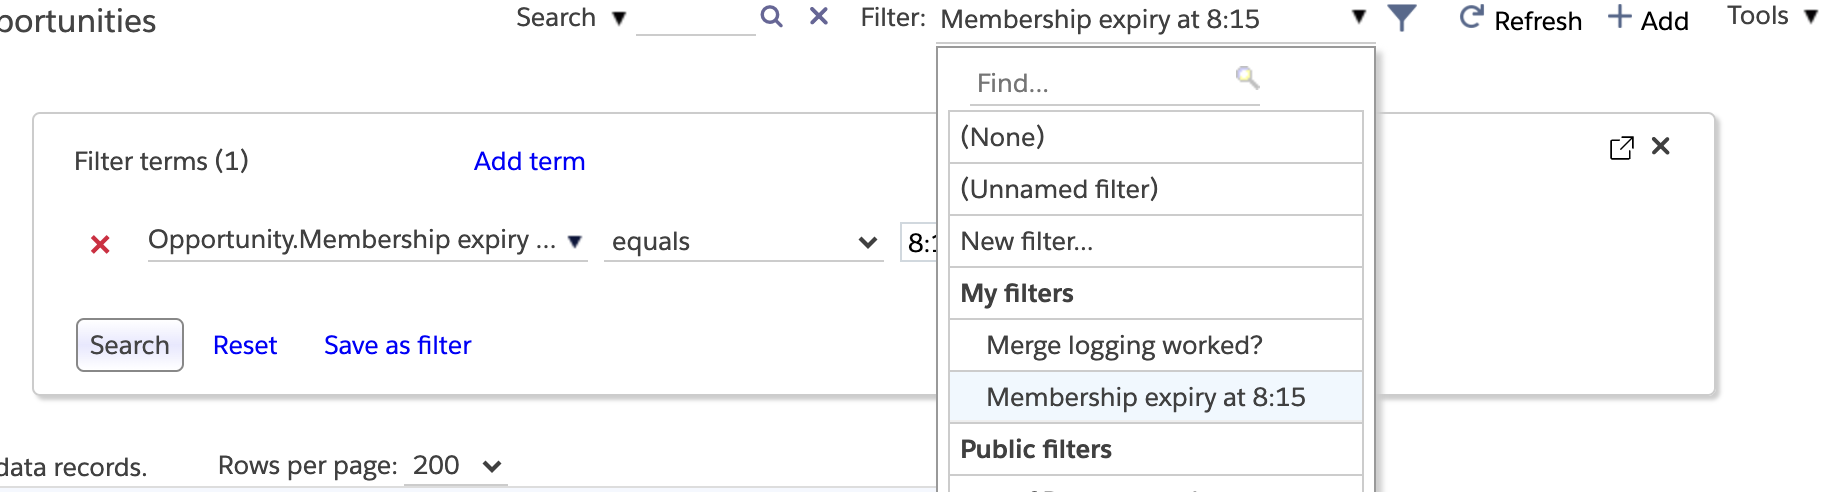
Searching time fields #
When looking for records based on time fields (i.e., time of day), you can provide a match value in either 12-hour or 24-hour formats, e.g., 8:15 am or 13:25:15. Below is a screen shot illustrating this.
Quantified search #
Suppose you have a main object A that has a one-to-many relationship to a secondary object B, such as the Account object has to the Opportunity object. Suppose further that you want to find records in object A based on a condition on object B. Less abstractly, suppose we want account records for which the opportunity stage is “Closed Won”. Normally, this would mean that we want all account records that have at least one corresponding opportunity whose stage is “Closed Won”.
But Apsona lets us go further, and use a quantifier on the secondary (Opportunity) field. So we can (for example) ask for Account records all of whose opportunity records have stage “Closed Won.” Consider the screen shot below.
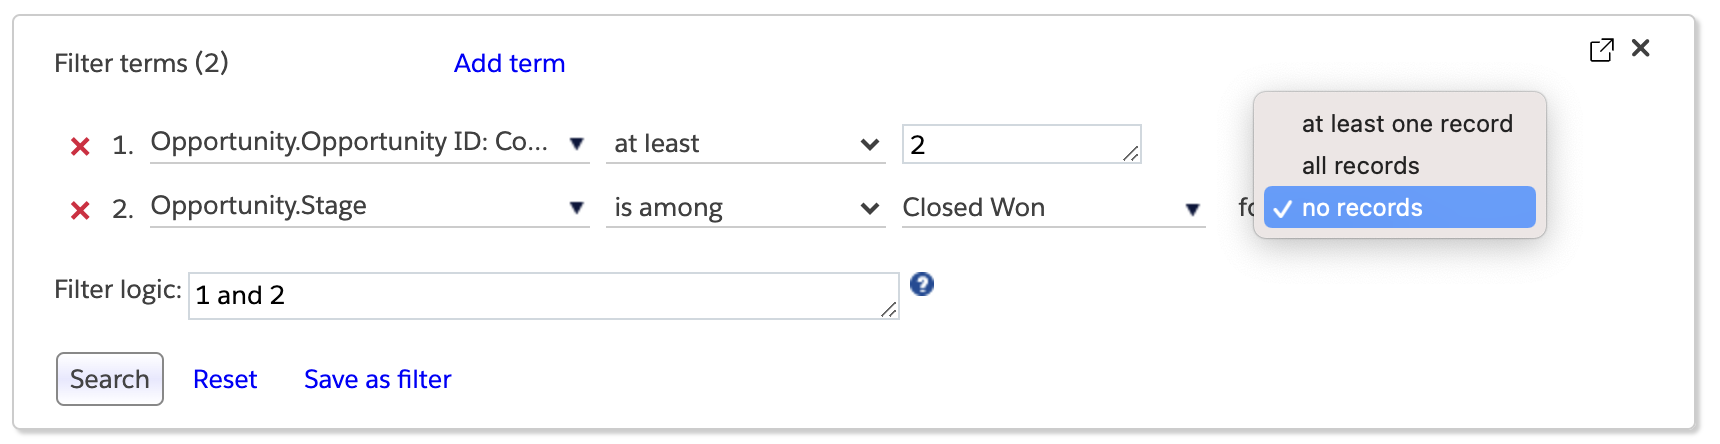
The first term in the filter requires that only Accounts with two or more Opportunity records must be shown, since we are asking for Opportunity record count. The second term adds the quantifier constraint.
- If we select “at least one record”, we’re saying that an Account record should be retrieved only if it has at least one corresponding Opportunity whose Stage is Closed Won. In other words, any Account record that doesn’t have any Closed Won Opportunities would not qualify.
- If we select “all records”, we’re saying that an Account record should be retrieved only if it has all of its corresponding Opportunities have a Stage of Closed Won. So with this choice, any account that has even one Opportunity with a Stage that isn’t Closed Won wouldn’t qualify to be shown.
- If we select “no records”, we’re saying the opposite: that an Account record should be retrieved only if it has none of its corresponding Opportunities have a Stage of Closed Won. So with this choice, any account that has even one Opportunity with a Stage that is Closed Won wouldn’t qualify to be shown.
Multiple quantified terms #
There is some intricacy to how Apsona handles multiple quantified terms. Suppose you want to find “high-value” Accounts – all Account records that have at least one Closed Opportunity worth $100 or more. You would then create an Account filter like this one:

With that filter, you are asking for all Accounts that have at least one Opportunity meeting both the criteria – Closed is true and Amount is at least $100.
Contrast this with another possible interpretation: get all Account records that have at least one Closed Opportunity and at least one that exceeds $100, even if those two Opportunities aren’t the same. That’s certainly not the intuitive way to interpret the above filter; in other words, our intuition says that the two Opportunity terms must both apply to every qualifying opportunity, even though the two terms are separate and indicate an “at least one” quantifier. And that is indeed how Apsona works: When it finds more than one filter term on the same child object (in this case, Opportunity) with the “at least one” quantifier, it combines all of those terms into one query and applies the combined query to the child object. Apsona therefore produces the expected result – in this case, Accounts with at least one Closed Opportunity worth $100 or more. Note that Apsona will only combine terms all of which use the “at least one” quantifier, i.e., any terms that use a different quantifier (such as “all records” or “no records”) will cause a separate query (or queries) on the child object.
Unfortunately, this interpretation causes problems in some cases. For example, suppose you want to identify all the Contacts who have been in two specific Campaigns. You might try a filter like the one below.
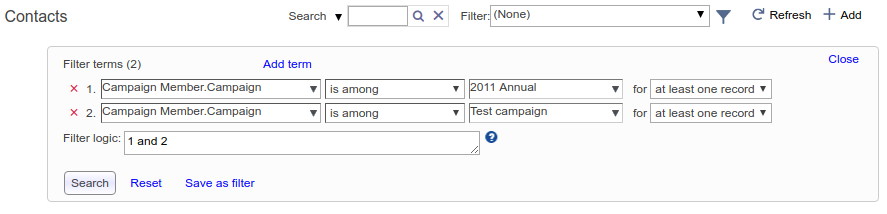
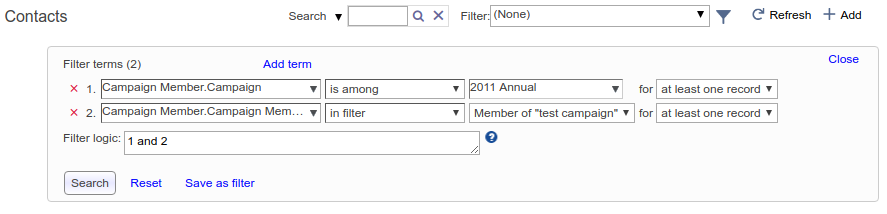
But this filter always produces zero results. That’s because, as indicated above it applies both the terms at the Campaign Member level, which means it first tries to find all Campaign Member records whose Campaign equals both the given campaigns. And obviously you cannot have the same Campaign field be equal to two different Campaigns, i.e., there can be no such Campaign Member records. The remedy is to ensure that one of the terms does not use an “at least one” quantifier, via the use of the “in filter” operator, i.e., a nested filter, as in the screen shot below. (See later in this article for more about nested filters.) Apsona treats the “in filter” operator as equivalent to a separate subquery, and will not combine it with other terms in the filter.
Exception search #
Given a “main” object A that has a one-to-many relationship to a “secondary” object B, an exception search lets you find records in object A that have no corresponding records in object B. For example, you could use this search to find account records that have no opportunities, or contact records that have no assigned tasks.
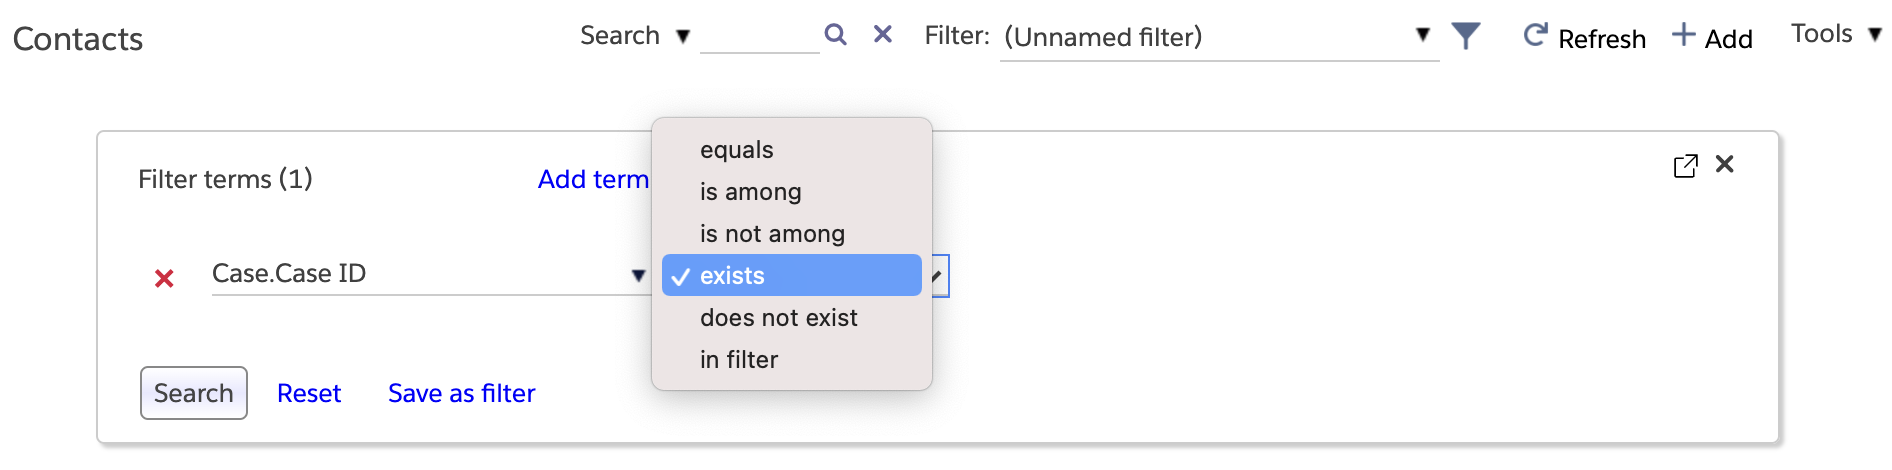
Apsona for Salesforce uses the existence (or otherwise) of the record id value of the secondary object to indicate this search. In the above screen shot, we wish to conduct an exception search that finds all contact records that have no related case record. To do this, we open the field terms panel and choose the Case ID field, which is the record ID for the Case object, and we choose “does not exist” as the operator. This search will then retrieve all contact records with no associated cases.
As with other searches, you can combine exception search terms with any other terms, e.g., for finding contacts that have associated cases but are not parts of any campaigns (via the Campaign Member object).
Using metric functions #
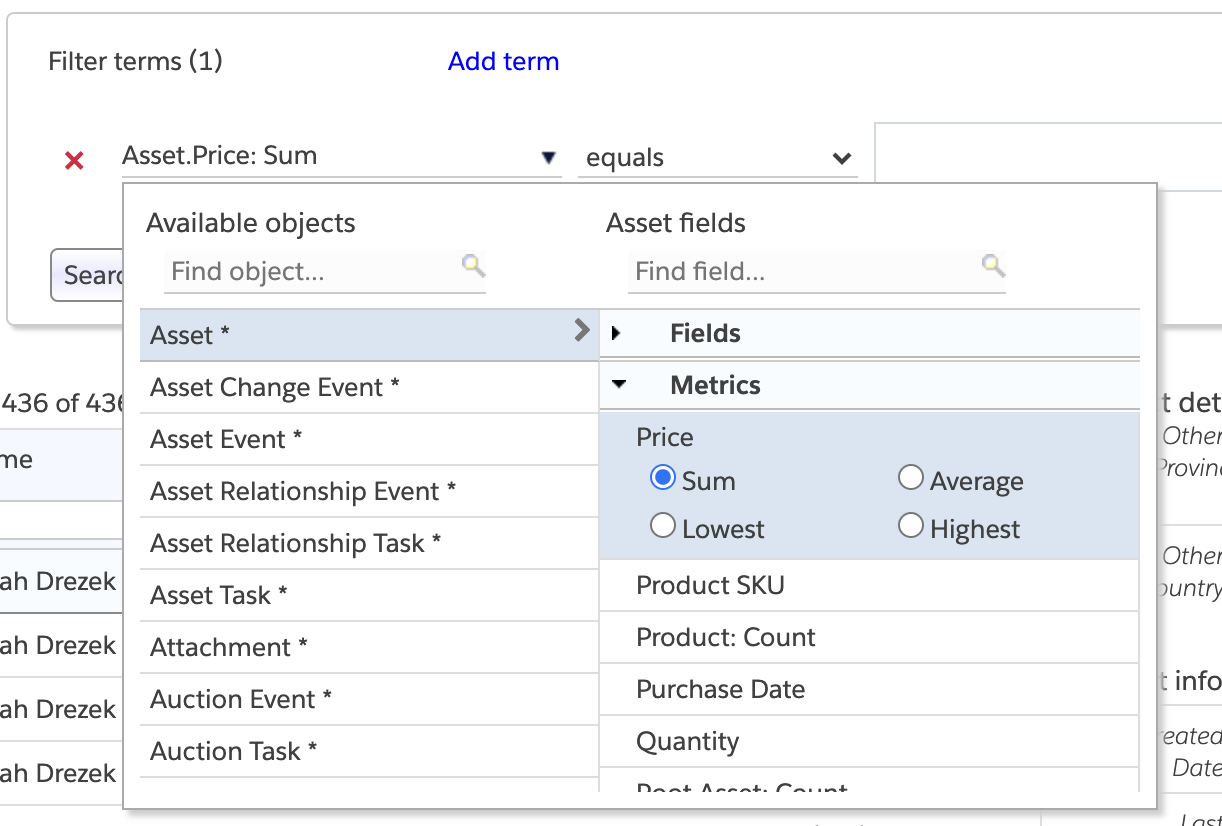
Metric functions enable you to look for records in an object A, based on metrics on a related object B, when there is a one-to-many relationship from A to B. For example, there is a one-to-many relationship from Account to Opportunity, since there can be many opportunities related to one account. So you can find all accounts that have at least 3 opportunities, or that have a total opportunity value of at least $30,000, or any other similar metric function applied to the Opportunity fields.
The set of metric functions available for a field depends on the field’s type. For example, date and date/time fields have “newest” and “oldest” available, while number and currency fields have “sum”, “average”, “lowest” and “highest” available. When you click a field in the metrics area, the list if available metric functions available for that field is shown with radio buttons, so that you can choose the one you want.
There is one special metric function labeled “# Records” that indicates the record count of the related records. You would use this metric for finding records in the main object based on the number of corresponding records in the related object, as in the above example.
You can use more than one filter term with a metric function, or combine them with non-metric filter terms. For example, you can find account records that have at least 4 opportunities with total value at least $25,000, and which also have at least 3 contact records and the most recent Task date no earlier than last week.
Filtering with metrics, aka dynamic rollups #
You can combine metric filter terms with the “at least one” quantifier described above to create what are essentially dynamic rollups. For example, Suppose you want a list of Account records which have at least five Opportunities in the Prospecting stage. You could set up an Account filter like this one:
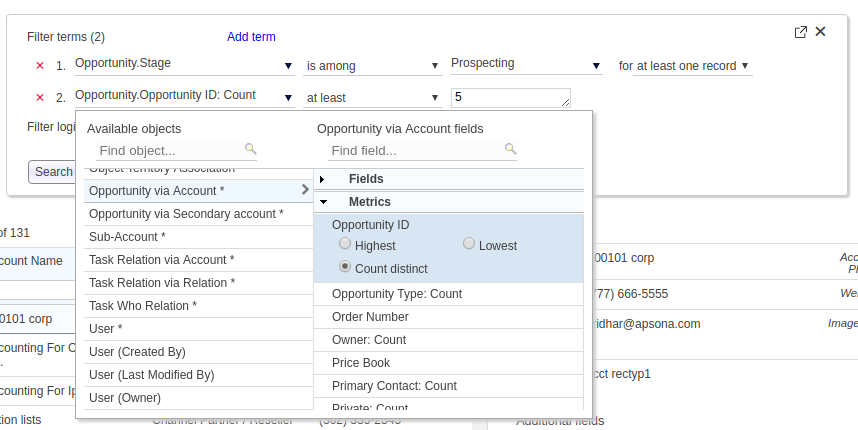
With this setup, Apsona combines the first filter term “Stage is among Prospecting for at least one record” with the metric term, so it limits the Opportunity records being counted to just those in the Prospecting stage. The result is to select only those Accounts with five or more such Opportunities. Also note that that the ordering of the filter terms in the screen is not important; Apsona takes care of issuing the queries in the correct order, regardless of what order you used in the screen.
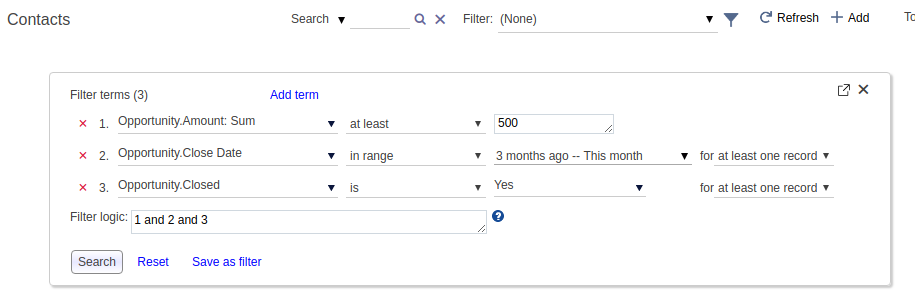
As another example, suppose you want to find all Contacts whose Opportunities (via the Primary Contact lookup) are worth $500 or more, where you only want to consider their Closed Opportunities within the last 3 months. Below is a filter on the Contact object that achieves this goal.
Some notes here:
- The screen shot above deliberately shows the metric term first, to illustrate the point that term order does not matter.
- The screen shot is shown on the Contact view, but you can create a similar filter in any Contact Single-step Report or any step of a Multi-step Report that uses the Contact object.
- The above examples show just one metric filter term, but you can combine multiple metric terms if you need.
- Only the filter terms with the “at least one record” quantifier will be combined with the metric filter terms; if you use any additional filter terms with the “all records” or “no records” quantifiers, they will not be combined with metric filter terms.
Aside: Comparison with rollup products #
This function is somewhat similar to that offered by the rollup-fields functionality offered by Salesforce add-ons such as Declarative Lookup Rollup Summary (DLRS) or Rollup Helper. However, those products typically require you to create additional fields within your Salesforce object, and populate those fields with specific rollup values whose filter criteria are hard-wired to the field. By contrast, Apsona’s metric filtering functionality is completely dynamic, and does not need any additional fields in Salesforce.
Saving your search #
After executing a search with a set of conditions, you can save the search as a filter for later use. To do this:
- Click the “Save as filter” link in the search panel.

- Type a name for the new filter, and click the “Save” button.

- The saved filter will appear in the list of filters.
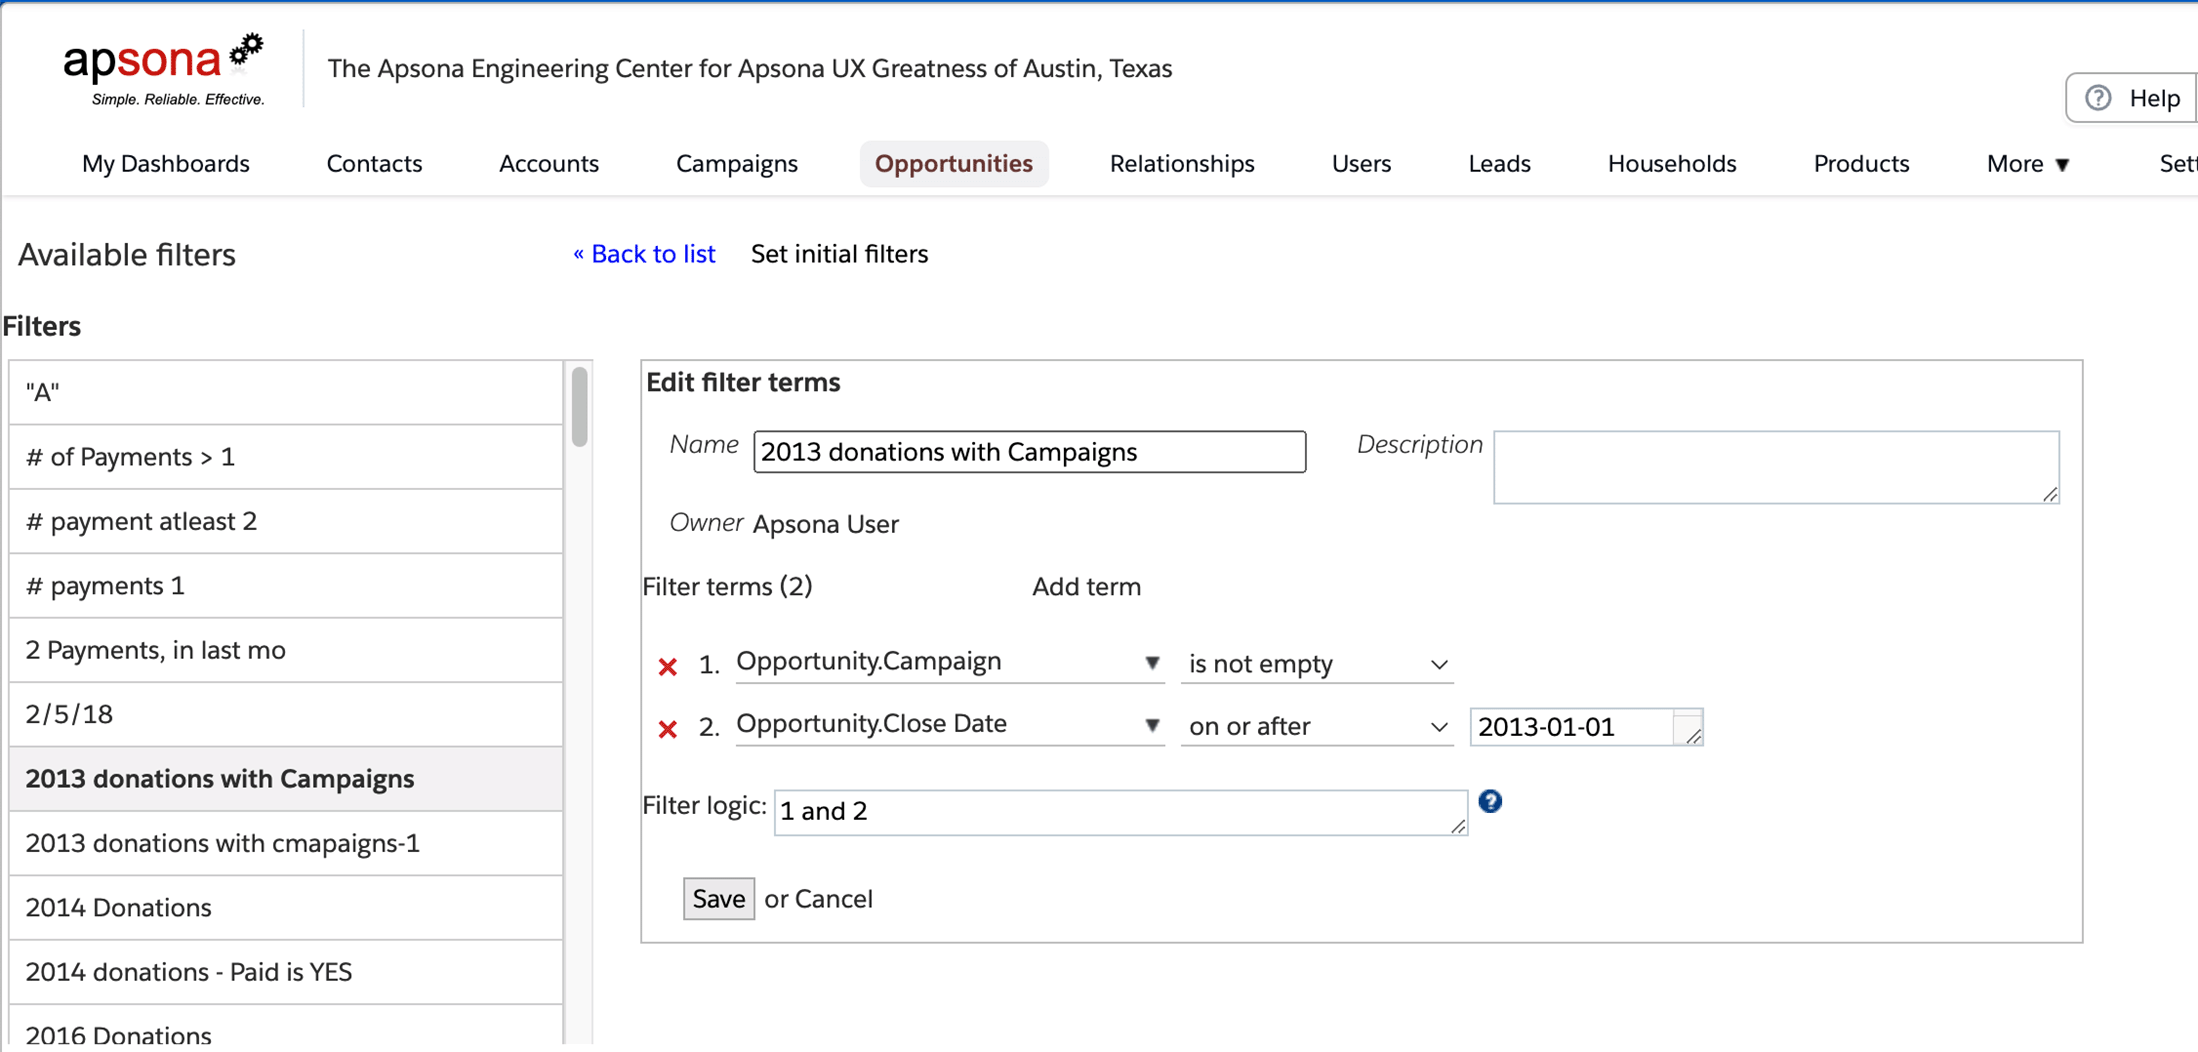
You can also edit an existing filter and change its name, description or filter conditions. To do this:
- Click the “Filters” menu item under “Tools”.
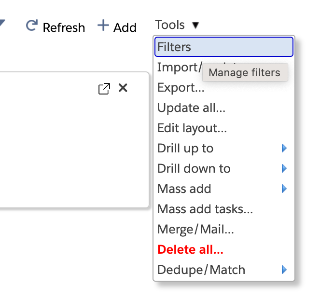
- The list of filters available for the current object is displayed on the left. If you click any of the filters in the list, an editor panel appears on the right, showing the filter’s details which can be edited.
Nested search #
The nested search feature lets you carry search conditions across chains of related objects. The way you use a nested search on a particular object A is to start by choosing the record ID field of a related object B. Doing so causes Apsona to show all the saved filters available for object B, from which you can choose one for use. The choice of filter means that you wish to find all records in object A which have at least one related record in object B that satisfies the selected filter condition.
As an example, suppose you have created an Opportunity filter named “Small opportunities”, representing opportunity records of value $5,000 or less. You can then use the nested filter feature to retrieve all account records that have small opportunities. Moreover, you can save this new search as a filter, say “accounts with small opportunities”, and you can then apply it to on the Contact object. This gives you contacts associated with accounts that have at least one small opportunity. Notice that we are now able to enforce a condition on the Contact object based on data from the (completely-unrelated) Opportunity object. You can repeat this process as many times as you want, thus carrying filter conditions across a chain of relationships. We use the term nested filter to refer to a filter that uses another filter within it, in this manner.
Note that when you save a nested filter, the containing filter makes a copy of the description of the contained filter. This means that even if you were to delete the original contained filter, the containing filter will not be affected and will continue to function correctly.
Here is a video demo showing an example of nested filters.
Limitations #
- You cannot filter by long text or rich text fields, because Salesforce’s SOQL API does not offer the ability to search on such fields. Therefore, long text and rich text fields will not appear among the filterable fields in the filter builder.