When viewing the records of a particular object, the sub-tabs section shows records from related objects. For example, when viewing a particular Account record, the sub-tabs section can show sub-tabs containing the Account’s Contact records, Opportunity records and Affiliation records, as shown in the screen shot below.
Each sub-tab can show either a detail panel or a list panel.
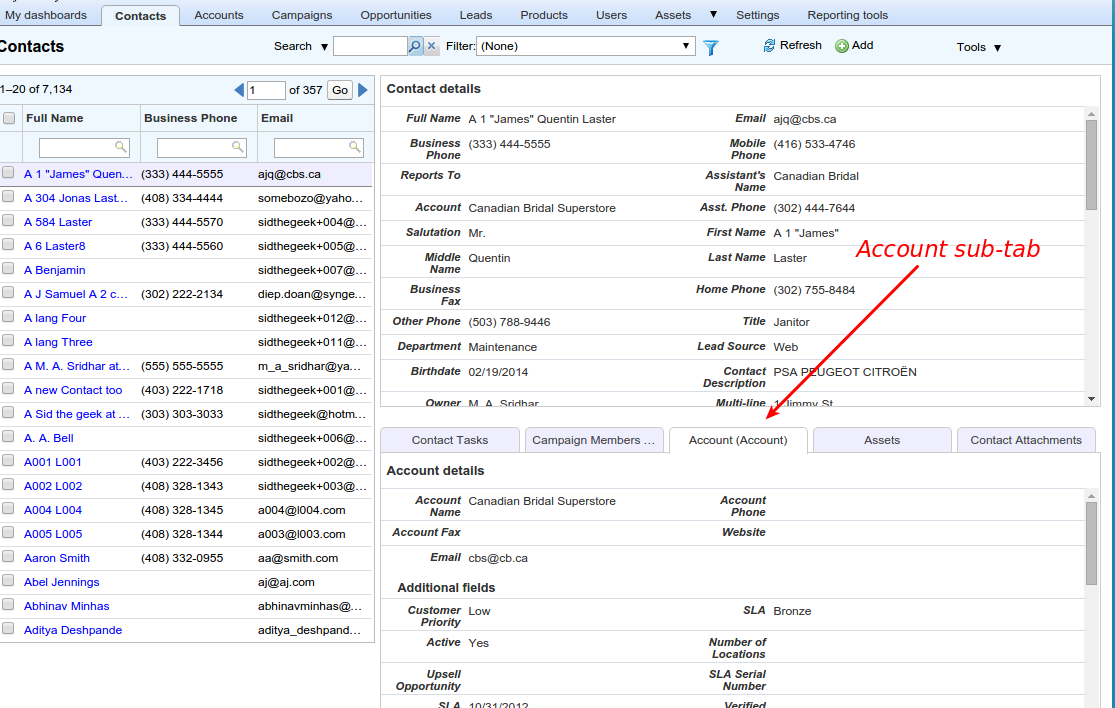
- A detail panel is shown when there can be at most one related record for the current record. For example, for a given Contact there can be only one Account. So when viewing the Contact record, the Account sub-tab shows a detail panel for the corresponding Account record. This happens when there is a lookup from the current object to the related object, such as the AccountId lookup in the Contact object.
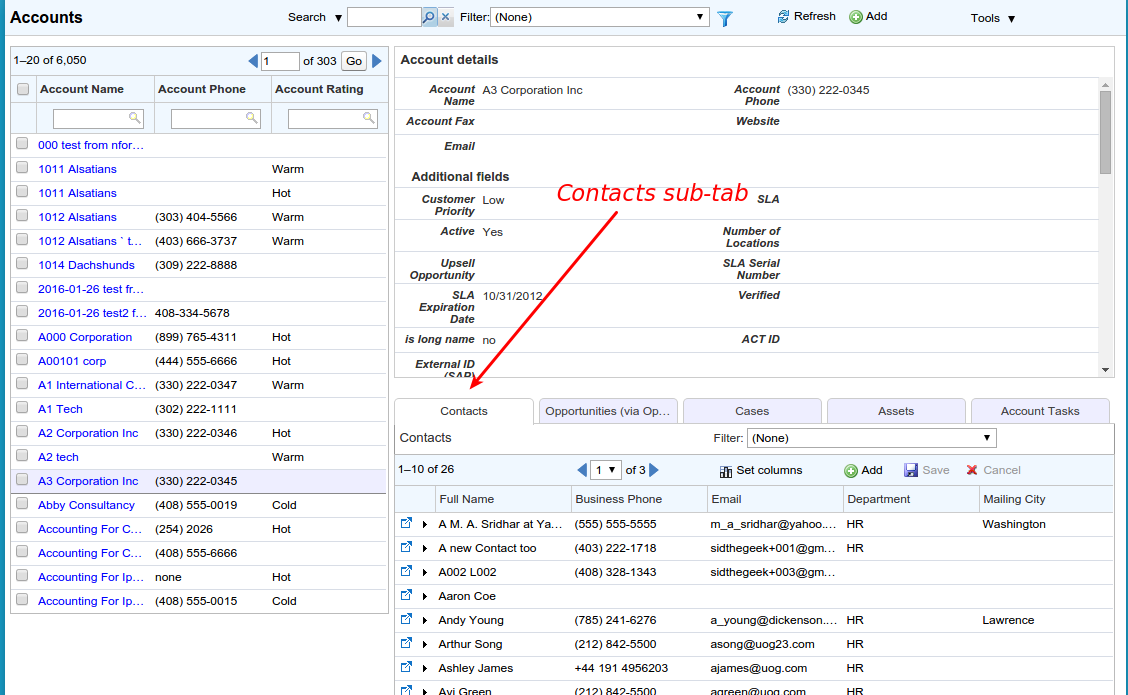
- A list panel is shown when there can be many related records for the current record. For example, for a particular Account record, there can be many Contact records. So when viewing the Account record, the Contacts sub-tab shows a list of corresponding Contact records for that Account.
Lists within lists #

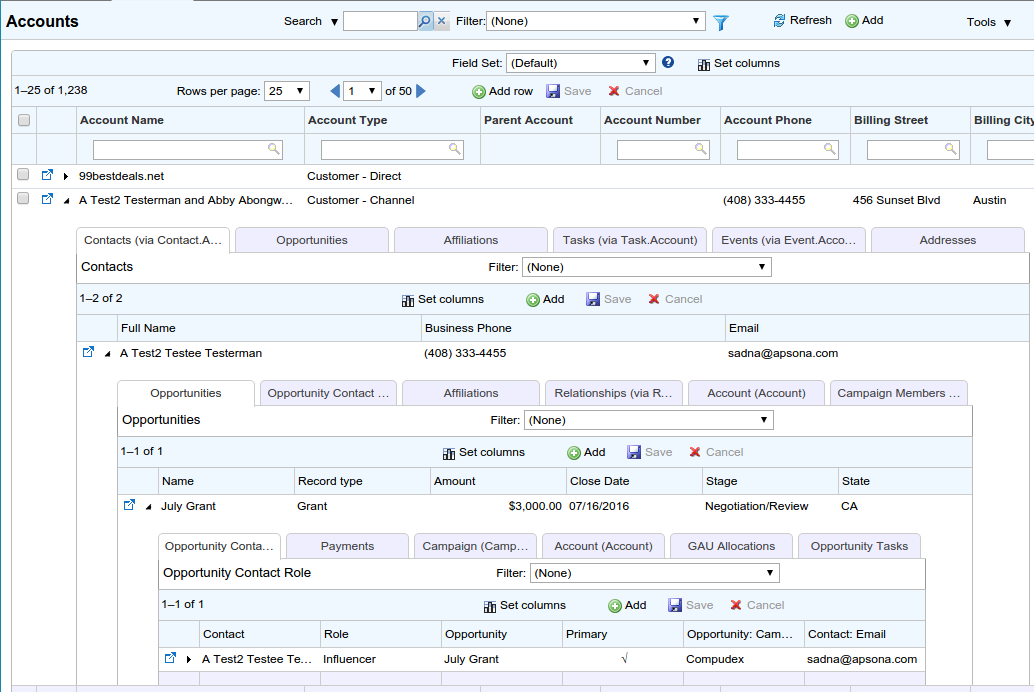
Each row shown in a list subtab includes a little right-arrow icon that opens another nested sub-tab section. For example, in the screen shot at right, the Contacts list sub-tab’s right-arrow icon opens another section containing records related to the Contact in question, showing the lists of Opportunities, Opportunity Contact Roles, Affiliations and Relationships of that Contact.
Sub-tabs can be nested within each other to any depth. This enables you to drill deep down into your data. For instance, you can start at a particular Account record, open its related Contacts, examine the Opportunities of a particular Contact, and then drill into the product line items for that Opportunity.
All the usual filtering and editing features are available in all sub-tabs, no matter how deeply nested they are:
- The data in the detail panel, as well as in the list panel, is editable in-line in the usual way, by simply clicking the cell, making any necessary changes, and clicking the Save button.
- List panels include the usual filtering capabilities. You can use any filtering terms you need, to find specific records within the sub-tab’s list. The search will of course be restricted to just the records related to the parent record from which you drilled down into the child record.
- You can also set the columns you want to see in the list via the Set Columns button.
- You can add new records via the Add button within the list panel. When you click the Add button, the lookup field for the parent record will be appropriately pre-filled so that when you save the record, it will be associated with the correct parent record.
Sub-tabs in tabular views #
The above examples show sub-tab sections in console views. But these sections are also available in tabular views, by clicking the same right-arrow icon. The screen shot at right shows a tabular view of Account records, in which the user has drilled down four levels, into the Opportunity Contact Role records.
Configuring sub-tabs #
For any particular object, you can choose the sub-tabs and the order of their occurrence by navigating to the “All records” menu of that object in Apsona (e.g., the “All Accounts” menu item) and then clicking Tools – Edit layout. The sub-tab settings that you specify in that layout editor there will then be used wherever the sub-tabs for that object are shown. This applies to all sub-tab sections, no matter how deep you drill into your data. For example, if you open the sub-tabs panel for the Account record, you will see the sub-tabs configured for the Account object; and if you then open the sub-tabs for a particular Contact in the list for that Account, you will see the sub-tabs configured for the Contact object.
Embedding sub-tabs in Salesforce detail pages #

Sub-tab sections can be embedded within Salesforce detail pages. The screen shot at right shows an example of the sub-tabs of the Account object embedded as a related list in a Salesforce Account detail page. To create such an embedding, you can easily generate the code for a Visualforce page that renders the embedding, and then add the page as a related list to your object’s detail page. Here are the steps:
- Log in as an administrator, open the Apsona window and navigate to Settings – VF pages and buttons.
- Select “Sub-tab panel” as the component, and select the object for which you want to create the embedded tabs.
- Click the “Generate code” button.
- Copy the generated code, create a new Visualforce page (via Setup – Develop – Visualforce Pages – New) and paste the copied code into the page.
- Use the resulting page as a related list by editing the layout of the detail page.
Even though you (as an administrator) create just one VisualForce page to serve as the container for the sub-tabs, the particular sub-tabs shown to a particular user will be the ones which apply to that user. More specifically:
- If a non-admin user’s profile (or Apsona configuration) does not include access to a particular object, then there will be no sub-tab panel available for that object.
- If the user has configured their sub-tabs as described above, then that configuration will be used for the sub-tab section. If not, then the configuration set up by the administrator (via Settings – Set default layouts) will be used. If the administrator has not set up a configuration, then Apsona will compute and show a default configuration of sub-tabs.