- Prerequisites
- Accessing the Batch Gift Entry tool
- The batch list view
- Creating a batch
- Managing batch entries
- Adding an entry
- Finding a donor record
- Keyboard shortcuts
- Adding a new Account or Contact
- Adding a Payment
- Managing allocations and contact roles
- Partial Soft Credits
- Managing Products related to gifts
- Managing Account Soft Credits
- Saving an entry
- Editing a saved entry
- Deleting an entry
- The Donor Account and Donor Contact fields
- Managing Contact Roles, adding soft credit
- Committing a Batch
- Downloading batch entries as a CSV file
- Batch objects and fields
- Showing the batch name on the Opportunity record
- Batch list layout and custom fields
- Creating reports showing Batch and Batch item data
- Recovering from incomplete commits
- Troubleshooting
The Batch Gift Entry add-on is intended for non-profit organizations who use the Salesforce Foundation’s Non-profit Success Pack (NPSP). Take a look at our product information page for background information. This document provides a step-by-step description for creating a batch.
Prerequisites #
The Batch Gift Entry tool requires both the packages, Apsona for Salesforce as well as the Batch Gift Entry package, to be installed in your Salesforce org. The tool in its current form is intended for organizations that use the Non-Profit Success Pack.
Required objects #
To create and commit batches, the user must have access to the Salesforce objects Contact, Account, Opportunity and Opportunity Contact Role as well as the NPSP objects Payment, General Accounting Unit and GAU Allocation. To process partial soft credits, the user will need access to the Partial Soft Credit object. Please make sure that these objects are available and visible to the user’s profile, as well as in that profile’s Apsona Configuration. If an object or field is either unavailable in the user’s Salesforce profile or not visible in the profile’s Apsona Configuration, it will not be available in their Batch Gift Entry screen. Please see here for details about Apsona Configurations.
Note also that the user must have Write access to the Opportunity and Payment objects, and Write and Delete access to the Allocation object.
Installing in sandboxes #
If you have installed the Batch Gift Entry tool in a sandbox for testing, please note that the “Manage Licenses” feature will not be available in a Salesforce sandbox under Setup. So in order to make the tool available for your sandbox users, you must ensure that all of the objects listed in the Required Objects list above, as well as the two objects (Batch and Batch Item) in the Batch Gift Entry package, are made visible in the Apsona configurations for the users’ profiles. (Please see this article for directions on how to do this.) Once you do so, the tool will be available to all sandbox users whose Apsona configurations have been set up.
Accessing the Batch Gift Entry tool #
The Batch Gift Entry tool is accessed via the Batches menu item, which appears at the right end of the Apsona menu bar. Click the “All Batches” menu item to access the tool.
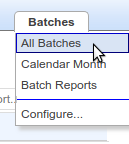
- You can also create single-step reports involving the Batch and Batch Item object by clicking the Batch Reports menu item.
- The Configure menu item produces a configuration window, described in another article.
The batch list view #
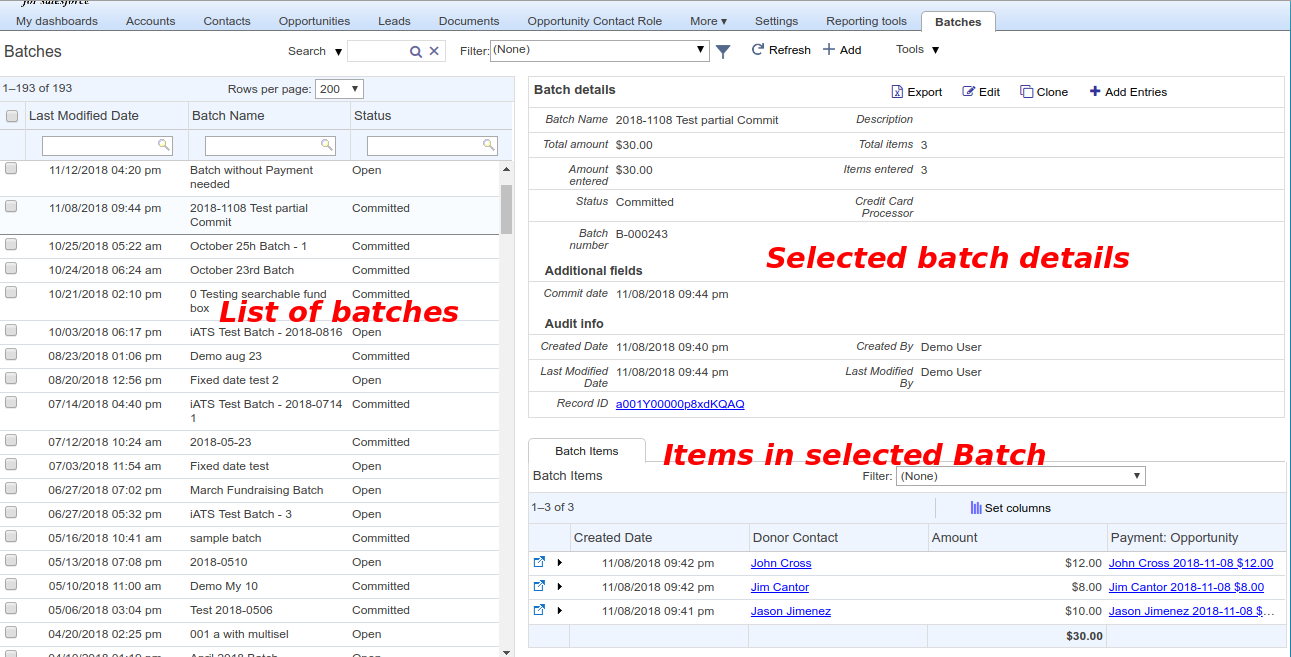
Clicking “All Batches” displays the screen below.
The batch list #
The list on the left shows all the batches in the system. You can filter this list using the filter button at the top, or using the search boxes at the top of each column.
Batch details #
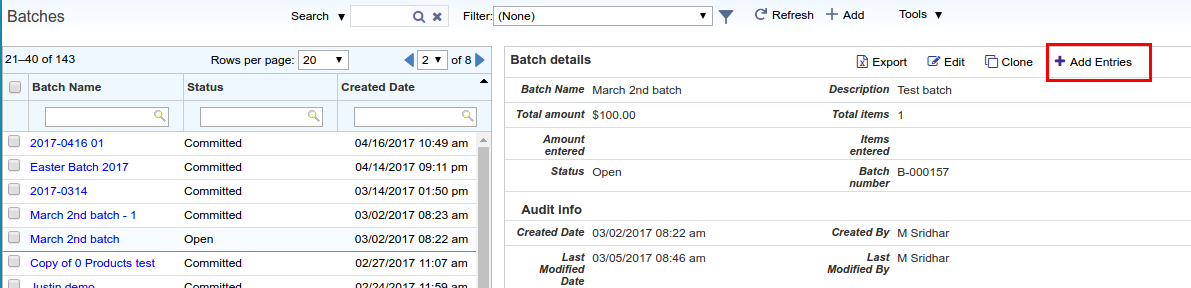
Clicking a row in the list shows the detail for that row in the Batch details area, including its total amount, entered amount, total items and items entered.
Batch items #
Clicking a row also shows the items in the clicked batch in the Batch items list in the child tab at bottom right. This list also be filtered in the usual way (see filtering in Apsona). You can also set the columns to be displayed in this list via the Set columns button in the child tab.
Creating a batch #
To create a new batch, click the Add button.
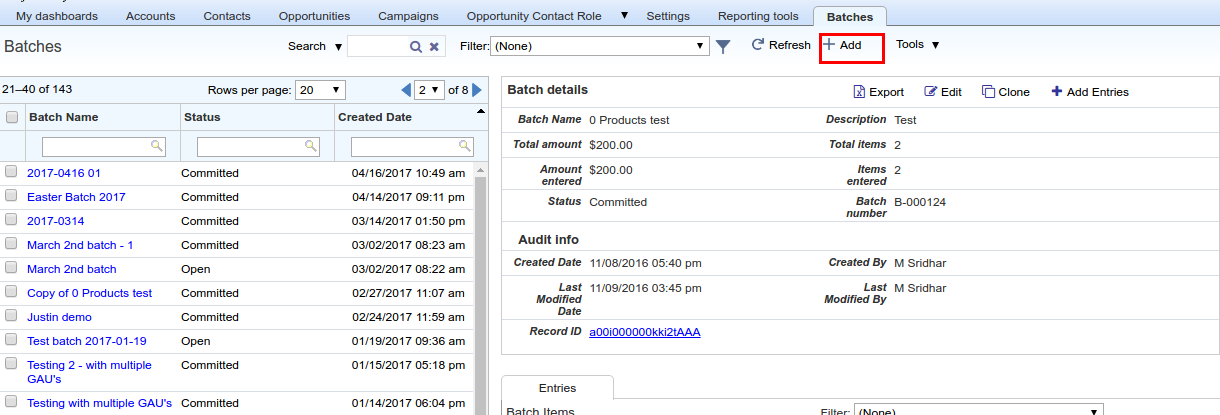
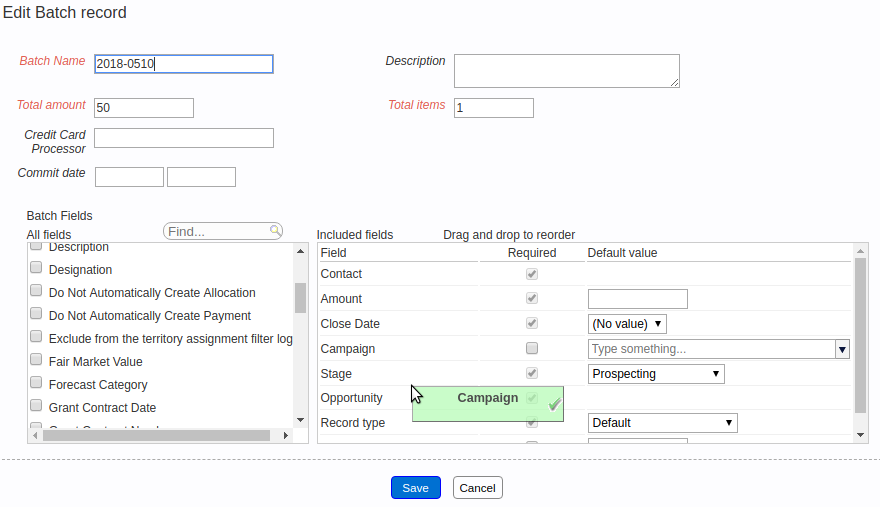
This displays the batch editor.
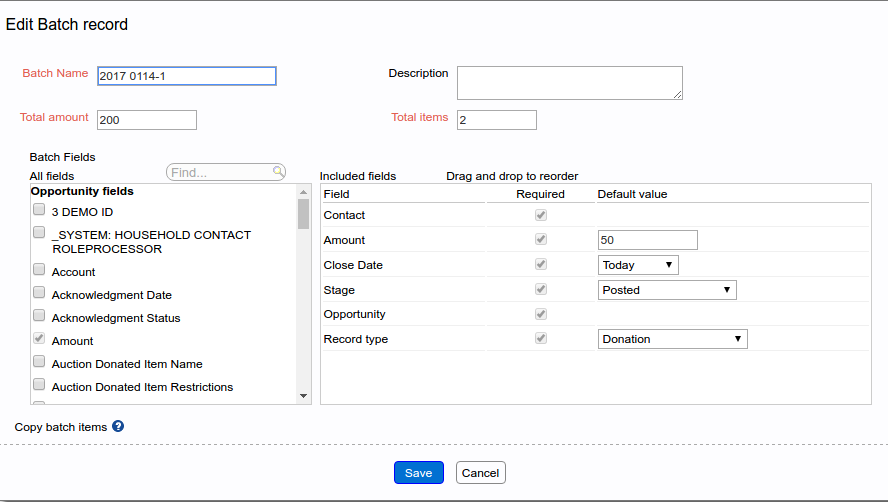
You can now set up the template for the batch. The fields in red are required. Each batch requires:
- A batch a name.
- A description (optional).
- The total amount to be entered for the batch. This need not be the exact amount and can be edited before the batch is committed.
- The total number of items or entries for the batch. This again need not be the exact number of items, and can be edited before the batch is committed.
- Batch fields – Check the required fields for the batch template from the All fields section on the left. Available fields are the fields in the Donation and Payment objects.
- The completed template – The checked fields will immediately show up in the Included fields box on the right. Drag and drop fields to reorder the fields. Some fields like Contact or Account, Payment, Close date, Record type and Amount are hardwired into the template as they are required fields for every batch. You can also choose to prefill values at this stage for fields which will have the same value for all the entries in the batch. For example, close date, Campaign and so on.
Once you have selected all the fields for the template, click Save. The batch template will be saved and you will be taken back to the Batch list page.
Rearranging fields in the batch #
Within the batch creation popup, you can rearrange the fields by simply dragging and dropping them, as in the screen shot below. The fields will appear in the batch entry screen in the order you have selected in the popup.
Managing batch entries #
When you click the row for a batch in the left (list) panel, it will be highlighted, and batch attributes such as Total amount and Total items can be seen on the right pane.
Adding an entry #
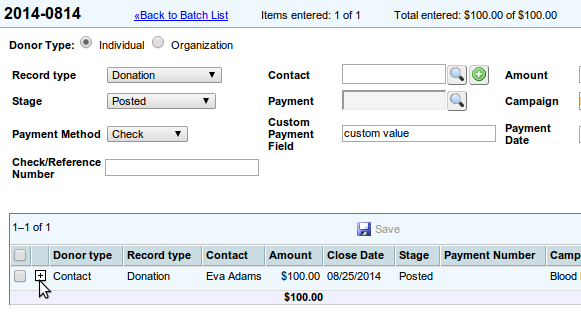
To add entries to the batch, click the “Add Entries” button. The batch items screen appears, and you see the fields chosen for the batch.
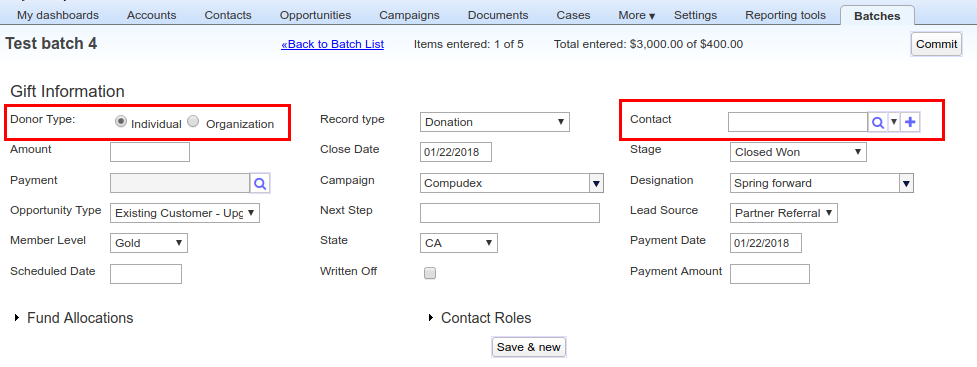
You begin by selecting the Donor Type, either Individual or Organization. If you select the Donor type to be Organization, the “Contact” field will be replaced by the “Account” field. You then select the Record Type of the gift you wish to enter, in the Record Type chooser.
Finding a donor record #
To find a donor record (Contact or Account) for which you wish add a gift, you simply type a few letters for a match string in the search box, and click the lens icon next to the box. The system will then find the records that match your search string, and display them immediately underneath.
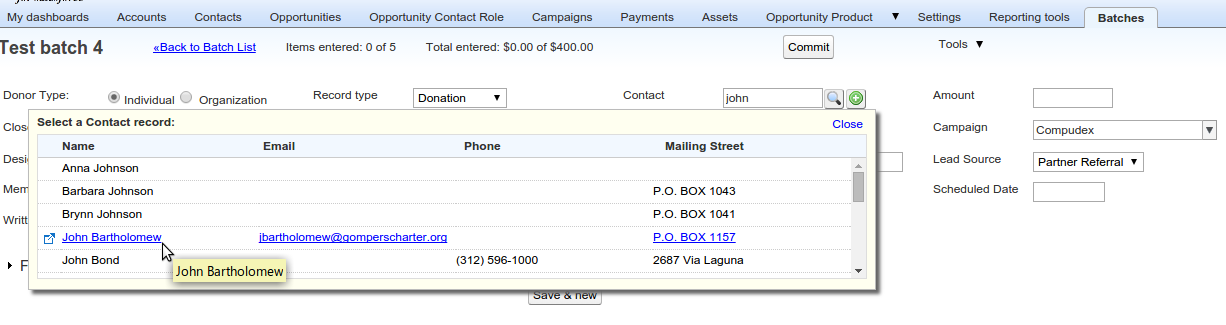
You can select the appropriate contact by clicking the row in the list. Notice also the “Open in Salesforce” icon at the left end of each row. Clicking that icon opens the corresponding record in a new window in Salesforce, so that you can sanity-check your choice.
Clicking the lens icon causes Apsona to match your search string against a pre-defined set of fields. (This logic can be customized for you, so please contact us if you need such customization.)
- When looking for a contact, if you type a single word, Apsona looks for that word as part of either the first name or the last name. (So if you type
Bertas your search string, records with eitherBertha,AlbertorAlbertsonwill match.) If you type two words, Apsona will try to match the first word against the first name and the second word against the last name. But in this case (with two words) Apsona looks for exact matches rather than partial matches. - When looking for an account, Apsona uses the same logic to match against the Account’s Name field.
Search by specific field #
You can also search by specific fields, by clicking the down-arrow next to the lens icon. Clicking the down-arrow button brings up a list of fields on which you can search.
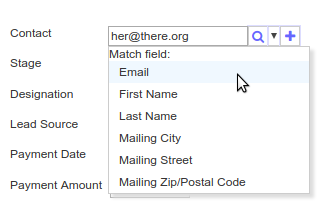
To use this feature, type a string in the search box, then click the down-arrow, and finally click the field that you want to match. In the above screen shot, we have typed an email address and will click the Email field to search for records matching the given string on that field. Two points to note here:
- When using this specific-field search feature, Apsona uses exact matches rather than substring matches, so that the search is much faster. Except when searching by the Mailing Street field for Contacts and the Billing Street field for accounts – in these two cases, it uses “starts with” matches, so that (for example) if you search for
1433 Elmand match on Mailing Street, it will match records with Mailing Street1433 Elm Ctor1433 Elmer Ave. - The list of fields shown in the dropdown will include any fields that you have marked as External ID in your Contact or Account object, so that you can easily search by those fields.
Keyboard shortcuts #
- Use the tab key to move from one field to the next. The focus on the fields will move in left-to-right, top-to-bottom order.
- Pressing the space bar when focused on a button – either a search button or the “Save and new” button – has the same effect as clicking the button with the mouse.
- In a date field:
- If you can type just one or two digits and tab out of the field, the typed digits will specify a date in the current month. For example, if today is 9/28/2015 and you type 15<tab> into a date box, the date box will take the value 9/15/2015.
- Similarly, if you type a date and month only, it will default to the current year. For example, if today is 9/28/2015 and you type 6/12<tab>, the date box will take the value 6/12/2015.
- In an auto-complete box for a lookup field, typing a few characters causes a search for all records that match the typed characters. The match algorithm looks for the name field of the looked-up object (e.g., the Campaign lookup matches the Campaign Name field) and finds records whose name field starts with the typed characters.
- In a picklist box:
- Typing a letter will cause the choice to jump to the next item that starts with the letter you typed.
- Typing the up-arrow or down-arrow key will move the choice upward or downward by one step.
Adding a new Account or Contact #
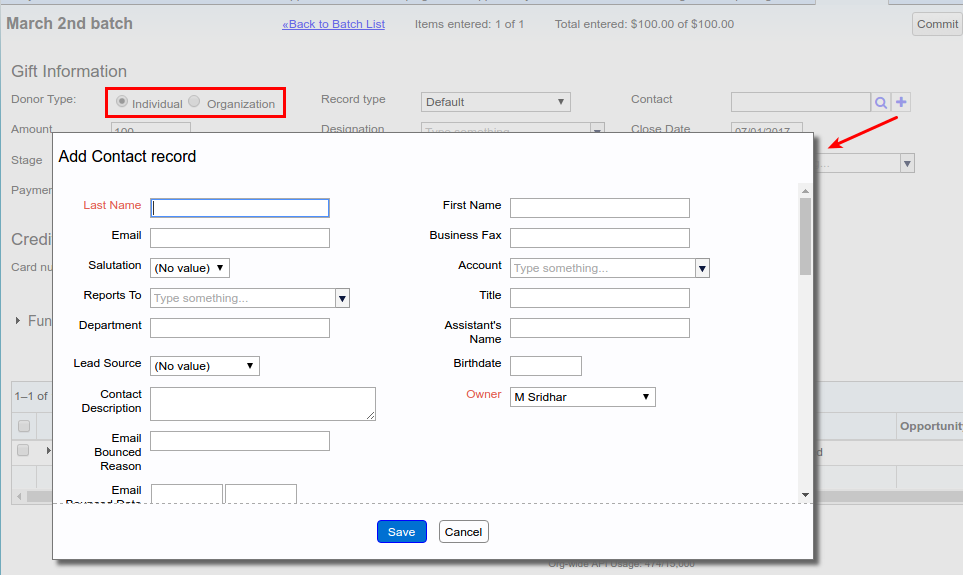
If a contact or Account does not exist in the database, you can add a new record by clicking the button next to the search icon. Depending on the selected Donor type, the Add Account or Add Contact pop up opens. Add the name and details of the contact or Account and click Save. The new record gets saved to the Salesforce database.
Editing the layout of the popup #
If you want to change the fields that appear in the “Add Contact record” popup, simply navigate to Contacts – All Contacts, click Tools – Edit layout, and edit the fields in the detail panel. The layout of the detail panel is what is used in the popup. Similarly, to edit the layout of the “Add Account record” popup, edit the layout of the detail panel of the Account object.
Adding a Payment #
When creating a batch item, you can either create a brand new Opportunity entry for the item, or associate it with an existing pending Opportunity for the donor you have selected. When you select a donor, the batch tool automatically finds any pending gifts from that donor and displays them in a popup, so that you can select one of them to pay off, as in the animation below (click the image to replay the animation).
When you select a pending gift to pay off, you’ll note that the Opportunity Campaign, Close Date, and Amount field pre-fill with the existing values from that Opportunity. This allows you to confirm the correct Opportunity details on the Batch Entry Screen before saving the entry. At this time, custom Opportunity fields will not pre-fill from that payment’s opportunity.
Some things to note here:
- You can turn off this automatic-popup behavior via the Batch Configuration popup. If you do so, you can still invoke the popup by clicking the search (lens) icon next to the Payment field.
- By default, the popup contains only those Opportunities that have a probability of 50% or more, and have at least one unpaid payment associated with them.
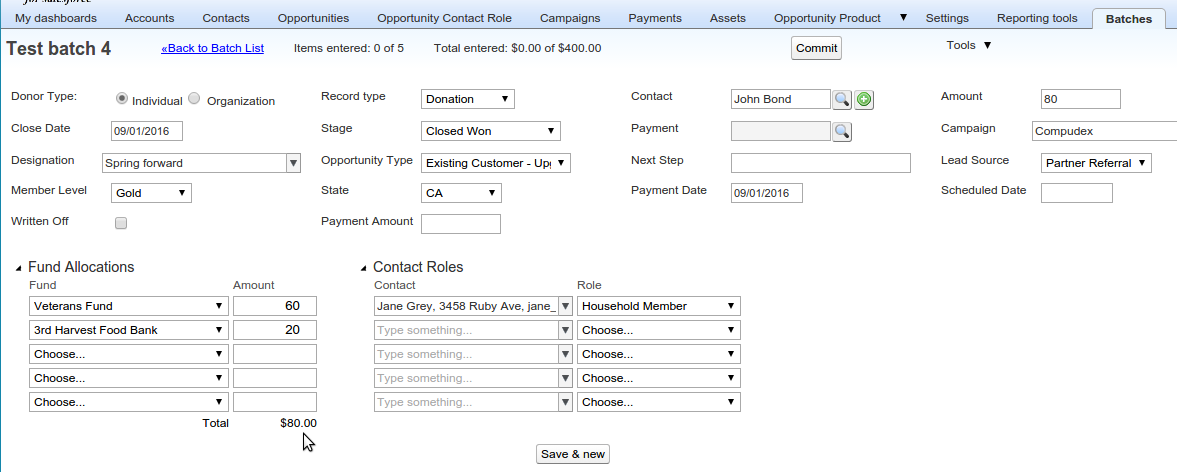
Managing allocations and contact roles #
At the bottom of the data entry screen, there are panes for managing fund allocations and contact roles for soft credit. You can use the allocations pane to add fund allocations for the gift. Similarly, you can use the contact roles pane to add up to five contact role records for the gift. These allocations and roles will be maintained as part of the batch item, and the actual allocation and role records will only be created when the batch is committed. Allocation records are added the Non-profit Success Pack’s GAU Allocation object, and role records are added to the Opportunity Contact Role object.
Existing allocations #
When you create an Opportunity record in the Non-Profit Success Pack, you can add Allocation records to it. The NPSP also includes a feature for managing allocations associated with Campaigns. With this feature, you can set up default allocations with each Campaign, so that when you create an Opportunity associated with the Campaign, corresponding Allocation records are automatically created for the Opportunity.
In the Batch tool, when you select such an Opportunity for a Batch Item, the tool displays the existing Allocation records in the Funds pane. You can then adjust the allocations if necessary and save the Batch Item. When you commit the batch, the Allocation records are updated to reflect the changes you made.
Payment-level Allocations #
Recent versions of the NPSP (after mid-2019) include support for Payment-level Allocations. With this feature, you can set up one or more Allocation records on a per-Payment basis, just as you can on a per-Opportunity basis. Thus you can allocate the amount of a Payment across multiple Funds (GAUs). Note, however, that it is one or the other, not both. In other words, either your Allocations are all set up at the Payment level, or they are all set up at the Opportunity level. Payment-level Allocations are enabled in the NPSP via a custom setting checkbox field Payment Allocations Enabled in the Allocations Settings custom setting. Note that, in order for the Batch Gift Entry tool to access this custom setting, the “View All Custom Settings” checkbox must be checked for the user’s profile (the checkbox is under Setup – Users – Profiles – The user’s profile – System Permissions).
The Apsona Batch tool now includes (as of September 2020) support for Payment-level Allocations. The tool uses the above custom setting to automatically detect whether Payment-level Allocations have been enabled in the org, and if so, it ensures that the Payment lookup of each Allocation record is updated to point to the appropriate Payment record when the Batch is committed. If you modify any existing Allocations on the Payment, or add new Allocations, the tool ensures that these updates take effect correctly on commit.
Partial Soft Credits #
The Batch Gift Entry tool includes a feature for assigning a Partial Soft Credit to each Contact who has a Contact Role for a particular gift. To enable this feature:
- your user profile must include access to the NPSP Partial Soft Credit object (API name
npsp__Partial_Soft_Credit__c), and - this object must be visible in your Apsona Configuration. See this article for how to add it.
With this feature enabled, the Batch tool displays an additional column named PSC at the right of the Contact Roles panel, in which you can enter the partial soft credit for each donor with a suitable Role. It also provides the option to use either an exact amount or a percentage when entering partial soft credits. See the screen shot below.
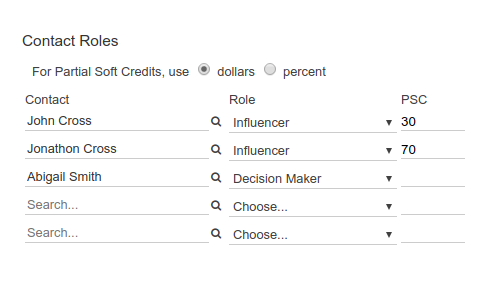
Some notes about this feature:
- The PSC column, and the radio buttons for choosing dollars or percent, will only appear if the Partial Soft Credit object is available to your Salesforce profile and visible in your Apsona Configuration.
- The PSC column requires a numeric value entered in it.
- You don’t need to assign a PSC value in every row. So you can select some contacts for whom to assign soft credits, and assign no partial soft credits to others.
- PSC amounts can be either dollars or percent.
- If you select the “dollars” radio button at the top of the panel, the Batch tool assumes that the values entered in the PSC boxes are exact dollar values. It will then verify that the total dollar amount of all the partial soft credits equals the amount of the gift.
- If you select “percent”, it will interpret the value you provide as a percentage of the total opportunity amount, and will automatically calculate the correct fraction of the total amount to assign as partial soft credit.
- When the batch is committed, the tool will automatically create the necessary records in the Partial Soft Credit object.
Managing Products related to gifts #
Some organizations need to track Product records related to gifts, e.g., as ticket sales. For such use cases, the Batch Gift Entry tool lets you add records to the Opportunity Line Item object related to the Opportunity. To enable this feature, you must (a) check the “Show the Products panel” checkbox in the Batch Configuration popup and (b) ensure that the OpportunityLineItem, Product and Pricebook objects are visible to your profile as indicated in this article.

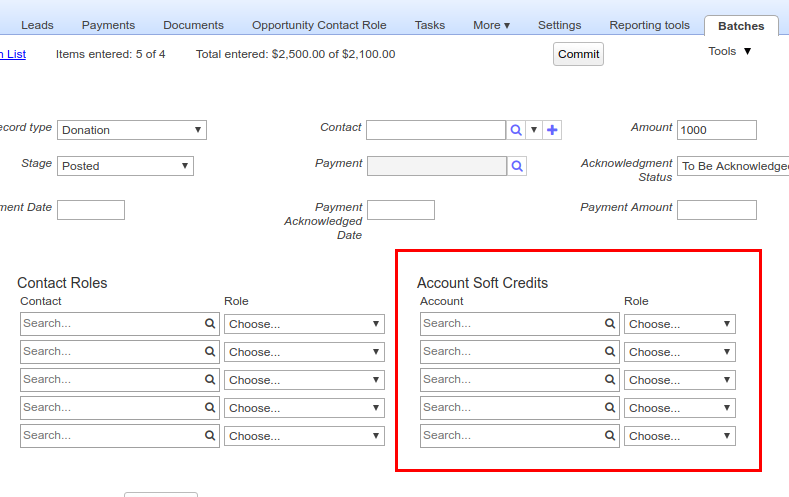
Managing Account Soft Credits #
The Non-Profit Success Pack includes the Account Soft Credit object via which you can track soft credits to Account records, associated with each Opportunity. If you need this functionality, you can use the Batch Gift Entry tool to associate up to five Account Soft Credit records with each Opportunity. To enable this feature, you must (a) check the “Show the Account Soft Credits panel” checkbox in the Batch Configuration popup and (b) ensure that the Account Soft Credit object is visible to your profile as indicated in this article.
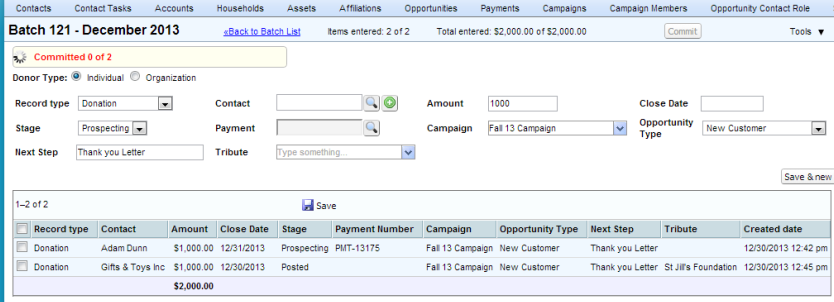
Saving an entry #
Click the Save & new button to save the entry. The image shows a completed entry.
Editing a saved entry #
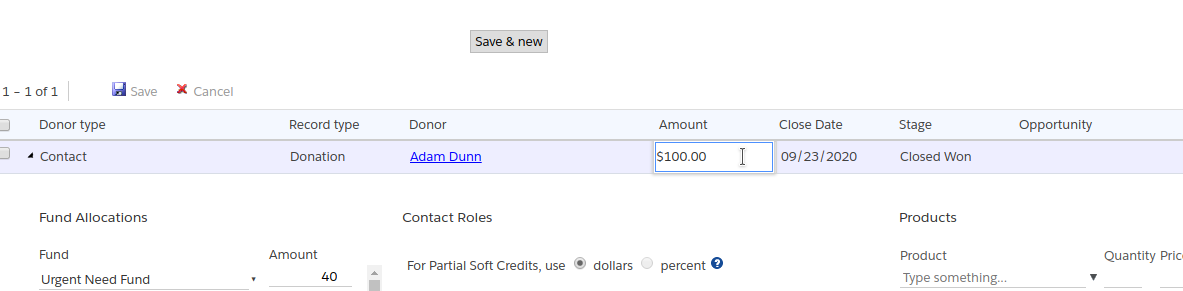
If you wish to edit an existing saved entry, click the cell containing the value you want, edit the value, and click the “Save changes” button in the table’s header.
You can also edit the related items of a saved entry (e.g., its Allocations or Soft Credits) by clicking the arrow at the left of the entry to open up its details.

Deleting an entry #
You can delete entries in the batch by checking the checkbox for the batch item in the grid below, and then clicking Tools – Delete.

The Donor Account and Donor Contact fields #
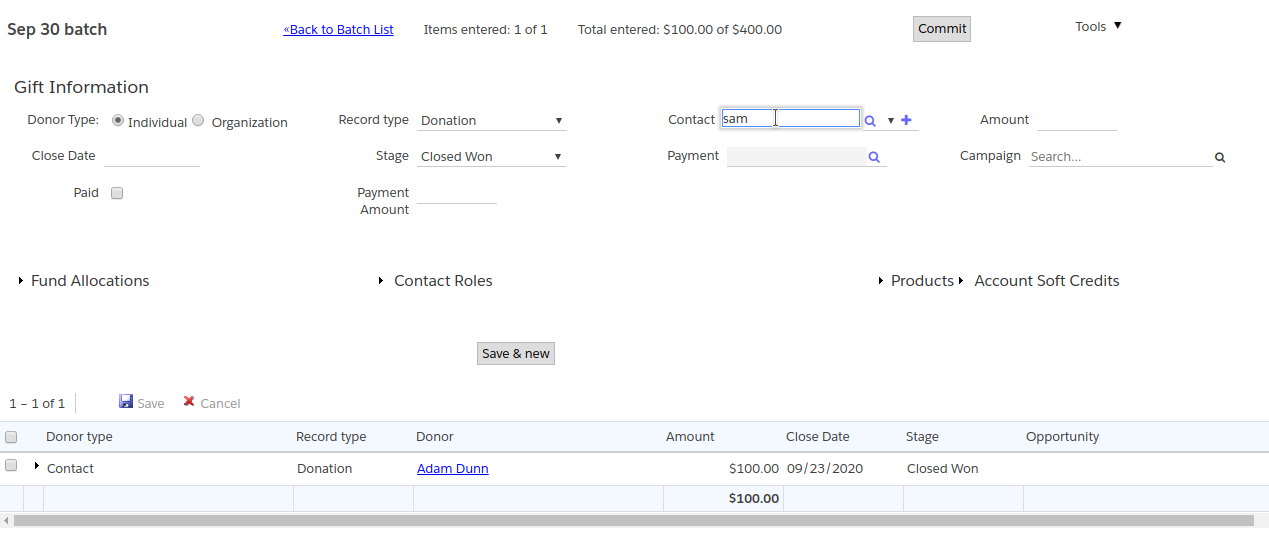
The Batch Item object contains two fields named Donor Account and Donor Contact that identify the donor who gave the gift for the item. These fields facilitate reporting and tracking donors and their gifts.
When you save a Batch Item record by clicking the Save & new button, the Batch tool automatically fills one of these two fields:
- If the gift is from an Organization Donor, the Donor Account field is filled with the record ID of the Account record for the donor.
- If the gift is from an Organization Donor, the Donor Account field is filled with the record ID of the Contact record for the donor.
Notice that, for any given batch item, only one of these two fields is filled, not both. Also notice that these fields are filled at the time that the Batch item is created, not when the item is committed. So you can use the Batch item’s Set columns button to add them to the child tab layout, and they will automatically show the donor’s name in the appropriate column – see the screen shot above.

These two fields are available only in the Batch Gift Entry package version 1.7 and later. If you created batches before that version, the items in those batches will have these two fields empty.
Managing Contact Roles, adding soft credit #
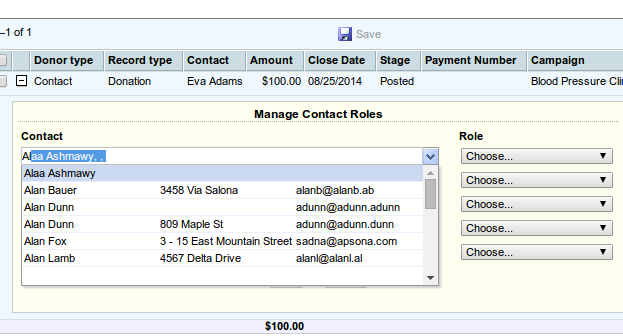
After a batch entry has been created, it will appear as a row in the table at the bottom of the screen. At the left end of the row is a plus sign icon for triggering the contact roles widget.
Clicking the plus sign opens the contact selection panel via which you can assign soft credit to that donation for upto five contacts.
Committing a Batch #
Once the entries are done, a batch can be committed.
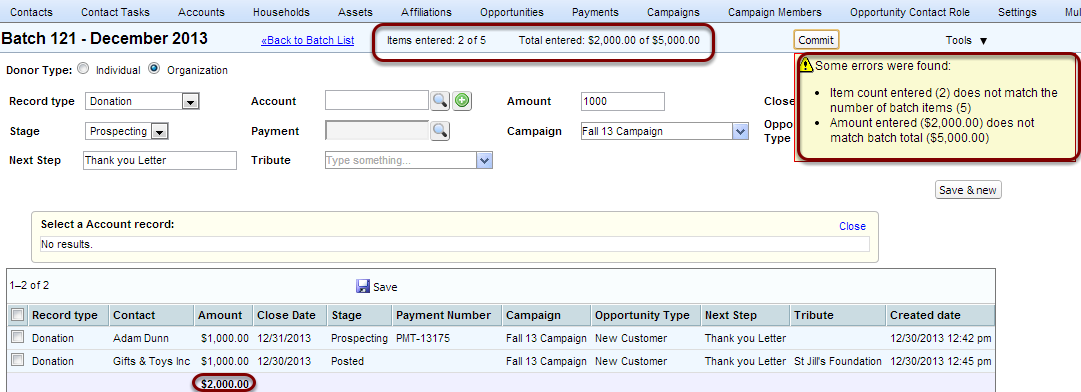
Before committing a batch you will need to make sure that the number of items entered and the Total Amount entered match the numbers while setting up the batch. If the amounts do not match up you will get an error message pop up saying the ‘Amount entered does not match the batch total’. If the items do not match the error pop up will say “Item count entered does not match the number of batch items’. Correct the errors and click Commit.
Create necessary Donations & Payments #
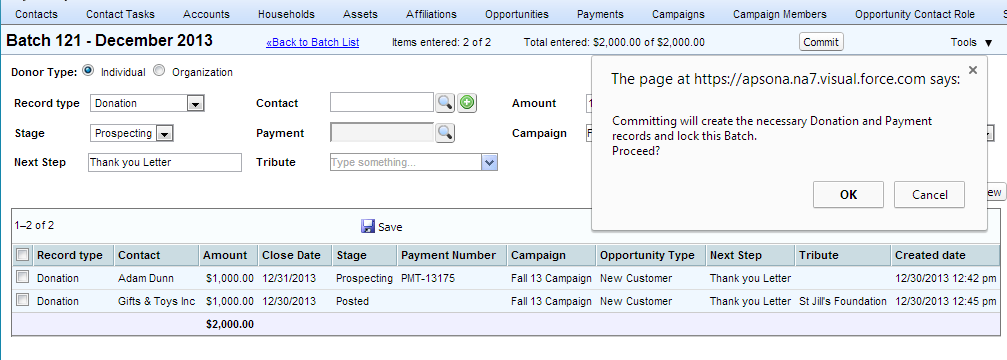
When you click the Commit button you will get a pop up which will say that the batch will be locked and the necessary Donations and Payment records will be created if necessary. Click OK to commit and lock the batch.
Locking the batch #
You will see the progress of the number of entries as they are being committed on the top right of the page.
A Committed Batch #
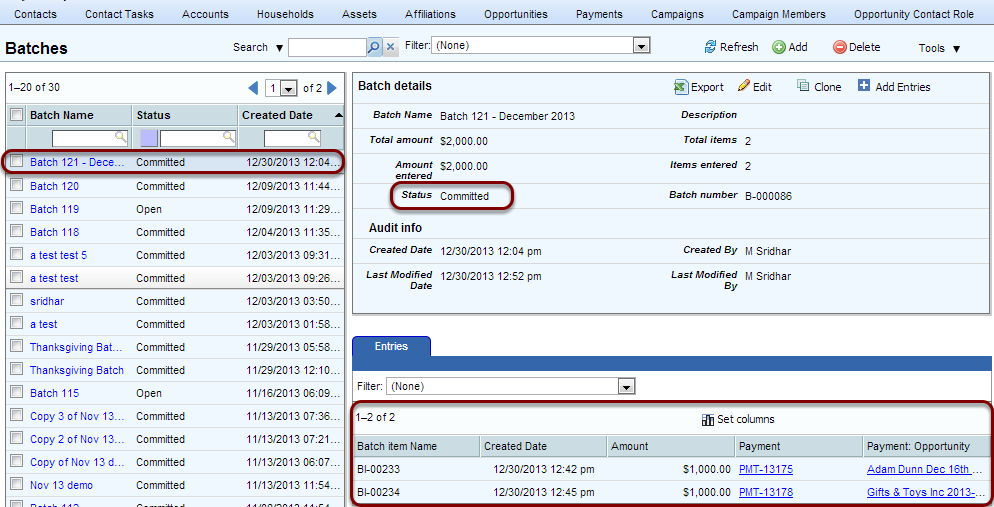
Once a batch is committed you are brought back to the main list page. You will see the following:
1 – The newly committed batch is highlighted on the left pane.
2 – On the right pane are its details with the Status field showing as Committed.
3 – The child tab has all the Entries to the batch. Also notice the Payment and Opportunity record to each entry. If you click the Payment or the Opportunity link you will be taken to that record page in Salesforce.
Downloading batch entries as a CSV file #
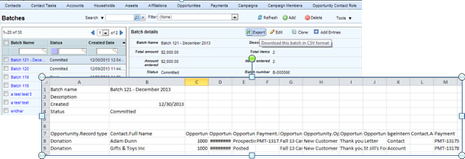
Entries of Open and closed batches can be downloaded into a CSV by clicking the Export button which is located on the detail pane of each each. This is a report of the batch and will contain all the entries, its details and its values.
Batch objects and fields #
The Batch Gift Entry tool uses two Salesforce objects, the Batch object (API name apsona_be__Batch__c) and the Batch Item object (API name apsona_be__Batch_item__c).
Batch fields #
| Field Label | Field API name | Data type | Comments |
|---|---|---|---|
| Record ID | Id | String | |
| Batch Name | Name | String | User-specified batch name |
| Created Date | CreatedDate | Date & time | |
| Created By | CreatedById | Lookup | |
| Last Modified Date | LastModifiedDate | Date & time | |
| Last Modified By | LastModifiedById | Lookup | |
| Items entered | apsona_be__Items_entered__c | Number | Number of items currently in the batch |
| Description | apsona_be__Description__c | Text | User-specified description of the batch |
| Field mapping | apsona_be__Field_mapping__c | Text | Field mapping in JSON. Meant for Apsona internal use only: Do not modify this field. |
| Amount entered | apsona_be__Amount_entered__c | Currency | Total amount of the gifts currently entered in the batch |
| Status | apsona_be__Status__c | Picklist | One of Open, Partially Committed or Committed |
| Total amount | apsona_be__Total_amount__c | Currency | Expected total amount of gifts in the batch |
| Total items | apsona_be__Total_items__c | Fractional number | Expected total number of items in the batch |
| Batch number | apsona_be__Batch_number__c | String | Automatically-generated batch number |
| Commit date | apsona_be__Commit_date__c | Date & time | Date that the batch was committed |
| Credit Card Processor | apsona_be__Credit_Card_Processor__c | String | Used only by the iATS connector add-on |
Batch Item fields #
| Field Label | Field API name | Data type | Comments |
|---|---|---|---|
| Record ID | Id | String | |
| Batch item Name | Name | String | Auto-generated batch number field |
| Created Date | CreatedDate | Date & time | |
| Created By | CreatedById | Lookup | |
| Last Modified Date | LastModifiedDate | Date & time | |
| Last Modified By | LastModifiedById | Lookup | |
| Batch | apsona_be__Batch__c | Lookup | Lookup to the Batch to which this Batch Item belongs |
| Data values | apsona_be__Data_values__c | Text | Batch item contents in JSON. Meant for Apsona internal use only: Do not modify this field. |
| Entry notes | apsona_be__Entry_notes__c | Text | |
| Amount | apsona_be__Amount__c | Currency | |
| Payment | apsona_be__Payment__c | Lookup | Lookup to the Payment record created (if any) when this item is committed |
| Opportunity | apsona_be__Opportunity__c | Lookup | Lookup to the Payment record created (if any) when this item is committed |
| Donor Account | apsona_be__Donor_Account__c | Lookup | Lookup to the Contact record for the donor of this gift, if it is an individual gift |
| Donor Contact | apsona_be__Donor_Contact__c | Lookup | Lookup to the Account record for the donor of this gift, if it is an Organization gift |
Showing the batch name on the Opportunity record #
The Non-Profit Success Pack provides a Payment object separate from (actually a child of) the Opportunity object, to allow for multiple payments associated with the same opportunity. But some organizations have no use for this separation – they use only opportunity records to manage all of their donation information. In such organizations, users ask to see the name of the committing batch when they view the Opportunity record. This requirement is easily met via a cross-object workflow rule, as follows. For information about managing workflow rules, see the documentation on Salesforce’s website.
- Create a new custom field on your Opportunity object, called
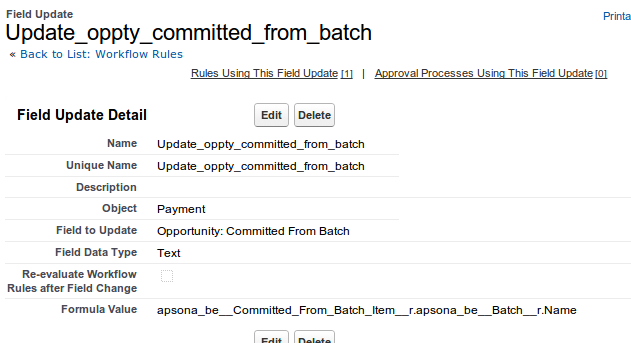
Committed from Batch. - On the Payment object, create a new workflow rule named
WhenBatchIsCommitted, which executes whenever the record is created and theCommitted From Batch Itemfield is not empty. See screen shot below.
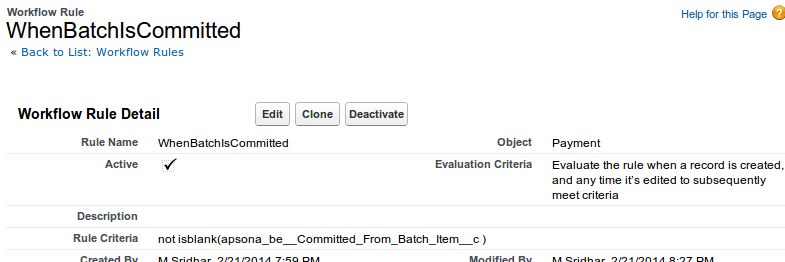
- For this workflow rule, set the action to update the parent opportunity record with the name of the batch. See screen shot below.
- Activate the workflow rule.
Batch list layout and custom fields #
You can edit the layout of the batch list by clicking Tools – Edit layout. This way, you can select the specific fields you need in the list and detail panels. See the animation below (click it to replay the animation).

Some notes:
- You can select up to five fields in the list panel. The list will appear sorted in the first (leftmost) field, except when you select a date field (e.g., the Created Date or the Last Modified Date) as the first field of the list, in which case it will be sorted in descending order by date value (i.e., most recent first).
- Do not remove the Field Mapping field from the detail layout, nor edit it in any way, because it is for Apsona’s internal use only.
- You can add any custom fields you need to the Batch object, and once you clear the Apsona cache (via Settings – Clear cache), these fields will become available for use in the batch layout.
For layout editing to work, you must add the Batch and Batch item objects into the visible objects list in your profile’s Apsona configuration. If those objects aren’t visible, your layout changes will have no effect.
Creating reports showing Batch and Batch item data #
There are several ways of creating reports involving Batch and Batch item fields.
- You can create reports involving Batch records via the Reports menu item in the Batches menu.
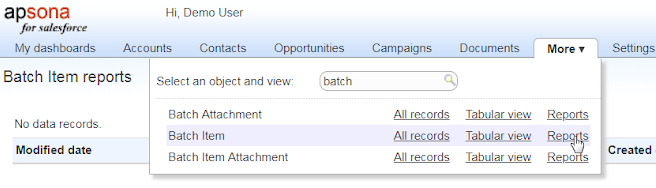
- In addition, you can create reports spanning the Batch, the Batch Item and the Opportunity and Payment objects using the Batch Item Reports menu. To do this, hover over the More menu in the main Apsona menu bar, and click the Reports item adjacent to the Batch item object – see the screen shot below.
You can then create single-step reports that use fields from the Batch item, Batch, Opportunity and Payment objects. Read more about single-step reports.
- Using these same objects, you can create multi-step reports that pull fields from other objects as well.
Recovering from incomplete commits #
Occasionally, a back-end error – such as a validation rule failure, a trigger failure, a flow failure or a sporadic Salesforce error – can cause a batch commit to fail. In such cases, the batch tool will display the error messages after the attempt to commit.
Apsona does not log the error popups anywhere. If an error occurs when committing, Apsona sends you an email with a summary of the errors, so that you can examine and fix them.
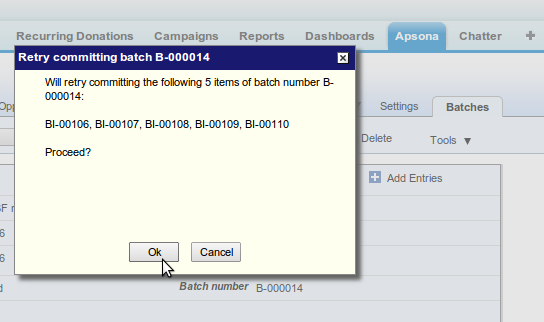
When such errors occur, one or more batch items might be left uncommitted (i.e., without corresponding Opportunity and Payment records set up for them). In such a situation, the Batch Gift Entry tool sets the status of the batch to Partially Committed. And when you click the batch in question, the batch tool will show a “Retry commit” button in the batch toolbar, as in the screen shot below.

Note that this button will be shown only for batches that have been partially committed (i.e., those that have one or more uncommitted items and one or more committed items.) You can then retry committing the batch by clicking this button. If you do so, the tool will display a popup showing you the batch items that have been left uncommitted, and ask you if you wish to try to recommit them. This feature lets you fix up any data errors and try to re-commit the batch without having to re-enter data manually.
Note that the retry feature will only try to commit the uncommitted items in the batch, i.e., those that do not have corresponding payment and opportunity records. It will leave the committed items untouched. Also, if the retry fails, the popup will display the errors that occurred and leave the batch in “Open” state so that you can once again click “Add Entries” and edit the offending items. If you re-edit such a batch, though, do not click the commit button on the batch again, because if you do, you will recommit all its entries. When repairing a partially-committed batch, use the “Retry commit” button to commit just the items that have not been committed.
The “Partially Committed” status #
As noted above, the “Partially Committed” status indicates that one or more errors occurred during the commit.
- If one or more Opportunity or Payment records failed to be created, you will see a “Retry Commit” button (as noted above) which you can use to retry committing the missing records.
- If all Opportunity or Payment records were successfully created, but some other errors (such as flow errors) occurred during the commit, Retry Commit button will not be available. In such cases:
- You would want to examine the errors you captured (as noted above) and examine the created Opportunity or Payment records as well as any other data changes expected from flow executions, to determine what caused the errors and rectify them.
- After the above step is done, you can click the Record ID field of the Batch record to open it in Salesforce, and change its status from “Partially Committed” to “Committed.”
Troubleshooting #
User does not see the Batches menu #
If an Apsona user cannot access Batch Gift Entry, please make sure that the following steps have been carried out:
- The Batch Gift Entry package (which is not the same as the Apsona for Salesforce package) has been downloaded from the AppExchange and installed in your org.
- The user’s profile in Salesforce has full permissions to access the Payment, Apsona Batch and Batch Item objects.
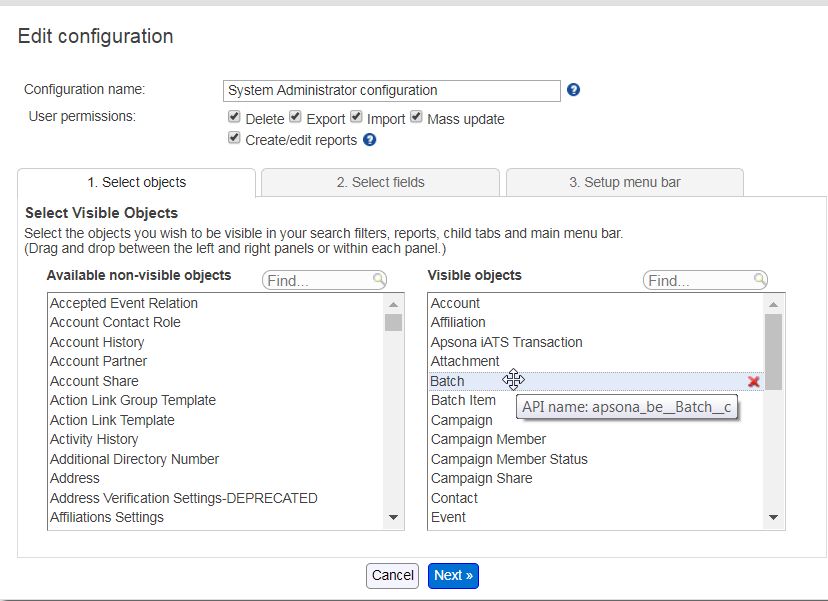
- The Apsona Configuration for the user’s profile includes the objects Account, Contact, Opportunity, Opportunity Contact Role, General Accounting Unit, GAU Allocation, Payment, Apsona Batch and the Apsona Batch item as visible objects. See the screen shot below.
- In Apsona, log in as the user and click Settings – Clear cache to re-initialize Apsona.
If all the above are done and the Batches tab is still not displayed, send email to support@apsona.com to add the add-on for the user. You can use the Feedback link from any Apsona page as well.
User cannot see the Allocations panel in the batch item entry screen #
Please ensure that:
- The General Accounting Unit and GAU Allocation objects are fully accessible to the user’s Salesforce Profile, via Salesforce Setup.
- These same objects are marked visible in the Apsona configuration for the user’s profile, as described here.
- The “Show Allocations panel” is checked in the Batch configuration, as described here.
- After the above changes are made, the user clicks Settings – Clear cache in Apsona.