Overview #
An Apsona Grid provides a simple, easy-to-navigate Excel-like view of all records in an object and immediately related objects in your Salesforce org. It is designed to minimize screen refreshes and navigation, so as to reduce your cognitive load as you use the grid. It also minimizes the clicks you need, so you can access and manipulate your data quickly.
An Apsona Grid includes common functions for inline editing, sorting, filtering and grouping based on column data. It also offers convenient functions for mass update, mass add tasks and mass delete.
Using an Apsona Grid #
As an end-user, you would access an Apsona Grid via a Visualforce page set up by your administrator. The screenshot below shows an example of such a page. It might contain multiple tabs across the top, with each tab showing its own Apsona Grid. To access a grid, simply click its tab.
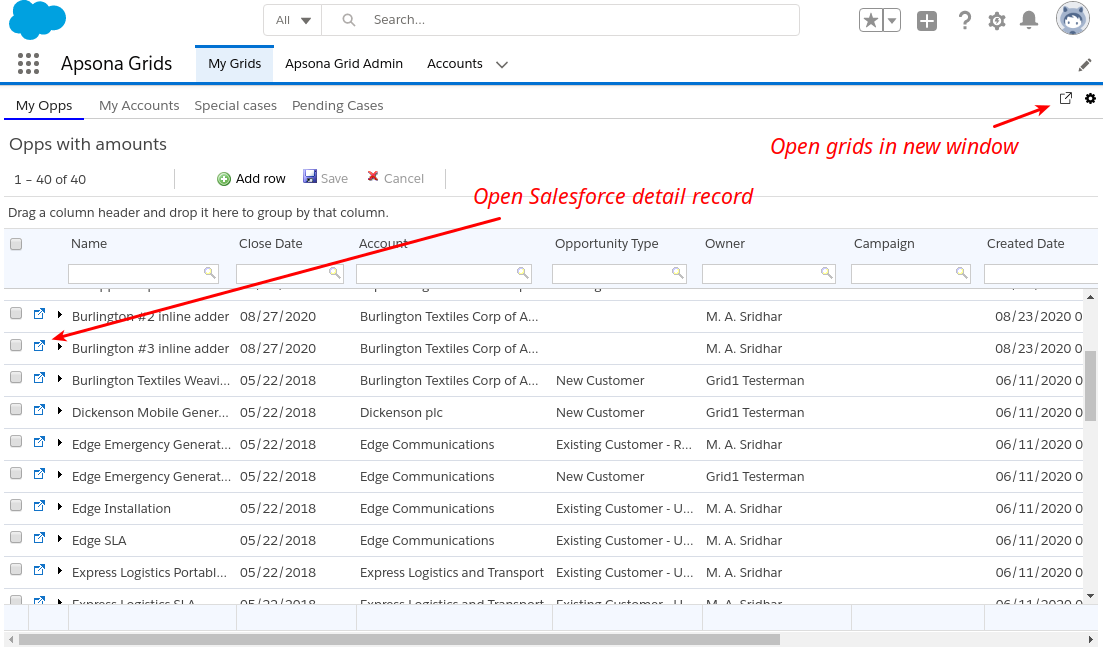
The columns in the grid are selected by your administrator. Each row shows an “open in Salesforce” icon at the left end. Clicking that icon opens the Salesforce detail page for that record in a new browser window.
Sorting and grouping #
To sort on a column, simply click the column header. Clicking once sorts by that column in ascending order, and clicking again sorts in descending order.
To group on the values of a column, simply drag the column header into the grouping bar. Note: grouping is not available for all types of grids. See the animation below.

Rearranging columns #
You can drag and drop columns in order to change your view of the grid. You can also resize the columns to see more of a particular column’s data.

Filtering #
Your administrator can set up a default filter for each grid. For instance, the My Opps grid might show your Opportunities only, whilst the Partner Accounts grid might show only those Account records of type Partner. (So you can have grids from different objects in the same tab group.) The default filter is coded into the grid, so the grid will never show records that don’t meet the default filter criteria. So if you make a change to a record that causes it to no longer meet the default filter criteria, that record will disappear from the grid. For example, if the default filter only shows Accounts in the Prospecting stage, and you change the stage to Closed Won, the updated record will no longer appear in the Grid.
You can further filter the records in a few ways.
- You can enter filter terms into the search box at the top of a searchable column, and select the appropriate match operator (e.g., “starts with” or “contains”) to find data records matching your condition.
- If your administrator has provided additional filters, you can select one of them to further restrict the data rows shown in the grid.
The animation below illustrates both these types of filtering.

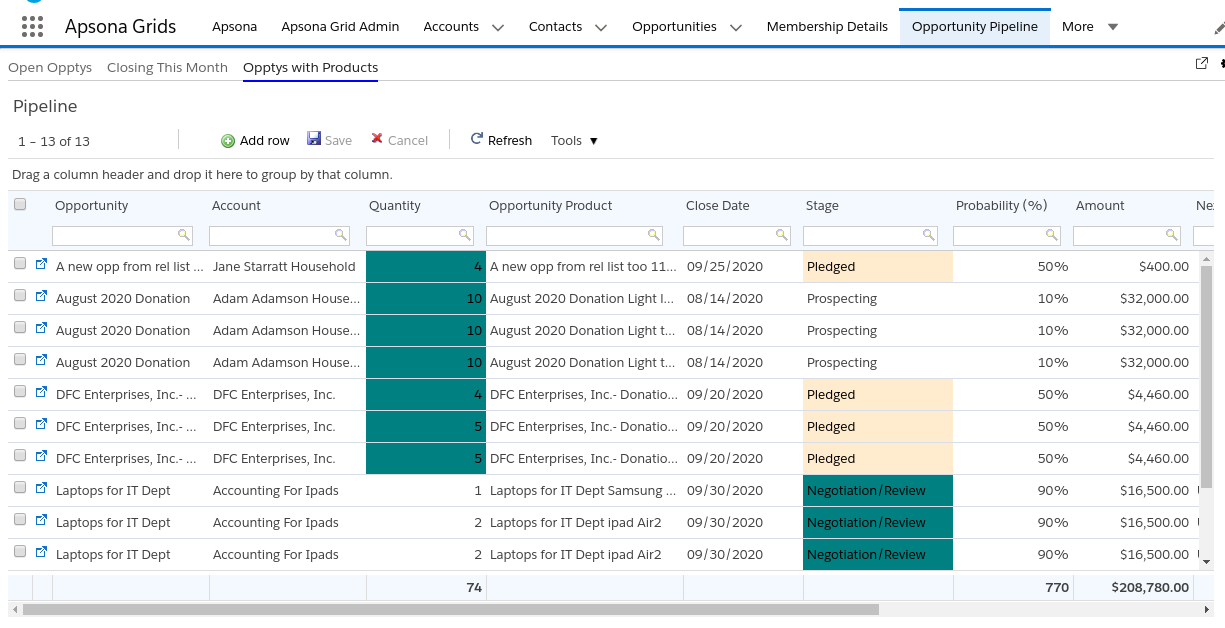
Conditional formatting #
Grids can also contain conditional formatting rules that highlight some cells with colors that call attention to them. For example, your administrator can set up a rule that shows the Due Date of all overdue tasks in light red to indicate action needed, or a rule that highlights the amount fields of large-value opportunities in green to indicate higher-priority opportunities. See screenshot below.
Inline editing #
To edit a field’s value, simply click into the field, and an editor widget appears, assuming that the field is editable. (Your administrator controls which of the fields are editable. Non-editable fields will not respond to clicks.) You can then edit the data in the field, and a highlight will appear on the field to indicate that it has been modified. You can make multiple changes in the grid and then save them all at once.
Some things to note:
- Type-specific widgets: The type of editor widget depends on the data type of the field being edited. For example, a date field will produce a date picker underneath, whilst a picklist field will produce a selector menu.
- Data validation: These widgets ensure that the correct data type is entered into the field. For instance, a picklist editor will only allow a valid picklist value to be selected. This ensures that your data retains good quality.
- Saving your changes: Click the Save button at the top to save your changes, or the Cancel button to cancel them all.
- Undoing a change: If you wish to undo a change in one of the fields, simply click the Undo button that appears next to the cell to revert it to its original value.
The animation below illustrates these points.

Adding new records #
To add a new record to the object, simply click the Add row button at the top of the grid. An “add row” widget appears, in which you can type in the field values for the new record and click the Save button. As with inline editing, this record addition feature enforces the field type and validation rules for the object. Also, as with inline editing, if you create a record that does not meet the default filter of the grid, you will not see the record in the grid after it is created. See the animation below.

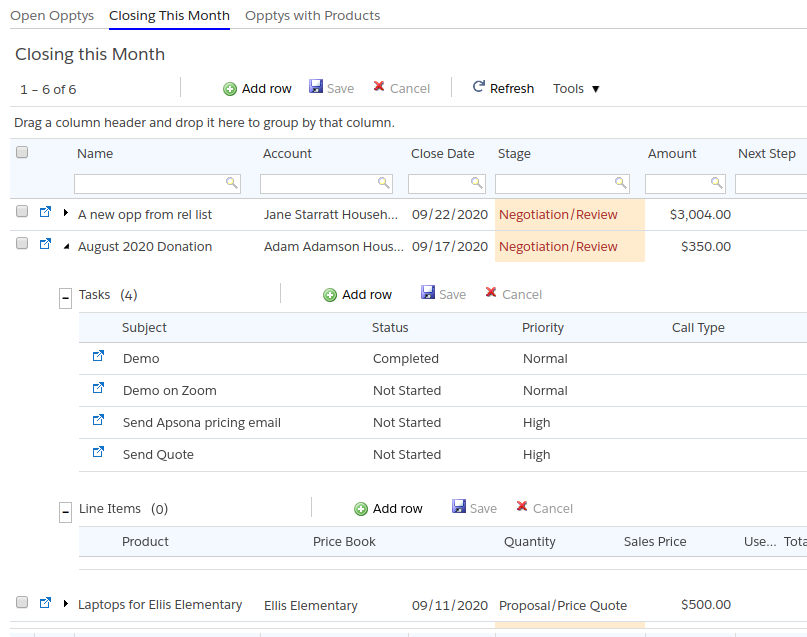
Subgrids #
An Apsona Grid can be configured with subgrids to show records from child objects. For example, an Account grid can include a subgrid for related Opportunities, related Contacts and related Tasks. Each subgrid has many of the same features as the main grid. You can open the subgrids of a particular record by clicking the “open subgrid” arrow at the left end of the record. You can sort subgrid columns. You can also add records in the subgrids, and edit the records displayed inline.
Tools #
Mass update #
With the mass update feature, you can update the fields of multiple records at once. You can use this feature in a few different ways:
- Update one or more fields of all the records in the grid.
- Select one or more records via the checkboxes at their left, and update the fields of just the selected records.
- Apply a filter on the grid to restrict the records to be updated, select some records via checkboxes (if needed) and then mass update the selected records.
To use the mass update feature, click Tools – Mass Update. This produces a popup containing the fields in the grid. You can then select one or more of the fields for which to provide values, and click the “Apply” button. Your changes will be reflected in the grid. You can then undo some of the changes if necessary, and then click Save to save the changes to the Salesforce database. The animation below shows this process.

Export #
The export feature lets you export data records from your grid into a CSV format. You can select fields from the current grid’s object as well as fields from looked-up objects from the current object. To use the export feature, click Tools – Export. In the left pane of the popup, under “Select an object”, is a menu with the current object at the top, and then one item for each lookup from the current object. In the below example, the current object is Opportunity, and it has lookups named Account, Campaign, Created By, Last Modified By, Owner, Primary Contact and Secondary account. Clicking one of the items displays the fields from the corresponding object, and you can select any fields you need to include in the export.

Mass add tasks #
With the mass add tasks feature, you can add a task for each record selected. The Mass add tasks feature functions very similarly to the Mass Update feature, where you can add tasks to all records or add tasks to selected records.

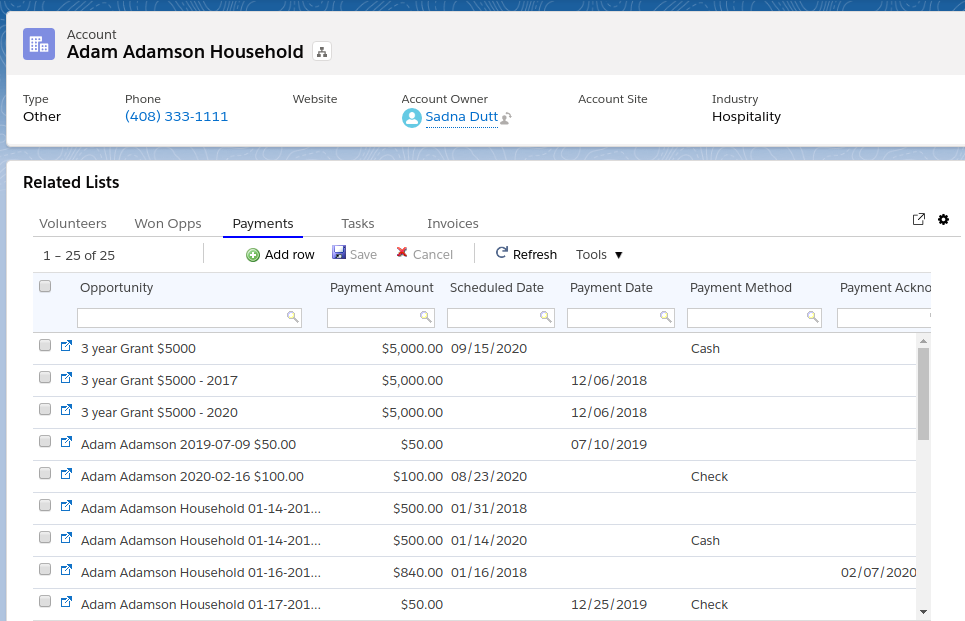
Grids in Salesforce detail pages #
Apsona Grids can also be embedded in Salesforce detail pages. For example, with an Account detail page, one can embed a tab set of Apsona Grids containing the Account’s Open Opportunities, Closed Opportunities, Contacts, and Pending Tasks. This provides all of the ease-of-use benefits of the grids within the related list.