- Installation
- Assigning licenses
- Single-table deduplication
- Accessing the Dedupe tool
- Editing a Dedupe Action
- Finding duplicates
- Cloning or replicating a dedupe action
- Match functions
- Matching CSV data
- Cleansing functions
- Troubleshooting and Usage Notes
- Account Name in orgs with Person Accounts enabled
- Out-of-memory errors
- "Anonymous" households in the Non-Profit Success Pack
- Merging Large Data Volumes
- Are there any limits to the objects you can merge?
- What does the Error code "Remote invocation failed, due to: status code:" mean?
- I see a wheel that says WORKING and just runs and runs, but the batch never completes. How can I fix this?
- What is your best practice when Deduping Large Data Volumes?
- Errors from Dedupes: What do they Mean?
The Dedupe and Match add-on enables you to
- identify and remove duplicate records in any single object in your Salesforce org, and
- find records in any single object that match the contents of a given CSV file.
Both these functions include powerful matching criteria such as fuzzy matching, company name or address reductions, and first name matching.
Installation #
To install the add-on into your Salesforce org:
- Ensure that you have Apsona for Salesforce already installed. If not, please install it from our AppExchange listing.
- Visit our AppExchange listing for the Dedupe and Match add-on, click the Get it Now button, and install it into your org.
- Click Setup – Installed Packages – Manage Licenses – Apsona Dedupe and Match, and assign licenses to your users.
- Click the Apsona tab in your org, and within Apsona, click Settings – Clear cache so that the newly-installed add-on becomes available.
Assigning licenses #
If you are seeing cases where a user with an assigned license is unable to see the Dedupe/Match menu item, please make sure that the user’s profile has access to all of the elements in the Dedupe package — specifically the Dedup Data custom object, and the Dedup Enabled checkbox on the Apsona Item object.
Single-table deduplication #
The deduplication process #
The general process followed when deduplicating records in a particular object (e.g., the Contact object) is an iterative one. In each iteration, you would set up some dedupe parameters, find the duplicates based on those parameters, and merge them. You would then revise the dedupe parameters to catch more duplicates, and merge the result. For example, as a first iteration, you might identify all Contact records that contain the exact same name and email fields, and merge those together. In the next iteration, you might loosen the First Name match function to match on loose First Names (e.g., treat Bob and Robert as the same), and then find duplicates and merge them. The process is iterated with progressively looser match criteria until very few duplicates remain.
Each iteration produces a list of duplicate groups, based on the criteria you set up. And within each such duplicate group, you would need to identify the so-called master record – the one that will be retained. After the merge is carried out:
- The master record will be retained.
- If the “Overwrite empty/null masterfields” checkbox is checked, data from the non-master records will be merged into the master as described below.
- The non-master records will be deleted.
- Any child records of the non-master records will be reparented to become children of the master record.
Accessing the Dedupe tool #
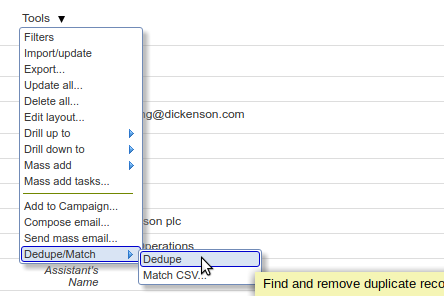
The single-table dedupe function is available via the Tools menu in every object within Apsona. For instance, to deduplicate Contact records, click the Contacts menu in Apsona, then click Tools – Dedupe/Match – Dedupe.
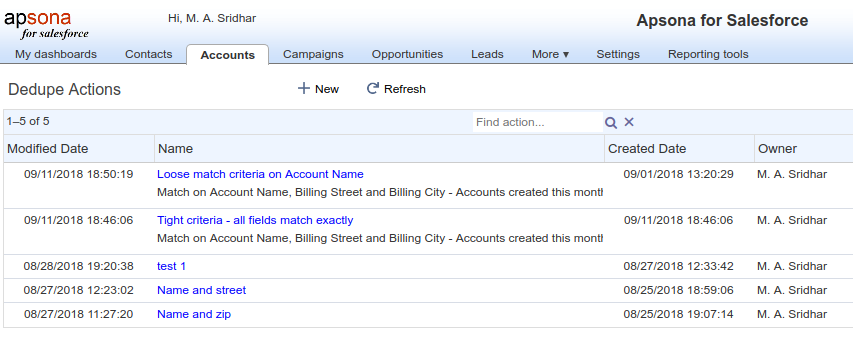
The list of available “Dedupe Actions” is then displayed. Each dedupe action contains all the parameters needed to specify how the action works, such as the names and match criteria for the fields being matched, the additional fields to show, and the filter conditions to use for the records being deduplicated. At this point, you can click the New button to create a new Dedupe Action, or click one of the actions in the list to work with that action.
Editing a Dedupe Action #
When creating or editing a Dedupe Action, you specify four groups of parameters:
- a filter condition that limits the range of records to be deduplicated;
- the match fields that should be used to match duplicate records;
- the additional fields that you wish to see alongside the match fields; and
- the master rules that the tool should use to identify the master record in each duplicate group.
Each of these groups appears in its own tab in the Dedupe Action Editor.
The Deduped Records tab #
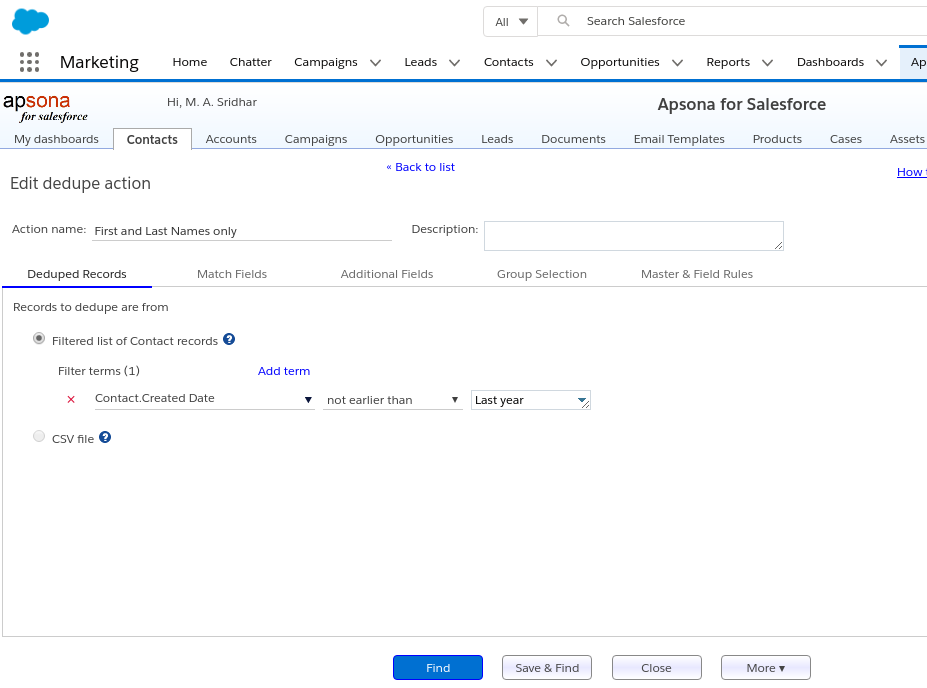
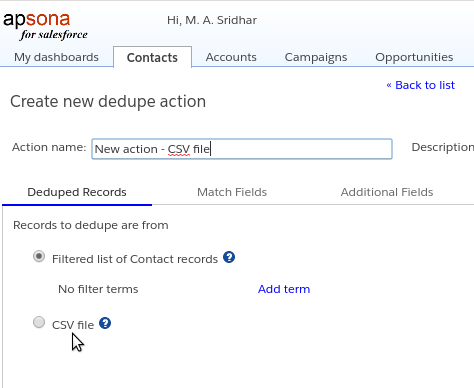
In this tab, you set the “record source” – the means of determining the records which are subject to deduplication. You have two choices, either a filter or a CSV file, and you can choose via the two radio buttons in this tab (see screen shot below).
Filter as record source #
If you select the “Filtered list of records” button, you are asserting that you want to deduplicate only the records meeting the filter you set up, and other records will not even be considered for deduplication. Such filtering is useful to improve performance. For example, suppose that a list of Leads were added recently, all of whose addresses are in California, and you therefore don’t wish to consider non-California Lead records. In this case, you might set a filter that says “Mailing State is California.” The dedupe tool will restrict its scope to just the records in this filter, i.e., records that don’t meet the filter conditions will not be considered for deduplication.
You can set filter criteria in much the same way filters are set everywhere else in Apsona. See this article for details about the filtering feature.
Using this filter enables you to speed up the deduplication process. But if you really want to include every record in your object, then simply set the filter criterion to “Created Date is not empty”.
CSV file as record source #
There are some situations where you have identified, using other methods external to this tool, the list of records to be deduplicated. Specifically, you would have available a list of record IDs of master and non-master records, in the form of a CSV file. In such a situation, you do not need the dedupe tool to identify the duplicate records, you only need it to merge the records. In such a situation, you would select the “CSV file” button for the record source. When you do so, you click the file selector button that appears, and upload a CSV file containing the record IDs.
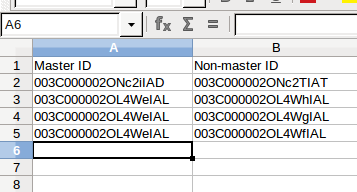
The CSV file you provide must contain two columns: The first column contains the master record ID and the second the non-master record ID. If you have a group of duplicates with more than one non-master, simply repeat the row with the same master record ID, and the other non-master ID. In the example screen shot below, notice that row 2 contains a master and non-master record ID, depicting a group of two duplicate records, one of which is master. Rows 3, 4 and 5 have the same master record ID but different non-master IDs, so they represent a group of four duplicate records, one of which (the one in the leftmost column) is master.
Available tabs #
It’s worth pointing out that if you select the CSV file input, you have already identified the master records, so there is no need for the Match Fields and Group Selection tabs. Those tabs will therefore only appear if you selected the Filter as record source; they will not appear if you select the CSV record source. Also, in the Master & Field Rules tab (see below), the Master Rules section will only appear with the Filter as record source, but not with the CSV file as record source.
Changing the record source #
You can set the record source only when creating a new dedupe action. Once you have saved the action, you can no longer change its record source: only the button corresponding to the action’s record source will be enabled, and the other button will be disabled.
Troubleshooting #
When using a CSV record source, if you find that no records (or fewer than expected) appear in the deduplication results grid below, your first step would be to ascertain that the record IDs in your CSV data are in fact available and valid record IDs in your Salesforce object. To do this, you can use Apsona’s search feature that matches record IDs, described in this article.
The Match Fields tab #
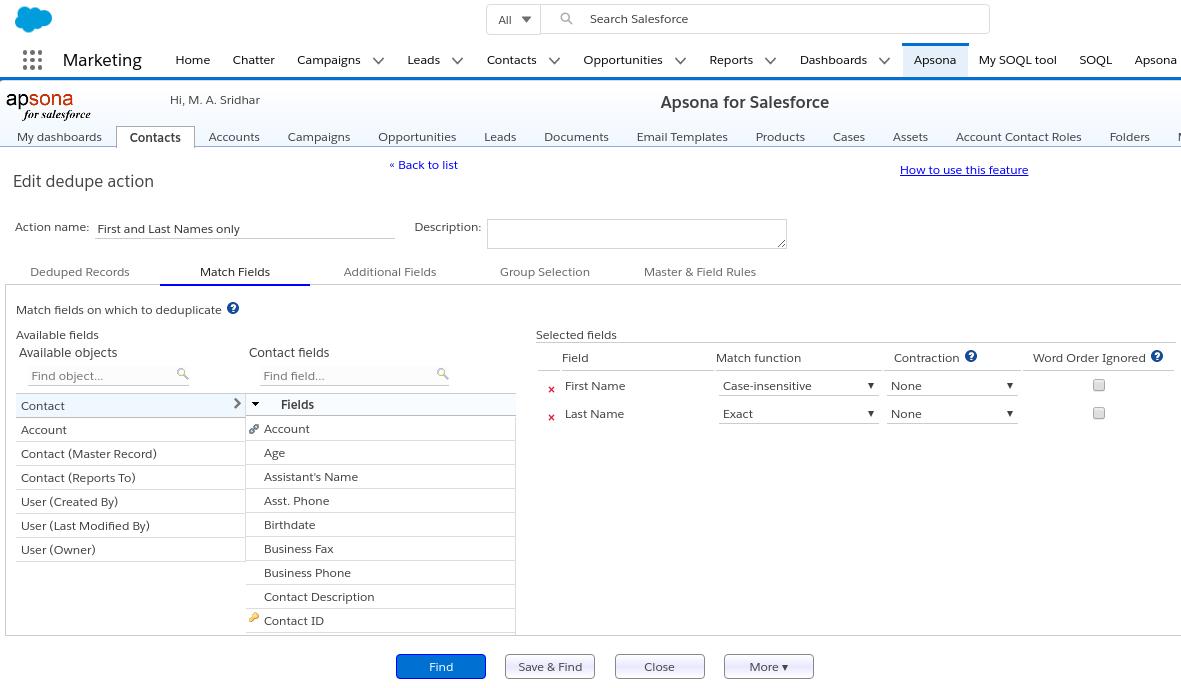
This tab lets you select the fields in your object based on which you wish to determine duplicates. For example, when deduplicating Contact records, you might select the First Name, Last Name and Email Address fields to indicate that two contact records that match on those three fields should be considered duplicates.
To select a match field, click the check box next to it in the Available fields panel on the left of the tab. Doing so will produce a row in the Selected fields area on the right. You can then select the match criteria for the field, including the match function, the contraction, and whether word order should be ignored. Match criteria are described later in this article.
The Additional Fields tab #
Once you have selected some match fields, you would also want to inspect some additional fields from each identified duplicate record so that you can decide which of the duplicates you wish to keep. To this end, you select one or more fields in the Additional Fields tab, and the values of those fields will appear in the deduplication results, as described below.
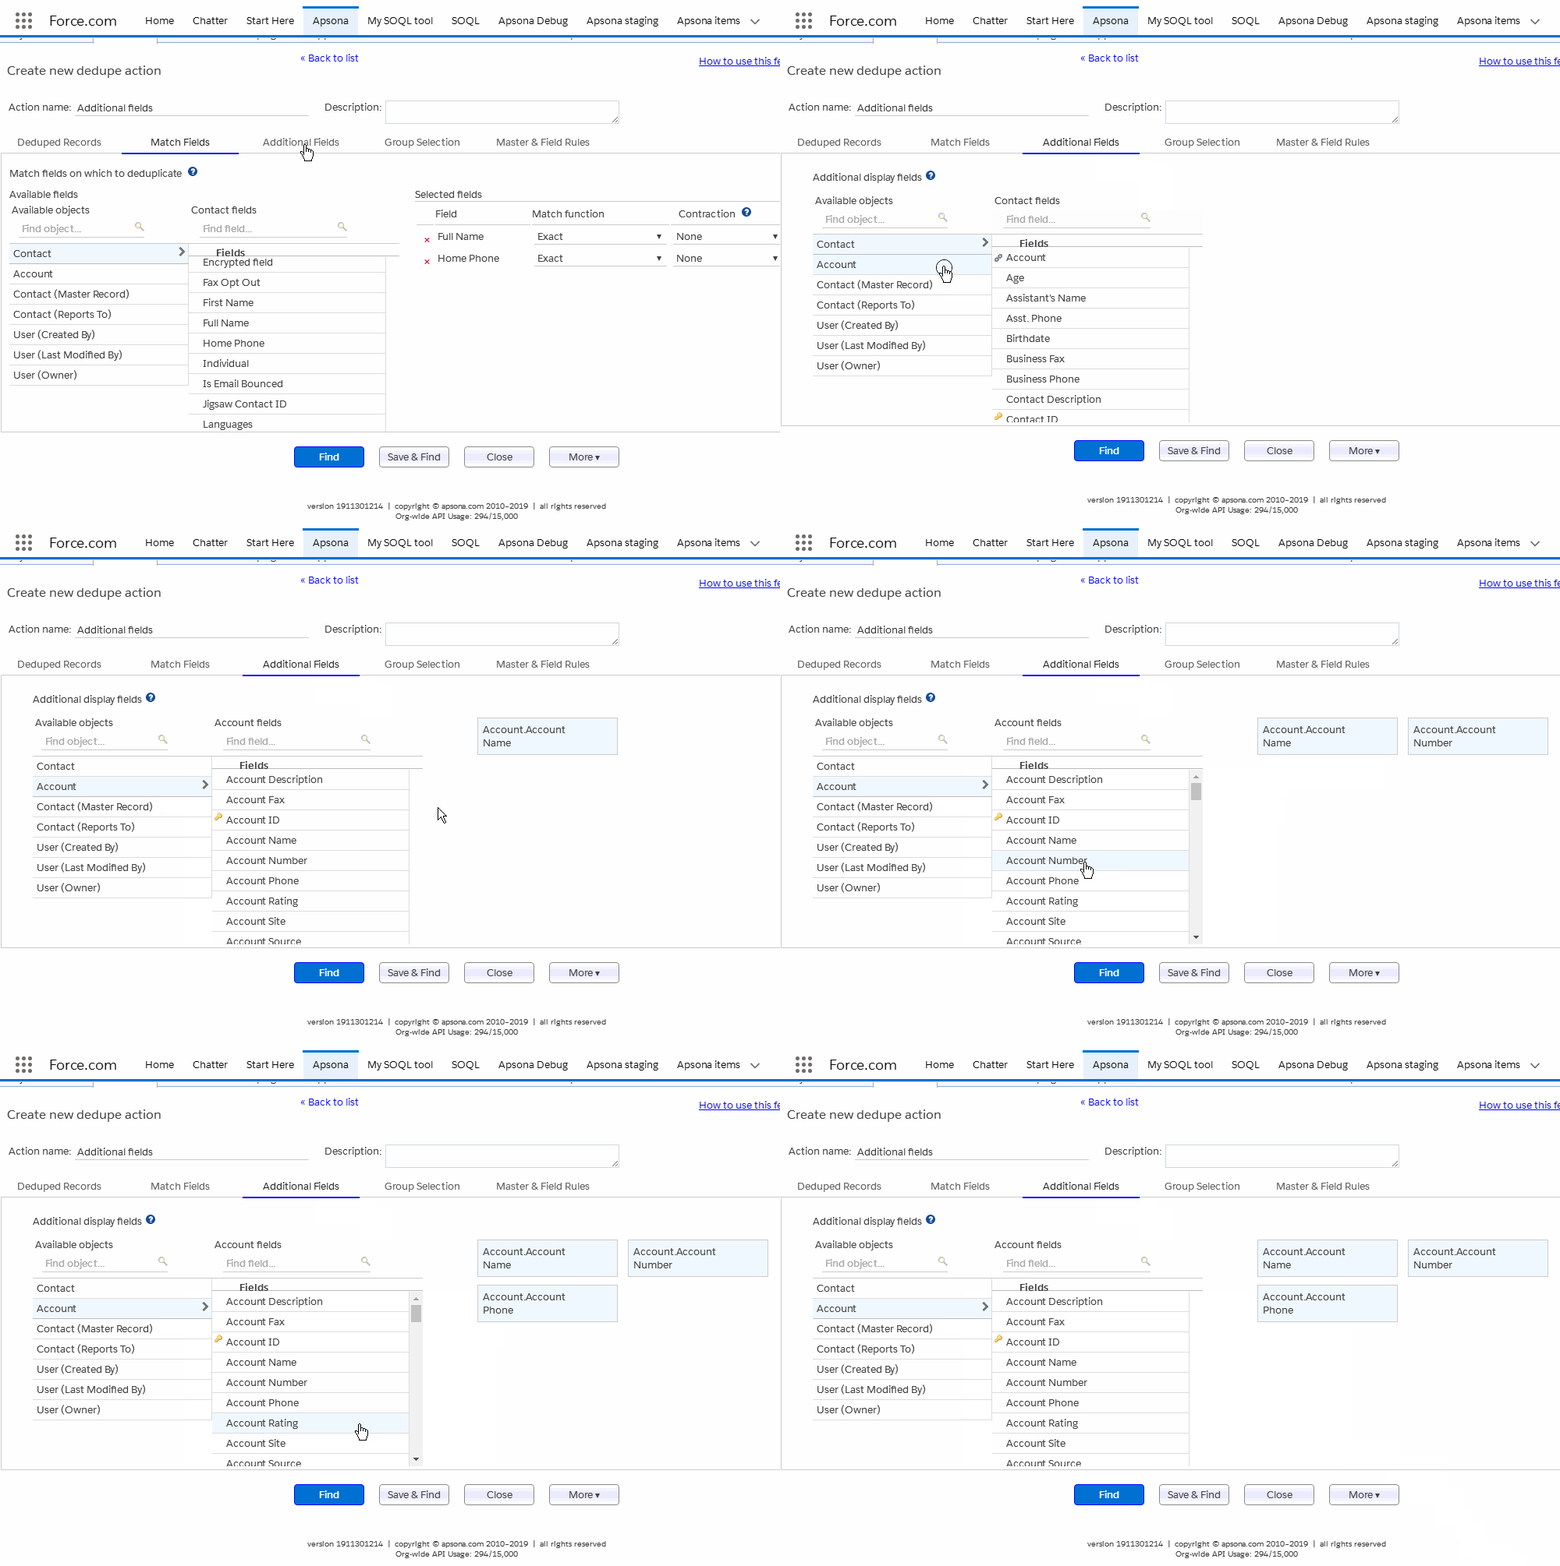
The additional fields tab lets you select fields from the current object as well as parent objects. For example, the screen animation below shows the Contact object, which (in this example org) includes two lookups to the Account object, one named Account and the other named Primary Affiliation. So both lookups are available in the selector. To select an additional field, click the lookup and object you wish to use, and then click the field within that object. The field now appears in the list on the right. (Click the image to replay the animation.)
The Group Selection tab #
This tab lets you control the groups of records selected for deduplication, based on the number of records in the displayed groups, or the content of at least one record in each group.
By record count #
At the top of the tab, there is the option to show only groups that contain “at least” or “at most” a particular number of records. The default setting is to show groups with at least two records, but that has essentially no effect because every group must have at least two records (one master and one non-master). But you can change that setting if, say, you wanted to see only those groups with 4 or fewer records, by setting it to “at most 4”.
By record field contents #
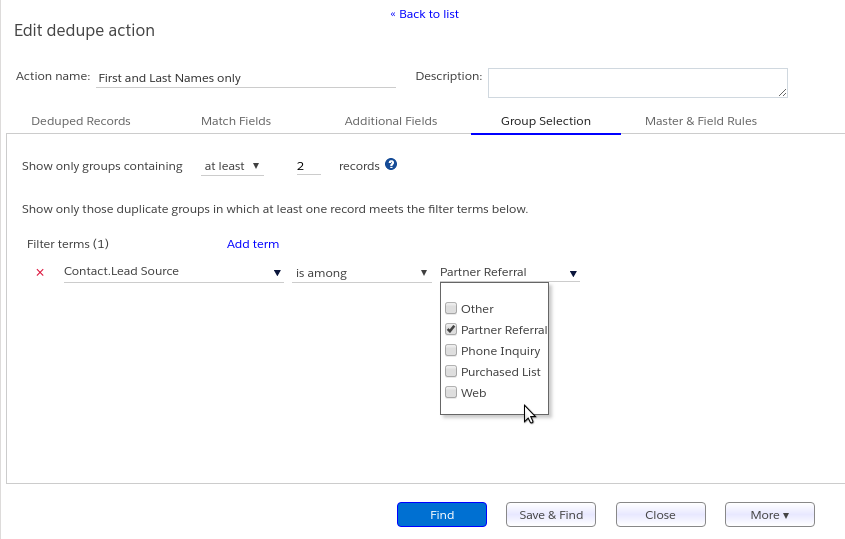
You can also limit the displayed groups based on the content of records in the group. For instance, as in the screen shot above, you can require that at least one record in each group being considered must have a Lead Source of Partner Referral.
Notice that this setting is different from the filter setting in the Deduped Records tab, in that the filter setting limits the entire range of records being deduped. For example, if you set a filter term requiring Lead Source to be Partner Referral, then any record that doesn’t have such a Lead Source will be omitted altogether. In other words, a filter setting of “Lead Source equals Partner Referral” in the Deduped Records tab means that none of the records with other Lead Source values will even be considered for deduplication; but the same setting in the Group Selection tab means only that at least one record in each group must have that Lead Source value.
This distinction is useful in cases where, for example, you have some old Leads that have a Lead Source of “Partner Referral”, which you regard as your original source of truth; and you want to deduplicate any new Leads against those existing old Leads. In such a case, you would use the Group Selection setting rather than the filter in the Deduped Records tab.
The Master Rules tab #
Within each group of duplicates that is found, you would need to identify one record as the master record – the one record from the group that will be retained after merging duplicates. The data from the other “non-master” records in that group will be merged into the master, and the non-master records will be deleted. (They will still be available in the recycle bin, until you empty the recycle bin.) The Master Rules tab lets you set up a few rules via which the dedupe tool automatically identifies a default master record in each duplicate group it finds. This way, you do not need to inspect every single duplicate group to identify a master record in it.
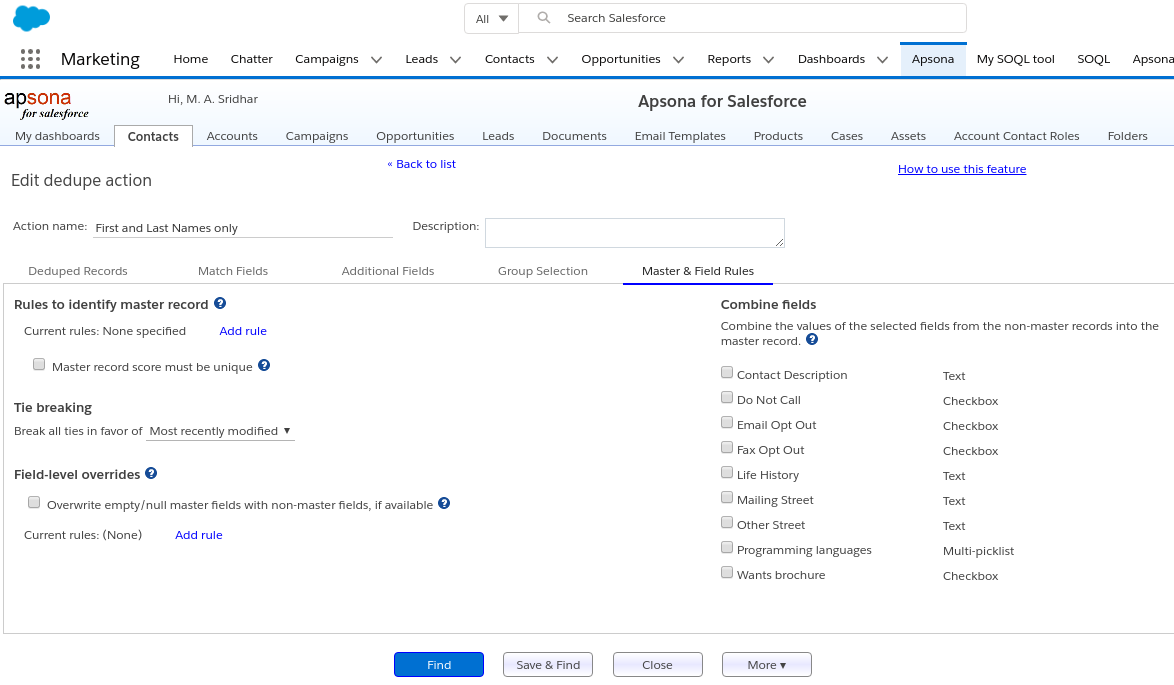
The Master Rules tab, when empty, appears as in the screen shot below. It contains sections for master rule identification, tie breaking, field overrides, and field combining.
(Note that the master rules section will not appear if you have selected a CSV file as record source, as noted above.)
Managing master rules #
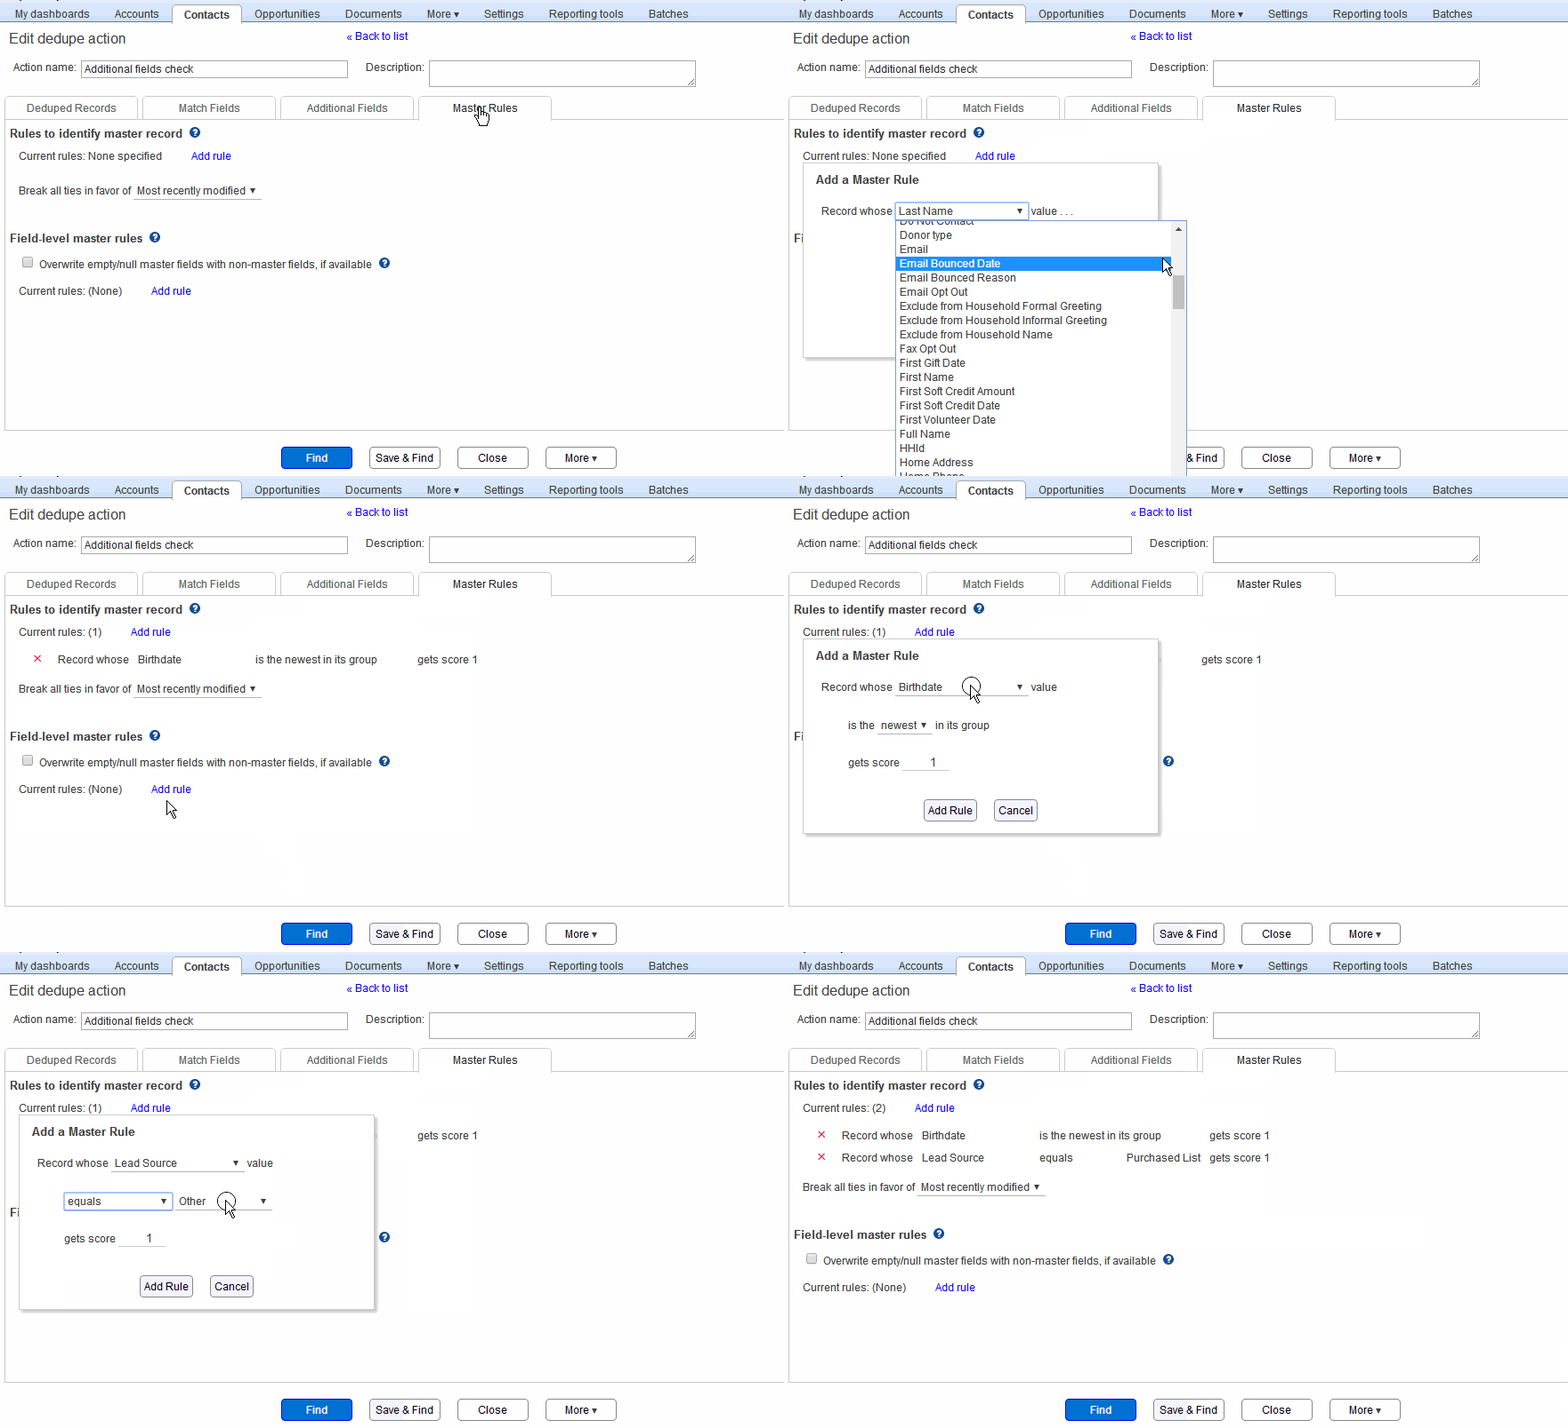
To specify a new master rule, click the “Add rule” button in the master record section, as shown in the animation below. This displays the Add rule popup. Here, you can select a particular field, associate an operator and optional value with it, and specify a score. And the master record in each group is the one with the highest score. Ties are broken according to what you specify in the “Break ties in favor of..” choice. Here are some examples, as in the animation below:
- Select the Contact’s Birthdate field, select “is newest” as operator, and give it a score of 1. The rule then stipulates that in each group of duplicates, the record with the highest value of the Birthdate field receives a score of 1.
- Select the Contact’s Lead Source field, select “equals” as operator and “Purchased List”, and give it a score of 1. This rule gives additional weight to records that have “Purchased List” as Lead Source value in them.
You can remove a rule by clicking the red x button at the left of the rule. (Click the image below to replay the animation.)
Ambiguous scores #
In some cases, you might find that your scoring rules produce an ambiguity, in that there is more than one master record with the same score. For example, your rules might yield a duplicate group containing 5 records, three of which have a score of 10, and two have a score of 15. The latter two would both qualify to be master, and the dedupe tool would have to use the tie-breaking rule to determine which one is master. And in such situations, it is sometimes better to simply not merge the group with such an ambiguity, and then make another pass with a more refined set of master rules, perhaps in a separate merge action.
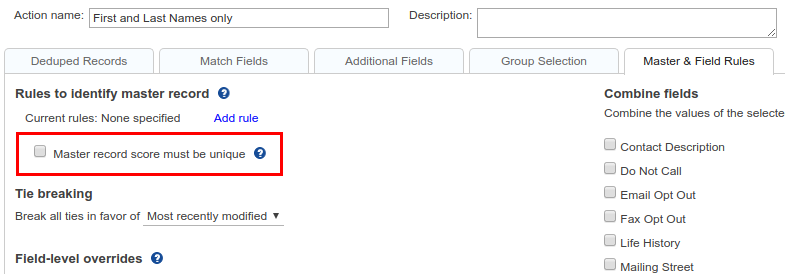
To cater to situations like this, there is the “Master record score must be unique” checkbox.
If you check this box, the tool will avoid identifying master records for any groups that have the above ambiguity. So you won’t see the master row checked in such groups. You can proceed with clicking the Merge All button, which will only merge the groups for which master records have been identified. (Note, though, that if you can still manually identify a master in such a group by manually clicking a row in it.)
Field-level overrides #
As noted above, the master record is the one that is retained after deduplication, and the non-masters are deleted. In some situations, you would want to retain some of the data in the non-master records, by carrying that data into the retained master record. For example:
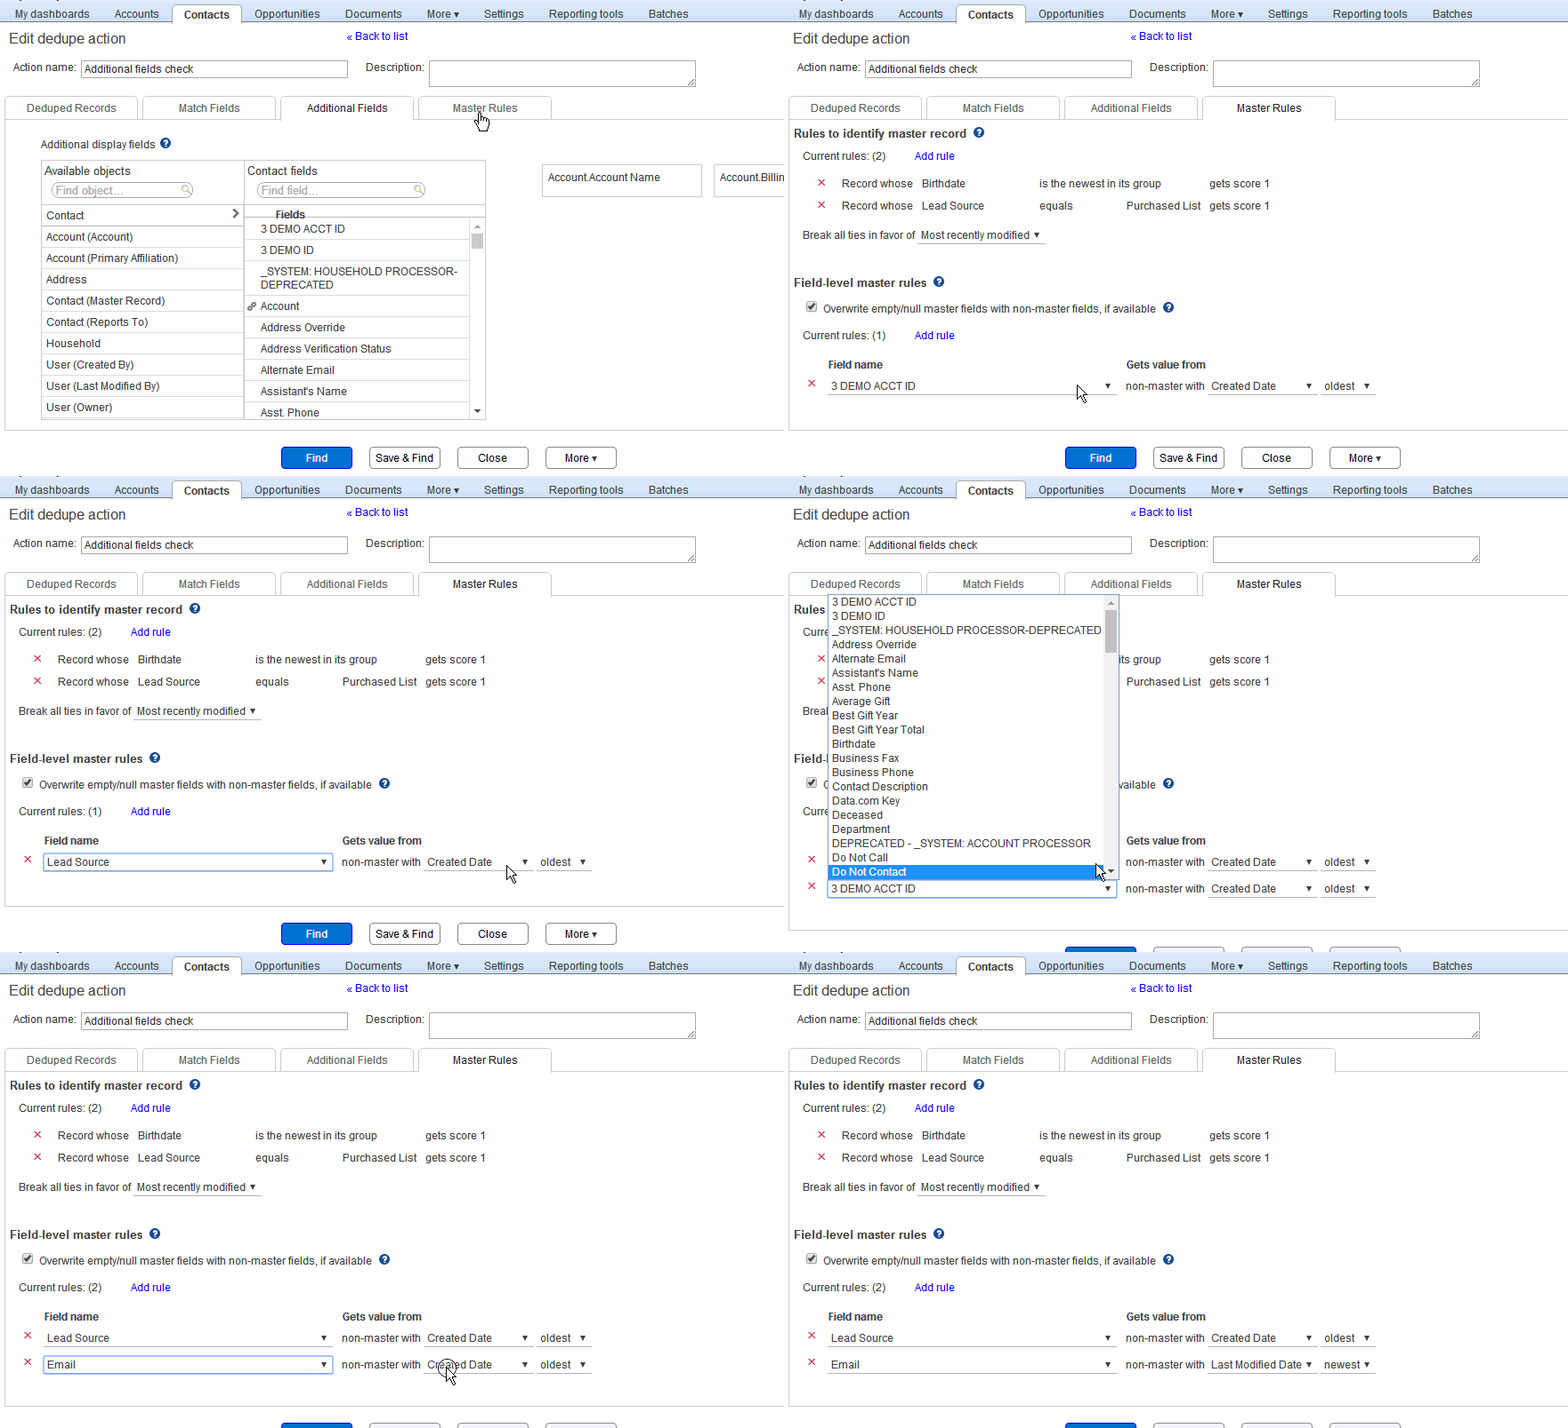
- You might want the Lead Source field to always contain the value from the oldest record in the group (so that you can retain the very first source where you got the Contact).
- You might want the Email field to always be from the most recently modified record, so that you can retain the Contact’s most current email address.
To delete a field override, you simply click the red x button at the left of the rule.
The animation below shows the above two override rules being added. (Click the image to replay the animation.)
In addition, you can check the “Overwrite nulls in master” to ensure that, if there is a field that is empty in the master but filled in a non-master, the non-master value is copied over to the master during deduplication. This ensures that you don’t lose data.
Combining fields #
When you merge the data from a non-master into a master record, the non-master is deleted. But you might want to retain some of the data from the deleted non-masters by combining them into corresponding master record fields. The “Combine fields” panel enables this feature.
The “Combine fields” panel shows a list of all the fields of type text, text area, rich text (HTML), multi-picklist or checkbox. If you select a field in this list, the data for that field found in the non-master records will be combined into the master record’s field as follows:
- Text fields: The contents of each selected non-master text field will be concatenated into the corresponding master text field, separated by spaces.
- Text Area fields: The contents of each selected non-master text area field will be concatenated into the corresponding master text area field, separated by line breaks.
- Rich text fields: The contents of each selected non-master rich text field will be concatenated into the corresponding master text field, separated by HTML
tags (HTML line breaks). - Multi-picklist fields: If a multi-picklist value is checked in one of the non-masters, it becomes checked in the master. Thus the master ends up containing the “union” of all the picklist choices in the master and the non-masters.
- Check boxes: If the field is checked in one of the non-masters, it becomes checked in the master. Thus the master field ends up with the OR value of that field across the master and non-master records.
Finding duplicates #
After setting up a Dedupe Action as described above, click the Find button. This extracts the data records from Salesforce, applies the parameters in the Dedupe Action, and displays a grid below, showing the duplicates. You can also click the Save and Find button to save the Dedupe Action so that it appears in the actions list.
The Deduplication Results list #
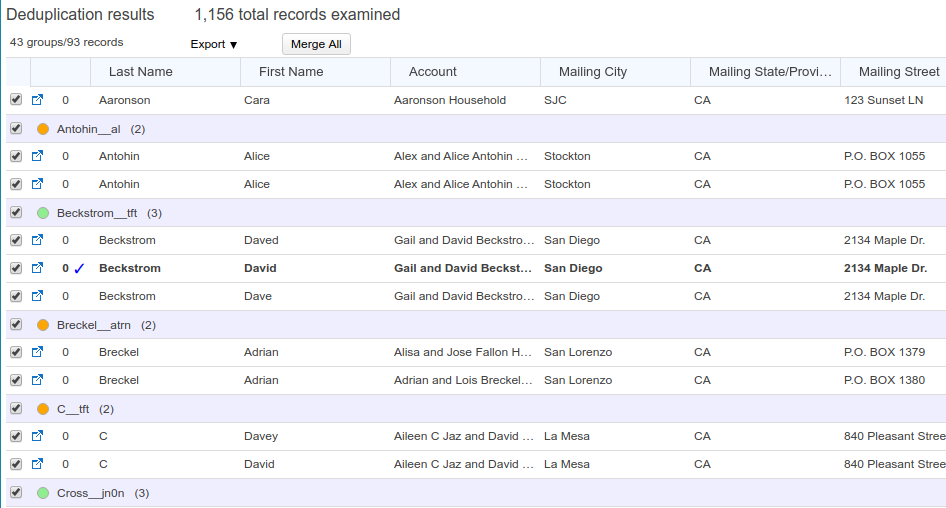
The deduplication results are shown in a list of groups, with each group captioned with the “signature” of the group (more about signatures below) and the number of records in the group. At the top left of the list is shown the total number of duplicates and the number of groups. At the left of each row, there is an icon to open the record in Salesforce, and a score indicator showing the records score under the current master rules in the merge action.
Selecting a master record #
To select a master record in the group, simply click the row for the master, and the row will appear in bold, with a check mark at left. If you want to un-select it, simply click the row again. You can select at most one row in a group as master.
Selecting records to merge #
Each row in the grid – whether a data row or a grid caption row – shows a checkbox at the left end. If you un-check the checkbox for a data row, you are asserting that the row should not be included for merging. If you un-check the checkbox for a caption row, you are asserting that you want that caption row’s entire group to be omitted from merging, and Apsona will automatically un-check all the rows in that group.
To qualify for merging, a group must contain at least two rows, one of which must be master. Each caption row includes a status indicator – a circle that turns green when the group is ready for merging (i.e., has one master and at least two records selected), and turns orange otherwise.
When you hover your mouse over the caption row for the group, two buttons appear in the row, for removing the group and for custom merge. Clicking the remove button simply removes the entire group from consideration for merging, but has no effect on the data records. By clicking that button, you’re telling the dedupe tool to ignore that entire group.
Exporting deduplication results #
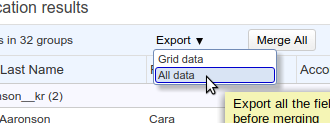
The Export button at the top of the results list includes two options: “Grid data” and “All data”.
Both options produce CSV files as results. The Grid data option produces a CSV file containing the duplicate records with signature information, which can be used by a Domain Expert in your organization to vet the correctness of the duplicate information. The “All data” option produces a full backup of all the records in the result list, including all the fields of each record. This can be useful as a safeguard in case of errors during the merge, so that you can restore your data to the state before the merge.
Custom merge #
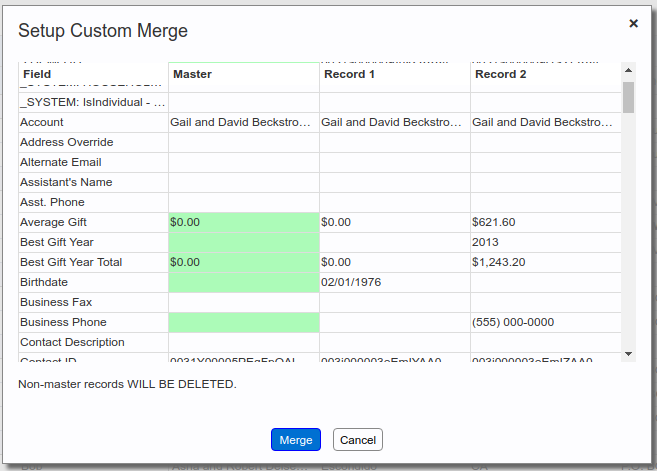
A “custom merge” is a one-off merge of a single group of duplicates. To perform a custom merge, you first select a master click the custom merge button within the duplicate group caption. This produces a popup such as the one below.
The leftmost column in the popup shows the modifiable fields in the object. (Non-modifiable fields aren’t shown, since you can’t merge data into them anyway.) The subsequent columns show the data in the master and non-master records of the group, in that order. Each row in the popup corresponds to a single field of the object. Within each row, if there is a discrepancy between the master’s data and the data in any of the non-master records, the master cell is highlighted in green, indicating the value which will be used for the merge. If you want one of the non-master values to be used for a particular field, simply click its value, and it will be highlighted.
After having selected the values you want to merge, click the Merge button. This will merge the data in the non-master records into the master, and delete the non-master records. Also, the group you merged will be removed from the results list.
Mass merge #
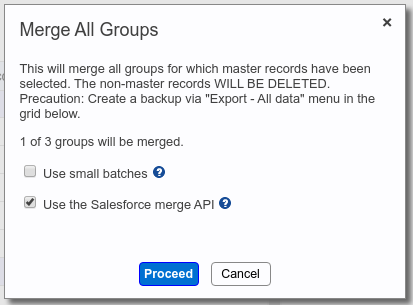
You can also merge, in one click, all the groups for which master records have been identified. To do this, click the Merge All button at the top of the list. This produces the popup shown below.
Notice that this popup will merge only the groups for which master records have been selected. If you have set up masters rule for the Dedupe Action, the results list will automatically have a master in each group. But you can still de-select masters on a per-group basis before performing a mass merge.
Using “small” batches #
There is a Salesforce API limitation that requires merges to be done in batches of at most 200 groups. So the Apsona Dedupe add-on breaks down your record groups into such batches, so that you as an end-user are not affected by such a limit. Normally, the Dedupe add-on code tries to use 200 as the batch size. But there are cases where, for example, a back-end trigger has not been properly bulkified and is unable to tolerate large batches, so you might see error messages with merges failing because of trigger errors. For such situations, you might try checking the “Use small batches” box. Doing so will reduce Apsona’s batch size from 200 to 5, and that is usually adequate to circumvent such trigger issues. Using smaller batch size can, however, result in more API calls being used.
Using the Salesforce merge API #
This checkbox determines whether the dedupe tool should use Salesforce’s native merge API, or it should use its own merge algorithm.
- This checkbox is only visible if you are merging Account, Contact or Lead records, because those are the only ones for which Salesforce offers a native merge API. If you are merging records from some other object, the dedupe tool will have to use its own algorithm anyway, so this checkbox isn’t shown.
- When you are merging Account, Contact or Lead records, however, there can be cases where back-end triggers or flows can cause issues with the native merge API. (Such an issue currently exists with EDA orgs.) In such a situation, you can try un-checking this box so as to tell the dedupe tool to use its own algorithm instead. Please bear in mind that the dedupe tool’s merge algorithm can use more API calls than the native API.
API usage #
When merging duplicates in the Account, Contact or Lead object, the add-on uses Salesforce’s native API for merging records (except when you uncheck the “use Salesforce merge” button as noted above). But for merging other objects, it uses a custom merging algorithm, because there is no Salesforce native API available for other objects. Some consequences of this approach should be pointed out:
- During the merge process, child records of non-master records must be automatically reparented to the new master record. For instance, when merging Campaign records, any Campaign Member child records of non-master Campaigns must become children of the new master record. But there are cases where the lookup field in the child record is not modifiable, e.g.,
- the lookup field in the child is part of a master-detail relationship, or
- the lookup field is not allowed to be modified (e.g., a lookup field whose deletion policy (“what to do if the lookup record is deleted”) says “don’t allow deletion of the lookup record that’s part of the relationship”)
In these cases, we cannot simply set the lookup field in the child record to point to the new master, since the lookup field is not modifiable. So the algorithm copies (or “clones”) the child record, makes the copy become a child of the new master, and deletes the old child record. This means that the Created and Last Modified Date fields of the child records cannot be carried over from the old child records.Note also that if we have to clone the child record, we lose any Field History records associated with the child object.
- Additionally, some errors can occur when reparenting child records, usually from business logic implemented via triggers or validation rules. For instance, when merging Campaign records, you might see errors saying something like “the Contact or Lead is already a member of the Campaign.” This can happen because, before the merge, the same Contact was a member of both the master and a non-master Campaign, so the merge causes more than one Campaign Member record for the master with the same Contact. Such errors are reported in CSV file available for download when the merge is complete.
Cloning or replicating a dedupe action #
When working with a particular dedupe action, you can click the More button in the button bar at the bottom and then click “Clone this action…” to create a copy of the action.
Match functions #
When finding duplicates, match functions let you decide what it means for two field values to “match.” For example, the “Exact” match function requires its two fields to match exactly, while the “Case-insensitive” match function treats two values as the same if the differ only in upper or lower case. There is a range of match functions available for use in different situations, and we describe them here.
Contractions are available and can be applied in addition to match functions. Contractions are of two types:
- Alphanumerics only, which removes all characters other than alphabets, numerals, the & (ampersand) sign and spaces. This contraction is useful where, for example, you wish to catch duplicates which differ only in punctuation characters, e.g., you want to treat
100 Main St., Apt. 100as a duplicate of100 Main St Apt 100. - Fuzzy matching, which essentially treats two values as the same if they sound the same when pronounced. This contraction uses the well-known metaphone algorithm to decide whether two values match.
Additionally, you can check the “Word Order Ignored” box if you want two values to be treated the same if they differ only in word order, e.g., you wish to treat County of Santa Clara as a duplicate of Santa Clara County.
| Function | Description |
|---|---|
| Exact | Allow only exact matches. |
| Case-insensitive | Allow matches only if the two values differ only in case (i.e., in upper- or lower-case). |
| Street address | Treat the values as street addresses, in which commonly-used address abbreviations are treated as equivalent. This function also ignores case (upper or lower case) of the values. For example, these two values are treated as the same:
	100 Main Street, Apartment 100
    100 Main St Apt 100
Below is the list of words treated as equivalent to their corresponding abbreviations. apartmentapt
avenueav
boulevardblvd
circlecir
courtct
highwayhwy
laneln
placepl
streetst
northn
souths
easte
westw
northeastne
southeastse
northwestnw
southwestsw
suiteste
|
| Street address – relaxed | Similar to Street address, except that two values that differ by the presence or absence of one of the aabbreviations are also treated as equivalent. For example, unlike the plain “Street address” function, the relaxed version treats these values as matching:
	1002 El Camino Avenue
    1002 El Camino Ave.
    1002 El Camino
|
| Zip code – 5 or 9 digit | Match the two values if they differ only in that one is a 5-digit number and the other is a 9-digit number, ignoring spaces and dashes. |
| Company name | Treat the values as company names, in which commonly-used company-related words are treated as equivalent. This function also ignores case (upper or lower case) of the values. For example, these values are treated as the same:
	Acme Corporation
    acme corp.
    Acme corp
Below is the list of words treated as equivalent to their corresponding abbreviations. &and
incorporatedinc
hospitalhosp
corporationcorp
llcllc
limitedltd
financialfin
companyco
servicesvc
servicessvc
|
| Company name – relaxed | Similar to Company name, except that two values that differ by the presence or absence of one of the above words are treated as the same. For example, these values are treated as matching:
	Acme Financial Corporation
    acme fin
    acme corp
|
| First 2 words | Treat the values as matching if their first two words match, ignoring case. |
| First 3 words | Treat the values as matching if their first three words match, ignoring case. |
| First 4 words | Treat the values as matching if their first four words match, ignoring case. |
| First letter | Treat the values as matching if their first letter matches, ignoring case. This can be useful when, for example, you want to use the first letter of a Contact’s first name along with the last name as the match key, thereby treating John Smith and J. Smith as the same person. |
| First 2 letters | Treat the values as matching if their first two letters match, ignoring case. |
| First 3 letters | Treat the values as matching if their first three letters match, ignoring case. |
| First name | Treat the values as matching if they refer to the same North-American nickname, e.g., Bob is treated as equivalent to Robert. |
| North American Phone | Allow matches only on 10-digit numbers, ignoring punctuation characters. |
| Salesforce Record ID | Allow matches if both the values are 15-character or 18-character alphanumeric values. |
| Email Domain | Match if the values have the same top-level email domain. For example, john@us.mycorp.com, jsmith@mycorp.com and jj@ca.mycorp.com will all match because they all share the same top-level email domain mycorp.com. |
| Website URL | Allow matches if both the values look like the same website URL, ignoring the https://, http://, and www. prefixes. |
Matching CSV data #
This function can match an existing input CSV data file against the records in any Salesforce object, where “matching” involves using the match functions and features available in the above Single Table Dedupe functionality. The result of such a match is a new CSV file that contains all the rows and columns of the input file, along with data from the records that were matched.
As a simple example, suppose you have a CSV file that looks like this:
| First name | Last name |
|---|---|
| Bob | Smith |
| Dave | Jones |
Suppose further that you have two records similar to Bob Smith in your Contact object, and none matching Dave Jones. By matching this data against your Contact object’s records using the Match CSV function, you would be able to produce a result like this:
| First name | Last name | Contact.Contact ID | Contact.Full Name | Contact.Account Name |
|---|---|---|---|---|
| Bob | Smith | 003000000000012345 | Robert A. Smith | Acme Drilling Corporation |
| Bob | Smith | 00300000000001a345 | Rob Smith | Alpha Pneumatics Inc. |
| Dave | Jones |
In the above list that shows the result of the match, the two records matching Bob Smith are both available. The original row for Dave Jones is also available but has no associated data, thus indicating no match.
The matching process #
To begin the process, navigate to either the console view (“All records”) or the Tabular View for your object in Apsona, and access the Tools menu.
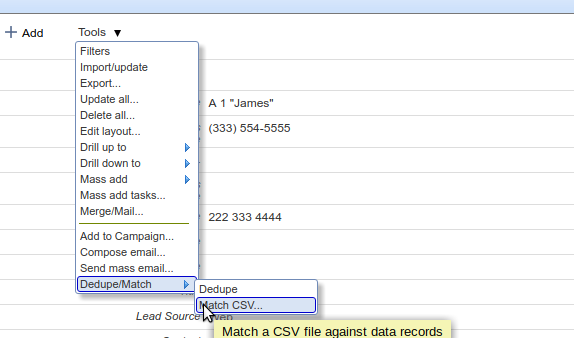
- Click the “Match CSV…” menu item under the Dedupe/Match menu under Tools. (Once you have a license available for the Dedupe/Match add-on, this menu item is available for all objects, both native and custom.)
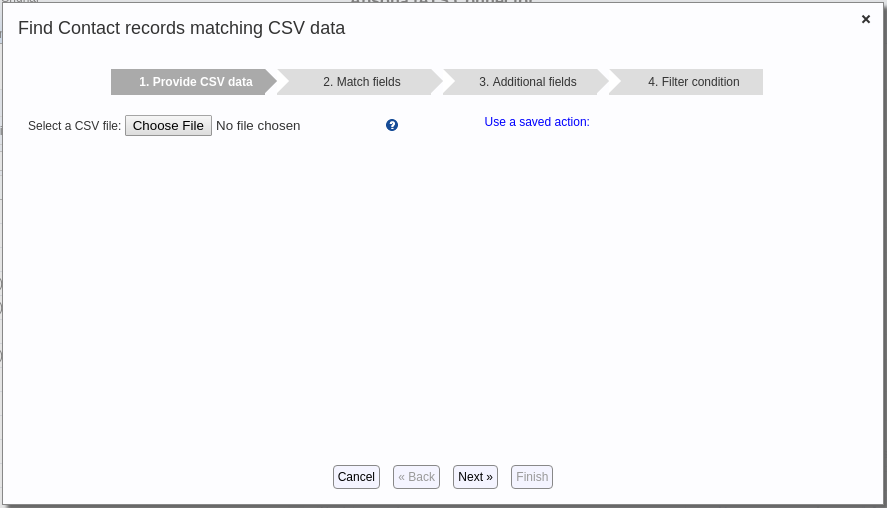
The Match CSV popup appears. The example below illustrates the process for the Contact object, but the process is similar for other objects as well.
- Click the “Choose File” button and select a CSV file (from your computer) that you wish to use for matching. The popup then shows a preview of the CSV file, with just the first four records, so that you can decide whether that is the correct CSV file you want to work with.
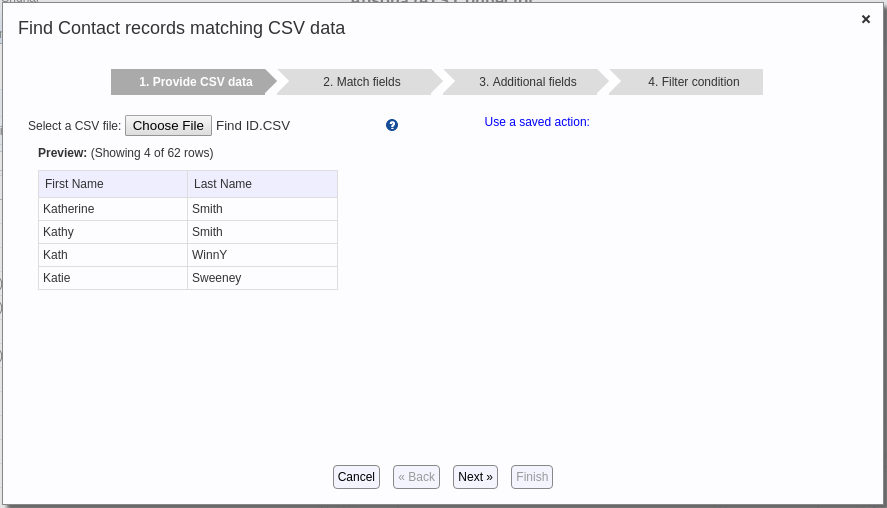
- Click the Next button. This produces Step 2 of the popup.
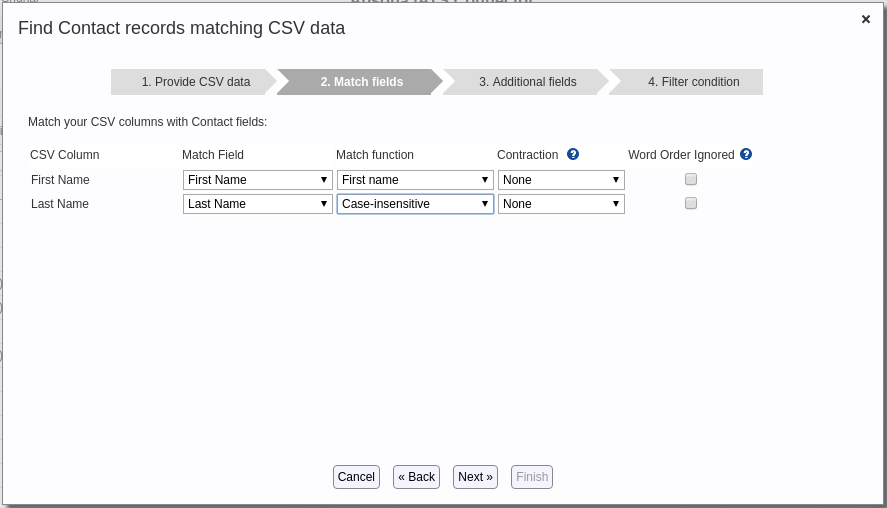
In this step, select the object’s fields you want to match against each CSV column. (You do not need to match all the CSV columns, just the ones that you want to use. Any unmatched column data will be retained in the output.) Also select any necessary match functions, contractions or “Word Order Ignored” options you might need. These aspects work in the same manner as described above with the dedupe function. - Click Next to produce Step 3 of the popup. Select any fields you want to include in the output file.
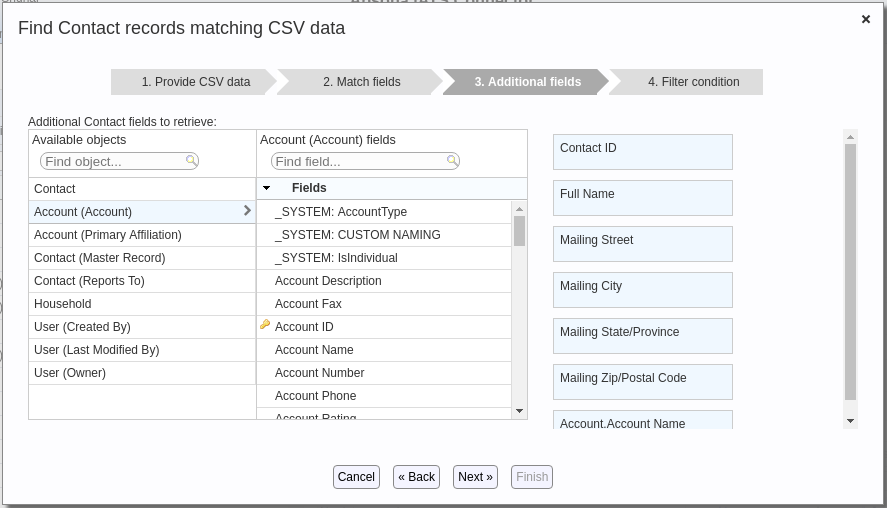
Notice that:- You can include fields from the current object as well as parent objects. In the example of the above screen shot, fields from the Account and the Primary Affiliation Account (available from a second lookup on the Contact record) are available, among others.
- You can include a field even if it is used as a match field in step 2. This is sometimes needed, e.g., when you are doing a fuzzy match on First Name, you want the actual matched First Name to be available in the output.
- Click Next. This produces the last step of the popup, in which you set filter criteria to restrict the records against which to match your CSV data. If you don’t restrict the records in any way (e.g., you set a filter that says Created Date exists, which would be true for all records), you would match against every record in your object, and that can cause slow-down if the object contains lots of records. So the filtering mechanism is just a check to limit the range against which to match.
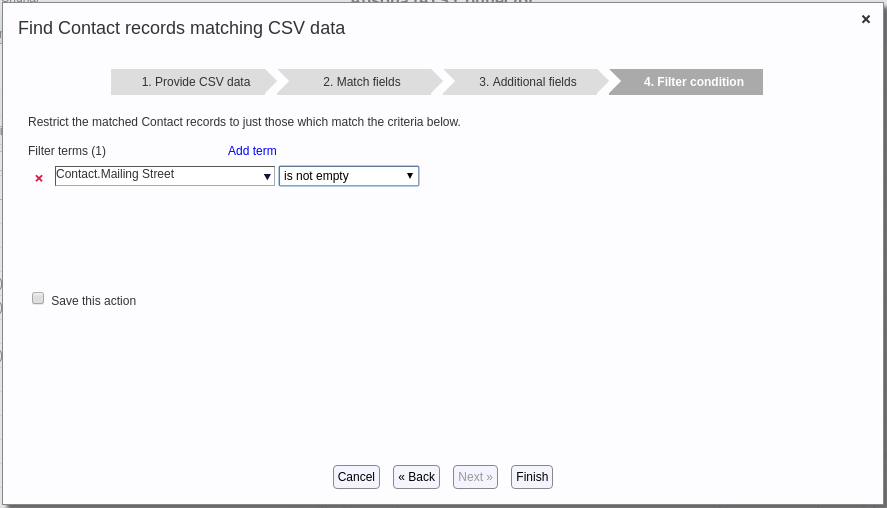
- Click Finish. This runs the Match CSV action and produces a “Download results” link. Clicking that link produces a CSV file like the one below.
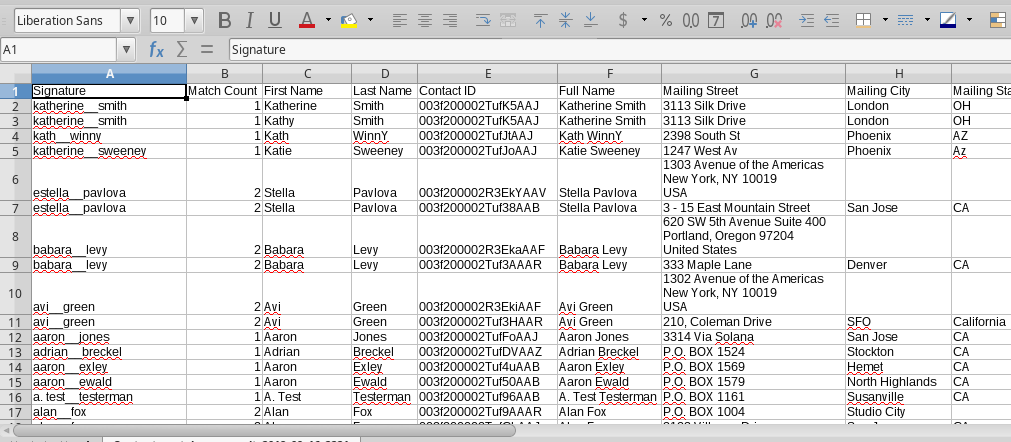
- The first column of the file contains the “signature” that was used to match the CSV data against Salesforce records. As with deduplication, two records with the same signature are deemed matching records. In the above example, the first two records matched “Katherine Smith” and “Kathy Smith” which both turned out to be the same contact, so the Contact ID in column E is the same
- If the same CSV row matches more than one data row based on the match criteria you selected, then the field values from all the matching data rows will be included in the CSV output. In the above example, notice that rows 8 and 9 have the same first and last name, but match two different contacts. So the CSV rows are repeated.
- The second column indicates the number of matches found. This rows 8 and 9 show a count of 2, as do rows 6 and 7.
Cleansing functions #
Dedupe & Match also comes with data cleansing functions that can help you identify and normalize malformed data. This information is here.
Troubleshooting and Usage Notes #
Account Name in orgs with Person Accounts enabled #
If your org has Person Accounts enabled, Salesforce does not allow modifying the Name field of an Account record when deduplicating with the native merge API. Therefore, the dedupe add-on will not change the Name field of Account records when merging duplicates. In other words, the value in the Name field of the master record will be retained even if the user chooses to overwrite it with the Name field of a non-master.
Out-of-memory errors #
In some situations, you might see your browser run out of memory and crash during a dedupe proocess. With Google Chrome, you will see a screen like the one below. Other browsers will display similar errors.
The usual cause of memory shortage for dedupe is one or more of these factors:
- The volume of records being deduped is too large for the browser memory.
- There are too many fields being combined (in the “combine fields” panel).
- The “overwrite empty/null fields” is checked.
The second factor above requires the dedupe code to read the values of all the fields being combined, and to create a combined value in memory whose size can be large when running dedupes on many records. The third factor requires that the dedupe code should read every single field on the object, in every record being deduped, in order to find the ones that are null in the master and non-null elsewhere. So the combination of these factors causes lots of memory usage.
One way to mitigate this problem is to reduce the number of rows being deduped, via the filter settings in the first tab. One possibility is to set the filters based on the match fields being used. For example, if you are using First Name as a match field, you can add a filter term requiring First Name to be non-null to reduce the range of records. You can also dedupe in phases: Phase 1 with First Name < "D", phase 2 with First Name >= “D” and First Name < "G", and so on. This will reduce the number of records in each phase, so that it is more likely to stay within the memory limits for your browser.
“Anonymous” households in the Non-Profit Success Pack #
When you merge two contacts, you might be left with an empty Account that has no contact. The NPSP trigger automatically converts this empty Account as an ‘Anonymous’ Household. For example, let’s say you have to merge John Doe1 [contact] and John Doe2 [contact], with John Doe1 as the Master. Once the merge is completed, the John Doe2 Household becomes an Empty Household [Anonymous Household]. After the dedupe process is complete, you can find all the Anonymous Households that were modified in the last hour that has no Contact children and delete them.
Merging Large Data Volumes #
Are there any limits to the objects you can merge? #
Apsona Dedupe and Match provides the ability to merge any Salesforce object for duplicates and merge them (overwriting/combining fields and re-parenting related records to the winning parent record). Apsona Dedupe and Match has two checkboxes after clicking “Merge All” to provide controls on the Merge Operation. You should generally use the “Salesforce merge API” for Contacts, Leads, Accounts unless your org specific triggers or automations are preventing the merges. Then you can uncheck the field and use a custom merge algorithm instead. The number of API calls will increase with a custom merge – so plan accordingly in the number of API calls available in your Salesforce Org.
Lastly, the “Use Small Batches” feature reduces the number of records that are merged in each operation (5 / batch vs. 200 / batch). This can increase the length of time it takes to produce the merge, so it may extend the length of time you are performing a merge operation. Do a smaller sample of 5-10% of your record set via the “Use Small Batches” initially to confirm how long it takes specific to your particular Salesforce org configuration.
What does the Error code “Remote invocation failed, due to: status code:” mean? #
“Remote Invocation failed” errors may be because of a break between the Apsona page’s operation and its internet connection – consider reducing your record size to successfully merge your next section.
I see a wheel that says WORKING and just runs and runs, but the batch never completes. How can I fix this? #
Apsona operates within your browser, as an app in your Salesforce instance. Its execution is dependent on the amount of computer memory to perform an operation within that browser – specifically, as it searches each record in your filter criteria, each field you’ve selected to compare for Matches, and then returns all of those values for each field selected into the output grid.
If the demands on your computer memory are high, then as Apsona executes your Merge Action, it may time out if it exhausts the available computer memory to provide that function.
Our recommendations for Dedupe & Match on larger volumes of records is to focus your computer’s processor speed on this single task at hand, i.e. close as many browser tabs and applications you have open that are tying up processor and memory resources.
A few tips: Reduce # of open browser tabs, # of open applications. When in doubt, log in to a different browser platform (Edge, Chrome, Safari, Firefox) and run the Dedupe Action there to note if the error re-occurs there.
Within Apsona: search for duplicates where you know you’ll find them, and use the Filter criteria in the first step to only search records that meet criteria relevant to your needs. (i.e. if you’re matching on Contact.Mailing Street, then filter only Contact records where Mailing Street is not empty).
Start small and build match by match. Generally, utilizing loose criteria and several initial Match fields allows you to start with a broad set of potential matching groups. Using the tabs in Apsona to add and remove Additional fields to establish more specific Match criteria allows you to adjust your Merge Action until it is adequately returning duplicates for which you are more confident.
Most laptops in our testing provide that Dedupe & Match takes about 12-15 minutes to merge higher data volumes – generally around 1 million cells (Matched fields x Number of Records – e.g. 5 matched fields x 200K records = 1M cells).
You can find the best practices customers use to improve the performance of Dedupe & Match below.
What is your best practice when Deduping Large Data Volumes? #
Our successful customers regularly cleaning large data volumes with Apsona Dedupe & Match have developed these best practices:
- Document specific instructions to reduce or deactivate triggers, automations, roll up fields for your Org’s configuration.
- Proceed through Merge Actions – adjusting filter actions to reduce the number of evaluated cells to roughly 1M cells (e.g. 5 matched fields x 200K records = 1M cells).
- While the Merge Action is running, take a break, grab a cup of coffee, or hang out and wait for up to 12-15 minutes (this is the top range of merge behavior – yours should take much less).
- If your browser crashes and/or you see specific error codes, then you’ve reached the limit of your laptop/browser capacity to perform the current queries and merging operation.
- Adjust the filters to increase/decrease the number of records in a merged set to fit your particular scenario.
- After the Merge operation completes, Download the results file to confirm the outcome of the Merge execution. If you see any errors caused by “Remote Invocation failed” – this may be because of a break between the Apsona page operation and its internet connection – consider reducing your record size to successfully merge your next section.
Apsona’s Merging Operation follows a number of Salesforce rules as it changes records.
There are specific scenarios noted here when a child record may not be able to be reparented and needs to be deleted and recreated instead.
More details here: /docs/help-and-support/dedupe/#api-usage
The normal behavior of merging operations is to place all deleted records in the Recycle Bin.
Errors from Dedupes: What do they Mean? #
As Apsona Dedupe & Match proceeds through the Merging process, the Salesforce operation happening in the background includes moving data from specific fields to the winning record fields and deleting losing child records (moving them to the Recycle Bin). Across the range of Salesforce objects and their behavior for merging, your Salesforce configuration may trigger error messages specific to your particular setup. Those are often the error messages noted in the Results download and at times, on screen during the Merge Process.
Additional information can be found in our Dedupe & Match documentation:
/docs/help-and-support/dedupe/#api-usage
Common Error messages returned by Apsona are included here:
/docs/help-and-support/common-sf-error-messages/

