Overview #
An Apsona Grid displays records in a tabular, Excel-like form.
- The displayed records are from a single object, such as the Opportunity, Account or Contact object. Both native and custom objects are supported.
- The fields in the grid can be from the grid’s object or from any parent object. For example, you can create a grid on the Account Contact Role object that shows Account fields, Contact fields and Role fields, thus offering a single editable view of Accounts and their related Contacts.
The Apsona Grid Admin page enables you, as an administrator, to:
- View, edit and delete existing grids
- Preview a grid to examine its behavior
- Create new grids
- Create Visualforce pages that contain one or more grids, both as top-level standalone pages and as related lists for Salesforce detail pages. Visualforce pages are needed to deploy grids for end users, either as top-level pages or as related lists in Salesforce detail pages.
Installation, configuration and licenses #
- Install from our Appexchange listing.
- To administer and manage Apsona Grids, a user will need an Apsona for Salesforce license as well as an Apsona Grids license. But a user who merely interacts with Apsona Grids will not need an Apsona for Salesforce license, only an Apsona Grids license.
- There is no limit on the number of grids or Visualforce pages you can create.
- We require a purchase of at least 3 Apsona for Salesforce licenses to qualify for purchasing Grids licenses.
- There is a minimum of 10 Grids licenses, after which you can add licenses on a per-user basis.
The Grid Admin screen #
After installing the Apsona Grids package, your org will include an Apsona Grids Lightning App and an Apsona Grid Admin Visualforce page. Click the Apsona Grid Admin tab to view the administration screen.
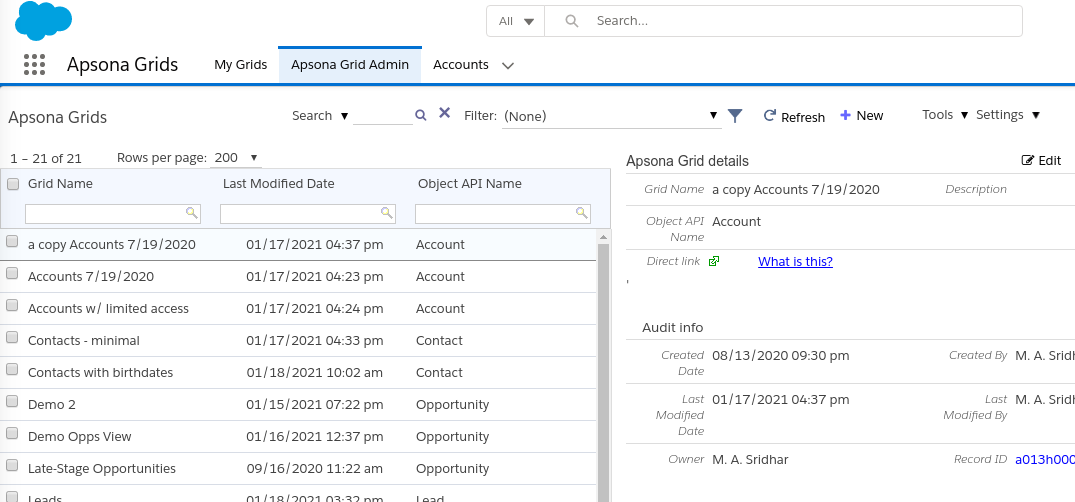
The screen shows a list of the available grids on the left. You can look for particular grids in this list using the usual Apsona filtering mechanisms. So you can search by grid name using the box under the Grid Name column, and you can use the filtering feature to perform more complex searches. You can also clone, mass update, or mass delete grids from this view. Let’s start by creating a grid!
Creating a new grid #
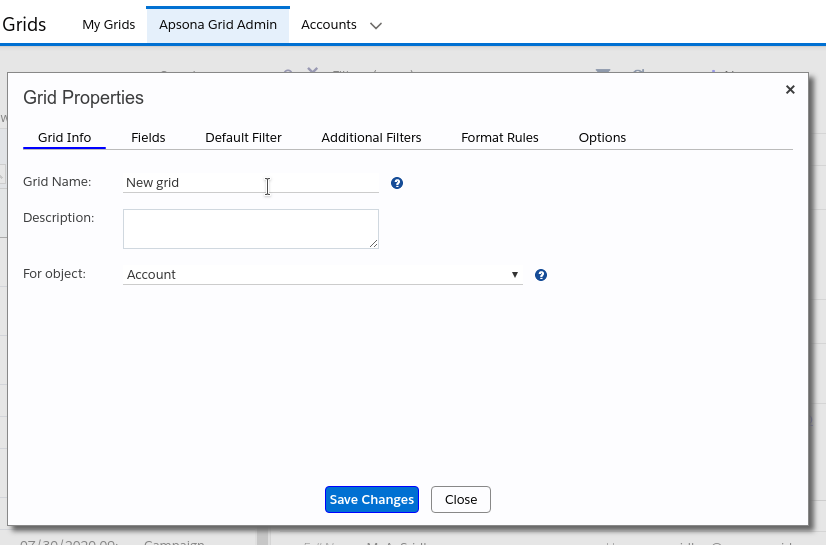
To create a new grid, click the New button at the top. This displays a popup window with tabs across the top, for setting up different aspects of the grid. Below is a short video illustrating how to create a simple grid.
Grid Info #
Use the Grid Info tab to set the grid’s name, optional description, and the object whose records will be displayed in the grid.
If the object selector (“For object”) does not include an object for which you want to build a grid, you will need to:
- Open Apsona for Salesforce, and add the object to your configuration as described here; and
- Return to the Grid Admin screen and click Settings – Clear cache the top right.
Fields #
In the Fields tab, you can select the fields of the object and any parent objects to show as columns in the grid. Simply drag the field from the “Available” panel to the “Selected” panel. You can reorder the fields in the “Selected” panel to determine their left-to-right order in the grid. There are two additional icons next to the field once in the Selected panel:
- The Edit icon next to a field in the Selected panel can be used to change the label of the field in the grid.
- The Lock icon can be used to make the field read-only, so that the grid’s user cannot edit the field. This will only affect the grid in question, and not any other grids. Also, this will only prevent users from making edits to the field in existing records – when creating new records, users may still add a value for the locked field.
See the animation below.
If you find that a newly-added field is missing from the list of fields available, you would need to click Settings – Clear cache at the top right of the Grids Admin screen.
Default Filter #
In this tab, you can set a default filter for the grid, meaning that only records which satisfy that filter condition will be displayed in the grid. The default filter is not shown to the grid’s user, so the user cannot override this filter, although she can add additional filtering. For example, if you create an Account grid with a default filter requiring that the Account Type is Partner, then the user sees only Partner records. But she can (for example) look for Accounts in California, and will then be shown Partner accounts in California.
Additional Filters #
Use this tab to configure additional filters available to the user. These additional filters are a vailable via a dropdown in the user’s display, providing a quick way to filter the grid’s records. For example, in an Opportunity grid, you might provide additional filters named “Closed Opportunities” for Opportunities which are closed, and “Large Opportunities” for Opportunities of $5,000 or more. The user can then filter the grid with either of these filters with a single click of the dropdown.

Format Rules #
This tab lets you add conditional formatting rules to the grid. For instance, you can add to an Opportunity grid a rule called “Large Opps” requiring that every Amount cell with value exceeding $500 should be highlighted in red with a light yellow background. See video below.
You can also choose to apply the format rule to the entire row in the grid, as below, where records with an Account Name starting with “United Oil & Gas” are italicized:
The operators available for creating format rules – for example, Amount values “greater than” 500, or Cases where the Status “is among” New or Escalated – are very similar to the operators available in Apsona filters. You can find more information about the operations available in the Apsona filters documentation. There are a few caveats we will note here:
- for checkbox fields, the rule value for the “is” operator in the Grid Editor should either be “Yes” or “No”
- For checkbox fields where the operator is “is not empty” or “is not empty”, since checkbox fields cannot have no value, all fields are considered “not empty”, and no fields are considered empty.
- For the operators “contains any of” and “does not contain any of” – multiline rule values are not supported in the Format Rules tab, so multiple values to match against must be comma-separated.
Note also that if you add multiple conflicting format rules, then the last one in the list is what will get applied to the cell / row. Also, use of format rules will prevent use of grouping in Grids.
Options #
Via the options tab, you can determine the additional tools available to the grid user: Export, Mass update, Mass delete, and Mass add tasks.
Viewing a grid #
Click the name of a grid in the list in the Apsona Grid Admin tab to view its details. The detail panel on the right shows the name and description of the grid, the API name of the object for which it is intended, and audit information.It also includes a direct link field. Clicking this link opens the grid in a new window, so that you can view its behavior without having to deploy it into a Visualforce page. Once you have opened this link, you can reload the webpage as you make modifications to the grid configuration, and the preview of the grid will be updated. Note that if you make data modifications within the direct link, your data will be modified – for example, if you edit a row and click Save in the direct link of a grid, the record will actually be edited.
Editing a grid #
To edit the properties of an existing grid, click the Edit button in the detail panel. This results in a popup showing the same six tabs as described in the “Creating a new grid” section, and you can adjust the properties of the grid in the same manner.
Cloning a grid #
To clone (or make a copy of) an existing grid, simply click the Clone button in the detail panel. The resulting popup shows the properties of the grid you are cloning. Make any necessary changes, and click the Save Changes button.
Creating subgrids #
The grid can include subgrids for child objects. For example, when creating an Account grid, you can add a subgrid that shows Account Tasks, and another that shows Opportunities. With such a grid, when the subgrid is opened for a particular Account record, the Account Task subgrid shows the Tasks associated with that Account, and the Opportunities subgrid shows that Account’s Opportunities. Then, you can edit the information related to the child objects – in this case, you can add Opportunity records related to this Account, or edit existing Tasks associated with this Account.You can only create a subgrid on an existing grid. In other words, when creating a new grid, you must save the grid and click its Edit button so that the left panel in the popup (with subgrid capability) becomes available.
To create a subgrid, click the Add subgrid button. In the Subgrid Info tab, you can give the subgrid a name, and select the child object for the subgrid. The child object selector displays only the objects that have a lookup or master-detail to the main object. When you select a particular child object, the Lookup Field selector shows all of the available lookup or master-detail fields from the selected child object to the main object. You can select the appropriate child object field so that the correct list of child records is displayed. See the animation below.

Deploying grids for end-users #
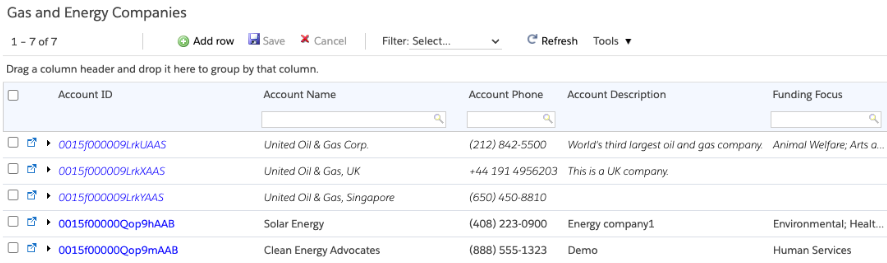
At this point, you may have made a few different grids, and may want to make a subset of them available to certain users. You can use Visualforce pages to make these grids available to the users. The Visualforce pages can contain one or many grids that will be loaded as tabs in the page. See the image below as an example:
You can create Visualforce pages that are either top-level pages accessible via the main menu bar (as in the above image), or related-list pages used as part of detail pages. After creating the Visualforce pages, you will need to give your users access to the Visualforce pages, per these steps. Deployment is a two-step process:
- Create a Visualforce page that contains the grids to be deployed, and
- If it is a top-level page, create a tab for it and include it in the user’s available tabs or apps. If it is a related-list page, add it to the user’s detail page layout.
Note that any edits made to grid configuration after the grid is deployed into Visualforce pages will immediately appear in the Visualforce pages – you need not re-create the Visualforce page. Also note that we do not recommend distributing the direct link of the grid, mentioned here, to end users, because that is merely intended to be a preview of the grid configuration. You could, however, create a top-level Visualforce page using Apsona Grids and distribute the link to that Visualforce page, if desired.
Top-level pages #
A top-level page is available directly via a menu item in the main menu bar. Such a page can contain multiple grids from unrelated objects. For example, you can create a top-level page containing the user’s Open Opportunities, Partner Accounts, and Customer accounts. You can then create a Visualforce tab for the page via Salesforce Setup, and add the tab to the user’s available tabs or apps via their Salesforce profile or via a permission set.
Here are the steps to create a top-level Visualforce page. See also the animation below.
- From the Apsona Grid Admin page, click Tools – Create VF Page – Top-level page
- Provide a label for the page. Apsona will pre-fill the Page Name field based on the label. The page name needs to be unique across all Visualforce pages. Apsona prefixes the name with ApG_ so that Apsona Grid pages can be quickly identified.
- Optionally, provide a description of the page.
- Add the grids you want into the page, as shown in the animation below. The grid selector in the left column shows all the grids available. Select a grid to add, and give it a tab name. These tab names will be used for quick access to the pages, as shown in the animation below.
- Click the Create button. This will create the Visualforce page. You can then click the “Go to page” link to view the newly-created page. This page will also appear in your Visualforce pages list that you can view via Salesforce setup.
- Once the page is created, you can create a Visualforce tab for it via Salesforce setup, and make the tab available to your users via their nav bar or an app.
Related-list pages #
You can also embed one or more grids in a related-list page, intended for use within a detail page. For instance, it might be used in an Account detail page, and may contain grids for the Account’s Opportunities, Tasks, Cases, and Contacts.
- All of the grids used in a related-list page must be on child or grandchild objects of the detail page (at most 2 steps away).
- In the Lightning experience, you can use the Visualforce mechanism as a Lightning component, as described further below.
The process to create a related-list page is similar to the process for top-level pages, with the additional step of specifying a lookup field to connect the grid in question with the object of the detail page. See the animation below for an example of this:

Note that once the related-list page is created, if you go to the Visualforce page by clicking the link, you will notice that the page contains all records, not just those associated with a particular record. This is because it has not yet been added to a record detail page – once it is, the related-list page will be filtered and will only show records that are related to the record on the detail page.
Grid pages as Lightning components #
There are two ways to use a related-list Visualforce page in a Salesforce Lightning detail page.
Direct embedding #
You can deploy any Visualforce page directly as a Lightning component into a Salesforce object detail page or app page – essentially anywhere that a Lightning component can be placed. Once you create a Visualforce page with grids using the methods shown above, you can edit the object’s detail page and drag the Visualforce page into the position you want in the Lightning page. Below is an example showing a related-list grid page named “Contacts and Opps” that is placed into the Related area of an Account page.
Using the Apsona Grid Component #
You can use the Lightning component named Apsona Grid Component to embed grids in your detail pages. This component is part of the Apsona Grids package, and will be available among your Managed Components in the Salesforce Page Layout Editor. You can configure this component to give it the name of the Visualforce page, a caption, and the height of the grid panel in pixels (a good initial height is around 400 pixels). See the animation below:

A key benefit of using the Apsona Grid Component is that it generates refresh events when the grid data is updated. The result is that the rest of the detail page also gets updated as necessary. For example, suppose you have a Campaign detail page whose Compact Layout at the top shows the number of Campaign Members. Suppose further that you embed an Apsona Grid for Campaign Members into this page. If you then add or remove Campaign Members via the grid, the count shown in the Compact Layout gets automatically updated, without having to refresh the page. This makes for a more pleasant end-user experience.
Migration #
Migration of Grids between orgs, e.g. moving Grids from sandbox to production, is not yet supported programmatically, but can be done with a few manual steps. Contact support@apsona.com to learn more.
Assigning licenses to end users #
Apsona Grids uses a different set of objects than regular Apsona does. Therefore, in addition to assigning Grids licenses to your users, you will also need to provide them with access to two additional objects – “Apsona Grids” and “Apsona Grid User Prefs”. The Apsona Grids object stores the configuration metadata for each of the grids you create, and Apsona Grid User Prefs stores user preferences on grids, such as the column width a user has set.
Full steps to assign licenses:
- Click Setup – Installed Packages – Manage Licenses – Apsona Grids, and assign licenses to your users.
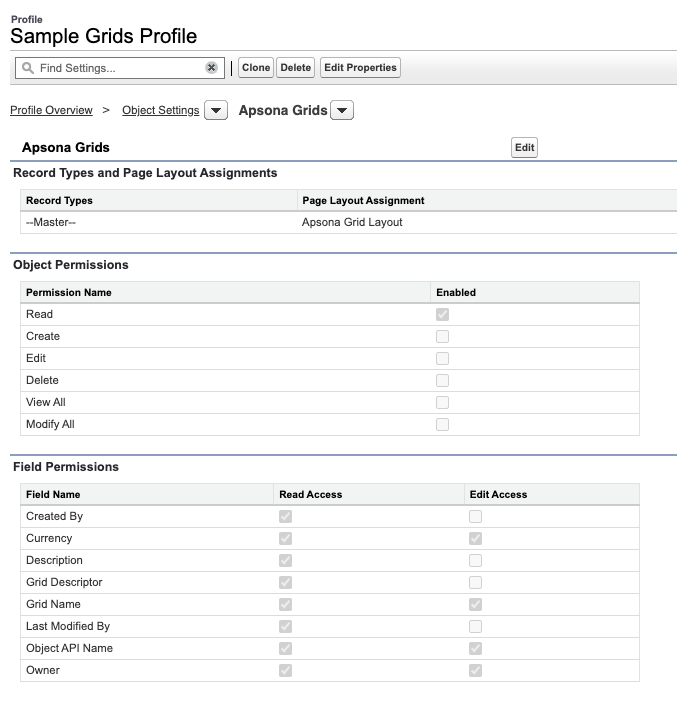
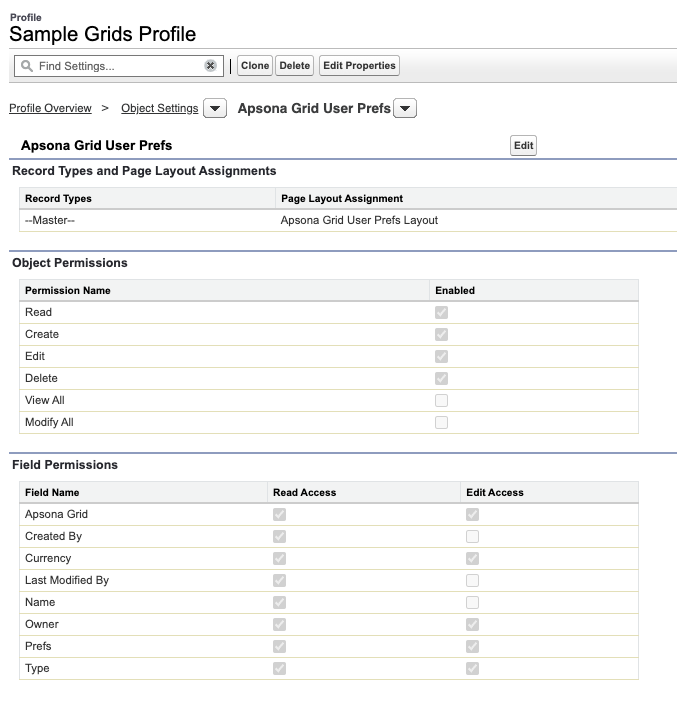
- At minimum, assign the user’s profile access to the following objects / fields in Salesforce:
- Objects: Read access to the Apsona Grids object, Read / Create / Edit / Delete access to the “Apsona Grids User Prefs” object.
- Fields: under Apsona Grids, read access to “Description” and “Grid Descriptor”; under “Apsona Grids User Prefs”, read and edit access to all fields.
The screenshots below show this minimum permission set applied to a “Sample Grids Profile”, assigned under Setup > Profiles > “Sample Grids Profile” > Object Settings: