
It’s a new year and we’ve made some big changes. Check out Apsona’s all-new pricing bundles for your organization!

View Categories

Sending email using Apsona

Apsona offers three features for sending email, depending on your requirements:

  • Select a set of Contacts or Leads via a filter, and use the Email Composer popup to quickly compose and send a one-time email to all the selected Contacts or Leads.
  • Select a set of Contacts or Leads via a filter, and use the “Send Mass Email” popup to select a particular Email Template, and send the resulting email to all the selected Contacts or Leads.
  • Use the Merge/Mail tool with any object or report that produces an email address, and send customized email to each email address in the object or report.

Composing a quick email #

The Email Composer can be used to send quick email messages to one or more of your Contacts without having to create a template or a Campaign. Simply select the Contacts or Leads you want, and click Tools – Compose Email. In the popup, provide the subject and message body, and optionally a copy-to address. Then click “Send” to send off the message.
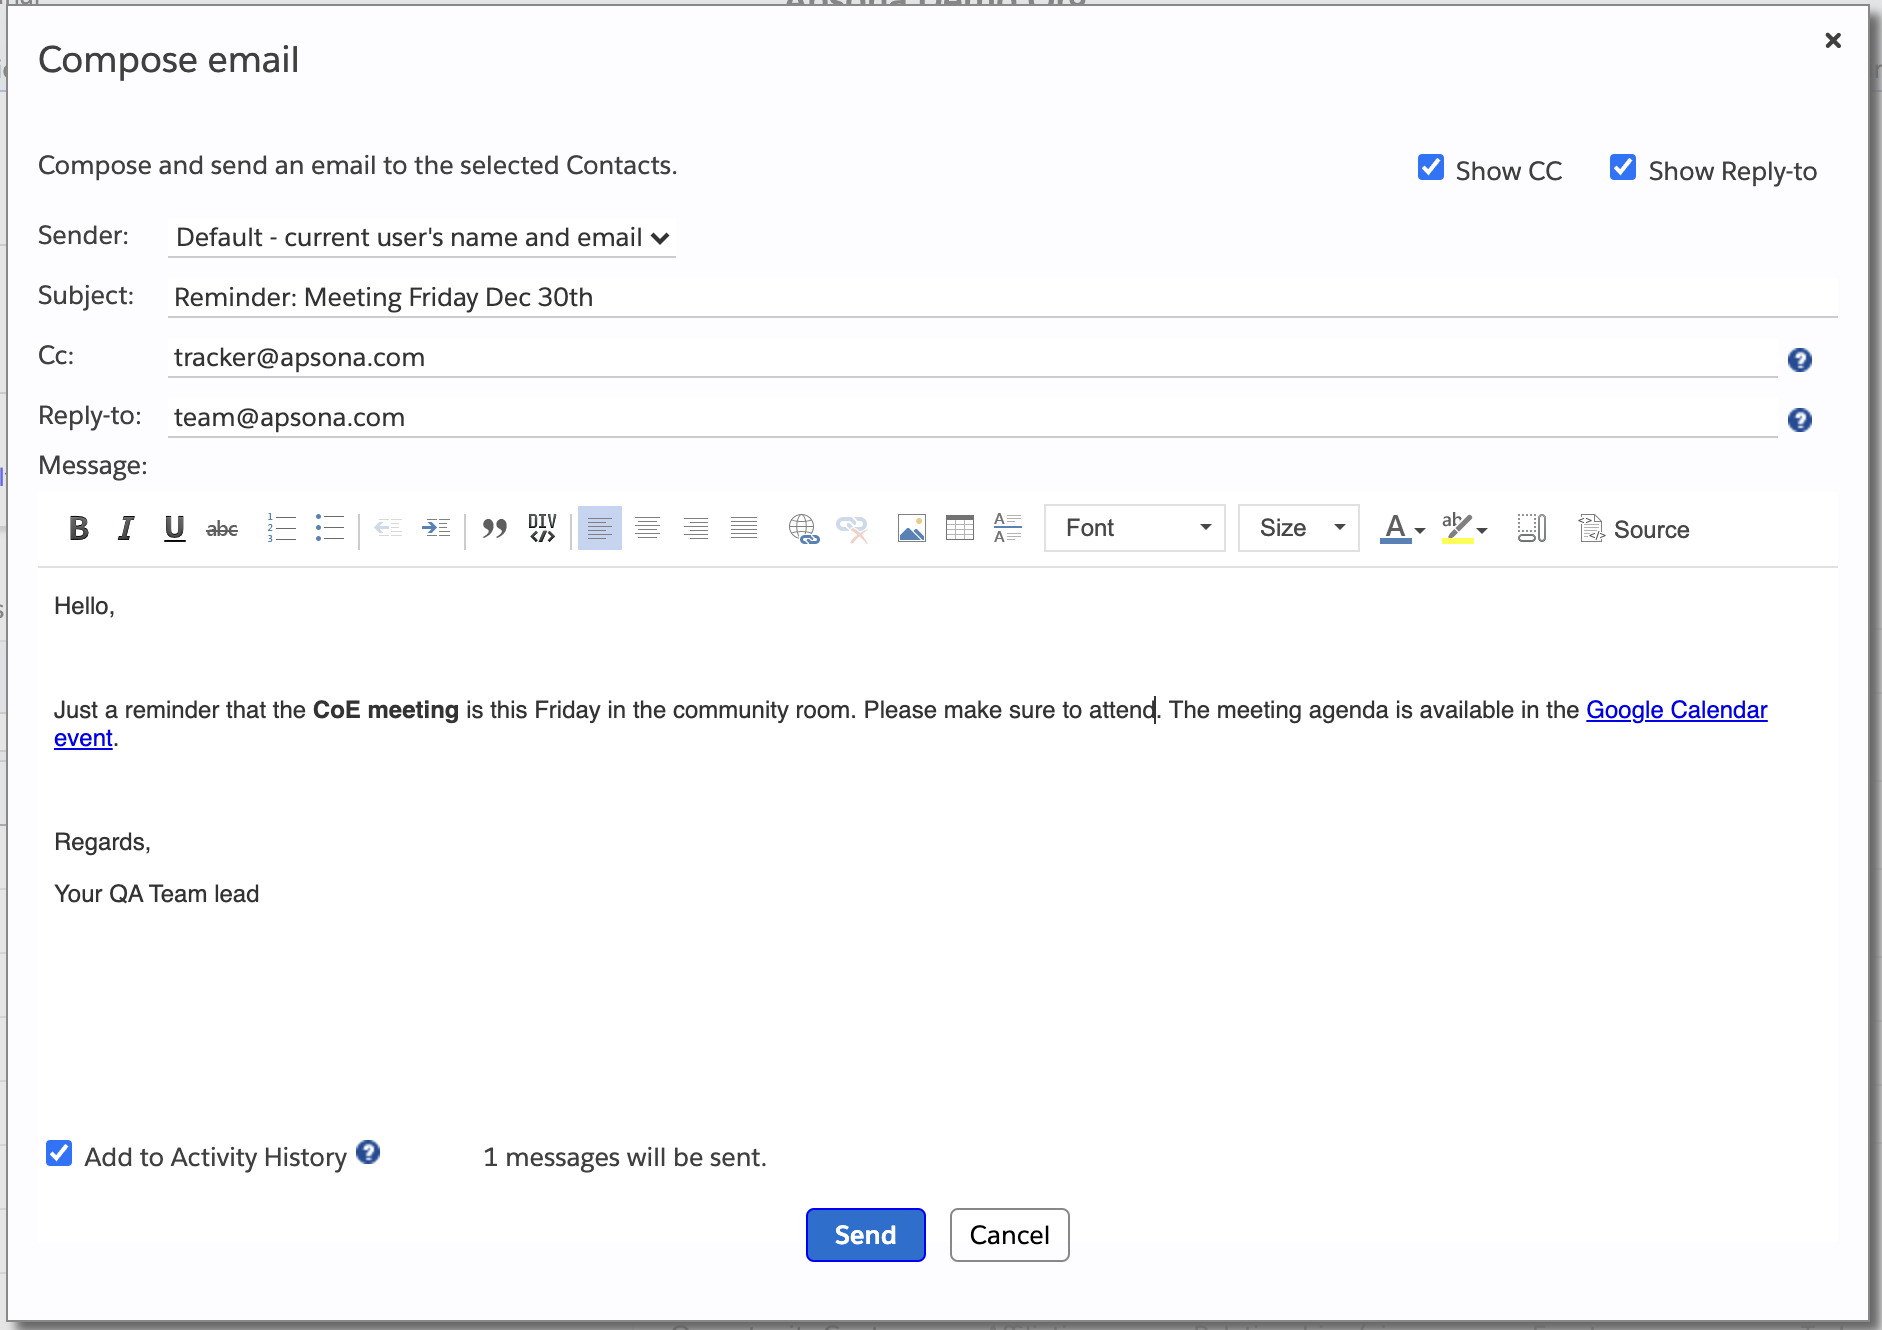
Some things to note:

  • All the contacts you select will receive the same message, with the same subject and message body; no personalization of messages is possible in this popup.
  • But each Contact or Lead will receive a separate email, i.e., the “To” address of the email they receive will only include their own email address, and not any of the other addresses you may have selected.
  • You can specify one or more email addresses in the “Copy to” field, separated by commas. If you do, then each of those addresses will receive a single copy of the email you sent, regardless of how many email addresses you selected in the list. The Copy-To addresses will not appear in the CC addresses that the recipient sees.
  • The email will appear as having been sent from the email address of the logged-in user.
  • If you provide an email address in the Reply-to box, then that email address will receive any replies sent by a recipient of your email.
  • You can check the “Add to Activity History” box to automatically create an entry in the Activity History for each Contact or Lead. If you do:
    • An entry will be added to the Contact’s (or Lead’s) Activity History, with a subject beginning with “Email:” and the subject of your message. The message content will be tracked as part of the Activity record.
    • If, for some reason, there was a failure to send a message, the resulting error message is logged as the subject of the Task.

Normally these emails are sent through the Salesforce SingleEmailMessage mechanism, so you are limited to a maximum of 5,000 email messages per day. If you need to send higher volumes, please see below or contact us.

Sending mass email from a template #

You can also send mass email to selected contacts by clicking Tools – Send mass email. This mechanism uses an Email Template that you will have created in your Salesforce org. (You can create Email Templates in Salesforce by navigating to Setup – Communication Templates – Email Templates.) When you invoke this tool, the resulting popup shows you a list of the available email templates in your org. When you select one of those templates and click Send, the template is processed to produce one email for each of the Contacts or Leads you have selected.
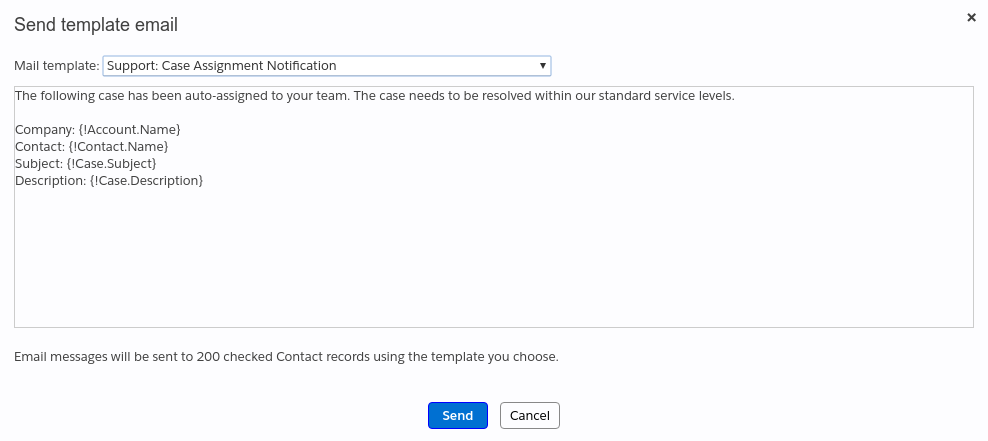
Some notes:

  • The mass-email menu item uses Salesforce’s MassEmailMessage feature, so it sends all its messages through Salesforce. It is therefore subject to the limits described here.
  • Mass email messages cannot be saved to the Activity History.
  • You can view the status of a mass-email batch in Salesforce Setup.

Using the mail merge tool #

You can also use Apsona’s Document and Email Generator add-on to produce and send personalized or customized emails to Contacts or Leads. This add-on also uses Salesforce’s SingleEmailMessage mechanism, with limits described here. Please see our documentation about this add-on.

Sending transactional emails and larger email volumes #

By default, emails sent through any of the above mechanisms are routed through Salesforce, and and is therefore limited by the Salesforce limits discussed above. For larger mail volumes, we now offer an Email Connector component that integrates with the Email Service Provider Mailgun. Using this Connector, you can send as many emails as needed, customized according to your requirements. More details are available on our email connector page.

Sending high-volume & transactional email: the Mailgun Connector
#

By default, emails sent through Apsona, whether from the Email Composer, the Send Mass Email tool, or the Document & Email Generator, are routed through Salesforce and are therefore subject to Salesforce’s limit of 5,000 single‑email messages per user, per day. For organizations that need to send larger volumes or that want stronger deliverability and tracking for transactional email, Apsona offers the Mailgun Connector.

The Connector routes your outbound Apsona email through Mailgun, a dedicated email service provider, so you can send as many messages as your Mailgun plan allows, with full delivery tracking. This article covers what you need, how to activate the Connector, where to enter your Mailgun API key, what it costs, and the practical things to know before you switch your sending over.

In this article:  What you’ll need  ·  Activating the Connector  ·  Where to enter your Mailgun API key  ·  Charges  ·  What changes when you send through Mailgun  ·  FAQs

What you’ll need #

  • An active Apsona for Salesforce license, with the Email Connector add-on enabled for your org (Mailgun Connector)
  • Salesforce administrator access to add a Remote Site Setting and save the connection settings.
  • A Mailgun account on a plan that supports your expected monthly sending volume.
  • At least one sending domain has been added and verified in Mailgun (SPF and DKIM records published in your DNS).
  • Your Mailgun Private API key (see Where to enter your Mailgun API key below).

Activating the Connector
#

  • Enable the Email Connector. Confirm the Email Connector add-on is active on your Apsona subscription. If you don’t see it, contact Apsona support to have it added.
  • Set up and verify your Mailgun sending domain. In the Mailgun control panel, add the domain (or subdomain) you’ll send from and publish the SPF and DKIM DNS records Mailgun provides. Wait until Mailgun shows the domain as Verified before sending.
  • Copy your Mailgun Private API key and note your region. In Mailgun, go to Settings → API Keys and copy your Private (sending) key. Note whether your account is hosted in the US or EU region, this determines the endpoint Apsona must call.
  • Add a Remote Site Setting in Salesforce. In Setup → Remote Site Settings, add an entry for the Mailgun API endpoint: https://api.mailgun.net for US accounts, or https://api.eu.mailgun.net for EU accounts. This authorizes Salesforce to make the callout to Mailgun.
  • Enter your Mailgun credentials in Apsona. Open Apsona’s connector settings, then paste your API key, sending domain, and a default From address into the matching fields, and save.
  • Send a test and verify. Send a small test message to an address you control, confirm it arrives, then check the Mailgun dashboard logs to confirm it was accepted and delivered. Once verified, your Apsona email tools will route through Mailgun.

Where to enter your Mailgun API key
#

In Mailgun:  Sign in and open Settings → API Keys. Use the Private (sending) key, not a public or validation key. If you don’t have one, create a new key and copy it immediately, as Mailgun may not display it again in full.

In Apsona:  Paste the key into the Mailgun API key field in the connector settings, alongside your verified sending domain and default From address, then save. Apsona stores the key as a protected credential; it is not shown in full once saved.

Region:  If your Mailgun account is in the EU, make sure both the Remote Site Setting and the connector’s region setting point to the EU endpoint (api.eu.mailgun.net). A region mismatch is the most common cause of authentication errors.

Keep your API key secret.

  • Treat the Private API key like a password, anyone with it can send email from your domain.
  • Never share it in screenshots, email, or support tickets; use a secure channel if you must send connection details to support.
  • Rotate it periodically, and immediately if you suspect exposure: generate a new key in Mailgun, update it in Apsona, then delete the old key.

Charges
#

There are two separate costs, billed by two different companies:

  • Apsona’s Mailgun Connector. The Connector is a paid Apsona add-on. Contact Apsona for current pricing and to add it to your subscription.
  • Your Mailgun subscription. Mailgun is billed directly by Mailgun, separately from Apsona, on a volume-based plan. There is a free tier for testing and paid plans that scale with the number of emails you send per month; higher volumes and add-ons such as dedicated IP addresses or email validation cost extra. Because Mailgun’s pricing changes from time to time, check current plans at mailgun.com/pricing before committing to a volume.

Apsona does not mark up or resell Mailgun email. You pay Mailgun directly for the messages you send, and Apsona for the Connector that links Mailgun to your Salesforce org.

What changes when you send through Mailgun
#

  • No Salesforce daily cap. Sending volume is governed by your Mailgun plan, not Salesforce’s 5,000-message daily limit.
  • Better deliverability and authentication. Because mail is sent from your verified, authenticated domain (SPF / DKIM, and ideally DMARC), it is less likely to be filtered as spam.
  • Delivery tracking. Mailgun logs every message, and reports opens, clicks, bounces, and complaints in its dashboard visibility you don’t get with standard Salesforce sending.
  • Which Apsona tools use it. Once active, the Connector can carry email from the Email Composer, Send Mass Email, and the Document & Email Generator (mail merge); pair it with Scheduler for automated, recurring email at volume.
  • Bounces, unsubscribes & compliance. You remain responsible for honoring unsubscribe requests and applicable anti-spam laws (such as CAN-SPAM and GDPR). Use Mailgun’s suppression lists together with your Salesforce email-opt-out fields to avoid mailing anyone who has opted out.

Frequently asked questions
#

  1. Do I still need an Apsona license to use the Mailgun Connector?
    Yes. The Connector is an add-on to Apsona for Salesforce, so you need an active Apsona license plus the Connector enabled on your subscription.
  2. Why would I use Mailgun instead of sending through Salesforce?
    Salesforce caps you at 5,000 single emails per user per day and offers limited delivery insight. Mailgun lets you send higher volumes, improves deliverability for transactional mail, and provides detailed delivery, open, click, and bounce tracking.
  3. Where do I get my Mailgun API key?
    In your Mailgun account, under Settings → API Keys. Use the Private (sending) key, and copy it as soon as it is generated.
  4. The connector says authentication failed. What’s wrong?
    The usual causes are: using a public/validation key instead of the Private key; a region mismatch (EU account pointed at the US endpoint, or vice-versa); or a missing Remote Site Setting for the Mailgun API URL. Re-check all three.
  5. Does Apsona charge per email?
    No. Apsona charges for the Connector add-on; the per-email cost is billed by Mailgun under your own Mailgun plan.
  6. How much does Mailgun cost?
    Mailgun is billed separately by Mailgun on a volume-based plan, with a free tier for testing and paid tiers that scale with monthly volume. See mailgun.com/pricing for current figures.
  7. Do I need to verify my sending domain?
    Yes. You must add your sending domain in Mailgun and publish the SPF and DKIM records it provides before mail will send reliably. We also recommend publishing a DMARC record.
  8. Can I still track sent emails in Salesforce?
    Detailed delivery analytics (opens, clicks, bounces) live in the Mailgun dashboard. Logging to Salesforce depends on the Apsona tool you send with.
  9. Is my API key stored securely?
    Yes. Apsona stores the key as a protected credential and does not display it in full after saving. Treat the key as a secret and rotate it if you suspect exposure.
  10. How do I stop sending through Mailgun?
    Clear the Mailgun credentials in Apsona’s connector settings; your Apsona email tools then revert to sending through Salesforce, subject to Salesforce’s limits.

Sending emails containing non-English characters #

If your email templates contain non-English characters, they should use the UTF-8 encoding. To ensure that such emails are delivered correctly, you must set the character encoding for the email templates to UTF-8 by editing the email template’s properties in Salesforce. Additionally, you must set your user’s preferred email encoding to UTF-8. Please see this Salesforce help article for details.