- Installing and getting started
- A short example
- Comparing multi-step and single-step reports
- What does a step do?
- More about linkages
- Controlling the record range and sort order
- Auto-filled output
- Rendering rows as column blocks
- Combining the results of two steps
- A tour of the report builder
- Running a report
- Managing reports and folders
- Allowing non-administrators to manage multi-step reports
- Notes
- Troubleshooting
Multi-step reporting offers a way to create reports that span any number of Salesforce objects, both native and custom. It lets you use separate filtering conditions for each object in your report. It also includes the ability to get “ranked” data, e.g., finding the top 10 opportunities by amount for each partner account, or finding the most recent pending tasks on each open case.
A multi-step report executes a series of steps, where each step retrieves data records from a single Salesforce object. The retrieved data is stitched together into a report using linkages, which are usually the key or lookup fields common between steps. You might think of a multi-step report as mimicking what a developer would do when hand-coding a complex report: construct and run series of database queries, and calculate the composite report by “lining up” (or joining) the results of those queries along the appropriate columns.
Installing and getting started #
You can install the Multi-step Reporting add-on by visiting our AppExchange listing and clicking the Get It Now button.
- Before installing this add-on, please make sure that the pre-requisite Apsona for Salesforce add-on is already installed.
- Once the Multi-step Reporting add-on is installed, please do the following:
- Assign yourself a license to the add-on via Setup – Installed Packages – Apsona Multi-step Reports – Manage Licenses.
- Ensure that your user profile in Salesforce has full access to the “Apsona Multi-step Report” object.
- Click Settings – Clear cache in Apsona so that the license update can take effect in Apsona.
Installing in a sandbox #
Sandbox orgs do not offer the Manage Licenses capability. Therefore, to try it out in a sandbox, simply ensure that your user profile in Salesforce has full access to the Multi-step Report object that is part of the add-on package.
A short example #
Suppose you need a report of all your Opportunities closing in the next month, including the Opportunity’s name, amount and close date. Suppose also that for each opportunity record, you wish to include in the report the names and email addresses of all those related contacts whose role is “Decision maker.” Below is a mock-up of such a report.
If you were to code this report using database queries, you might construct two queries, the first one retrieving the Opportunity records, and the second retrieving the contacts related to those Opportunities via the Opportunity Contact Role object. And if you were to create a multi-step report, you would do essentially the same thing: create a two-step report, as follows.
- The first step retrieves Opportunity records, with fields Opportunity ID, Name, Amount and Close Date, filtered so that the Close Date falls within the next month.
- The second step retrieves Opportunity Contact Role records. It extracts the Opportunity ID field from the Opportunity Contact Role object, and the Name and Email fields from the Contact object. This step links its Opportunity ID field to the Opportunity ID field of step 1.
The linkage set up in step 2 establishes the relationship between the steps, ensuring that we “line up” the Contact Role records retrieved by Step 2 with the corresponding Opportunity records retrieved by step 1.
Comparing multi-step and single-step reports #
Apsona for Salesforce includes the single-step reporting feature, which can be used for simple reports. But the multi-step reporting add-on offers much more. Here are a few key distinctions between the two reporting tools.
- You create a single step report specifically for one object, and it will extract data from that object and its parents or children. For instance, a single-step report for the Opportunity object can extract data from Opportunity, Account, Campaign and Opportunity Contact Role objects. But a multi-step report is not limited to just parents and children. You can create a multi-step report to extract data from any number of objects, because each step in the report can extract data from a separate object.
- A single step report is limited to one set of filter terms, and that set will apply to all the objects involved in the report. But in a multi-step report, you can set up separate filters for each step. For instance, you can create a multi-step report with one step that gets your partner accounts (with a filter on the Account object), and a second step that gets the open Opportunities from those Accounts which came from this year’s Campaigns (via a filter on the Opportunity object). Notice in this example that the Opportunity filter uses conditions on the Campaign object, which is not possible with a single-step report.
- You can use a multi-step report to repeatedly access the same object with different filters. For example, you can create a multi-step report with three steps, that shows Opportunity data from three consecutive years. This lets you compare year-over-year performance of your company. Such comparison is not possible with a single-step report.
- With a multi-step report, you can extract child-object records which are ranked in some way with respect to parent object records. For example, you can extract the top three Opportunities (ranked by amount) from each Account. You can do this with two steps, one for the Account records you want, and the second for the top three Opportunities for each account. This kind of ranking is not possible with a single-step report.
- Another common example is a report that extracts data from several different objects which are not all directly related. For example, you can create a multi-step report that extracts partner accounts in step 1, then the opportunites from those accounts in step 2, and then the product line items for those opportunities in step 3, and finally the inventory records for those product line items in step 4. In this way, your multi-step report can span a wide range of objects in your Salesforce database. Such a report is not possible with single-step reports.
What does a step do? #
There are three kinds of steps: query steps, union steps and calculation steps. A query step is one that retrieves data from the database. A combining or union step combines data from two previous steps, and a calculation step is one that calculates using formulas. We discuss calculation steps elsewhere.
Each query step is designed to execute a single query, and retrieve records from one selected Salesforce object. The step can specify the fields to retrieve from the object, the filters to apply when retrieving those fields, the sort and range, and linkages. In specifying what a step does, you provide five pieces of information, organized in the user interface as five tabs:
- Step info, which provides a name and description for the step, and specifies the object from which data records will be retrieved by the step.
- Retrieved fields, which lets you specify the fields to be retrieved from the object and its parent objects.
- Filter terms, which lets you provide the filter conditions that should apply to the record retrieval. The filter conditions can use any fields from the step’s selected object as well as its parents or children. Calculated values such as number of records or total amount can be retrieved from the metrics section of each object.
- Range and Sort, which lets you limit the number of retrieved records. This tab also has the ability to get “ranked” data, e.g., the top five Opportunities by Amount associated with account, or the most recent 10 activities associated with a Contact.
- Linkages, which lets you relate the records retrieved in a step with those retrieved in previous steps. For example, you might retrieve your top five partner accounts in Step 1, and their corresponding most likely opportunities in the Step 2, and you link the Opportunities of Step 2 to the Accounts of Step 1.
There is no a-priori limit to the number of steps in a multi-step report. Some things to note about what each step can do:
- Retrieve fields from parent objects: In any particular step, when retrieving data records from a particular object A, you can retrieve any of the fields of that object as well as fields from any other object to which A has a lookup field. For example, you might create a step named
Fall 2013 Campaignthat retrieves data from the Campaign Member object, with a filter setting for the Fall 2013 campaign. But since the Campaign Member object contains lookups to the Contact and Campaign objects, you can select fields from those objects as well, e.g., the Contact’s Name and Email fields, and the Campaign’s Name, Start Date and End Date fields. Thus, with one step, you can display information about all the Contacts who are members of a specific set of Campaigns. - Accommodate multiple lookups to the same object: In many real-world situations, an object can have more than one lookup field to another object. For example, your business might need to track two different Account records for each Opportunity – a Primary Account and a Secondary Account. The multi-step report feature allows for such situations: You can, for instance, retrieve the names, amounts and stages of a specific set of Opportunities, as well as the name and status of the primary and secondary account of each of those Opportunities.
- Accommodate hierarchical structures: Often, designers track hierarchical information for an object by adding a lookup field to the same object. For example, the Campaign object includes a lookup field called Parent Campaign that refers to the same (Campaign) object, and indicates the parent campaign of the record. The multi-step report can handle such situations too. So you can create a step that lists each Campaign record of a certain type, together with fields from its parent campaign.
- Multiple steps can access the same object: This feature is often quite useful. For example, suppose you want a multi-column report in which you show one Partner Account in each row, and the last three columns correspond to the total closed Opportunity values for each of 2010, 2012, and 2013. For this report, you could create one step for the Account information, and three Opportunity steps for each of the three years you need. All three of which retrieve data from the Opportunity object, but each step would have its own set of filtering criteria. This kind of retrieval is rather difficult to do with other reporting tools.
More about linkages #
A linkage aligns the records of two steps by relating (or linking) two output fields of the two steps. Apsona requires these two fields to be of the same data type. Linkages are of two kinds, depending on the data types of the two fields to be linked: lookup linkages and non-lookup linkages.
Lookup linkages #
A lookup linkage is one in which both the fields contain record id values pointing to the same object. This means either they are both lookups to the same object, or both are record ID values for the same object, or else one is a lookup to a certain object and the other is a record ID for that object.
As an example of a lookup linkage, you might link the ID field of the Opportunity object of one step with the Opportunity ID field of the Opportunity Contact Role object from an earlier step. You can even set up a linkage where both sides of the linkage are lookup fields, e.g., the Opportunity ID of an Opportunity Contact Role step with the Opportunity ID of an Opportunity Line Item step. But you cannot, for example, link an Opportunity ID field with an Account ID field, because those two are of different types.
“Polymorphic” lookups #
Some native Salesforce objects, such as the Task and Event objects and the Chatter-related Content Document Link object, include lookup fields that can point to more than one object. Salesforce uses the term “polymorphic lookups” to describe such fields. Examples include the Task’s “Parent ID” lookup, and the Content Document Link’s “Linked Entity” lookup. If you include one of these polymorphic lookups in your list of retrieved fields in a step, you will be able to select it for linkage with any of the objects to which it is allowed to link. Some examples:
- If you create a first step on the Case object and second step on the Task object, the linkages list will allow linking the Case ID with the Task’s Parent ID, assuming that you have retrieved the two linking fields in the corresponding steps.
- If you create a first step on the Contact object and second step on the Content Document Link object, the linkages list will allow linking the Contact ID with the Content Document Link’s Linked Entity.
Not-shown lookup linkages #
Some candidate linkages are deliberately hidden by the Apsona editor, to minimize confusion. Consider a specific example. Suppose you have a report with three steps: Account, Primary Contact, and Secondary Contact (in that order), intending to show all your account records, along with the primary and secondary contact for each. Naturally the linkage from each of the Contact steps would be on the Account ID field of the Contact object. But when looking at the available linkages for the Secondary Contact step, even though there are two possible Account ID linkages available — one to the Primary Contact step, and the other to the Account step — Apsona does not show the Primary Contact’s Account ID field as being available for linkage. The reason is this: Linking to the Primary Contact’s Account ID field is the same as linking to the Account’s Id field, because of the existing linkage from Primary Contact to Account. In other words, since the Primary Contact step’s Account ID field is already restricted (by the linkage) to be the Account Ids retrieved by the Account step, it makes no difference whether we link the Secondary Contact’s Account Id to the first step or the second. So Apsona adopts the convention of simply not showing the linkage to the second step as an option.
More generally, whenever we have a situation where
- there are three steps, A, B and C in that order;
- step C that can potentially link to either of two earlier steps A and B on a certain lookup field; and
- step B is already linked to step A on that same field;
we don’t see the linkage from step C to step B among the available candidates.
Non-Lookup linkages #
A non-lookup linkage is one where the two values are both of the same type — either string, picklist, date or date/time; and if they are both date or date/time, they must both use the same “deriver” (such as day of month or day of week).
Non-lookup linkages are discussed in more detail in another article.
Which kind of linkage to use? #
In general, we recommend using linkages across lookup or record ID fields whenever possible. There is more than one reason for this:
- Bear in mind that Apsona automatically de-duplicates the results of each step on the non-metric columns in the step, just as with single-step reports. So if you don’t have a record ID field included in a step, the results can be misleading if one or more records are duplicates based in the non-metric fields in your step. For example, if your step retrieves just the Name and Stage fields from the Opportunity object, and two or more Opportunity records have they exact same name and stage, they will just show as one record in your report. If, however, you invlude the Opportunity ID field in your report, you will see them as separate records in the report.
- Using lookups and record IDs can make the report run faster, because Apsona can use SOQL subqueries in some cases.
We suggest that you use non-lookup linkages only when you really need them, and either there are no possible lookup linkages available, or you are certain that they will not do the job you want.
Left joins and inner joins #
In database parlance, there is the notion of “left” and “inner” joins. Suppose you create a first step that extracts records from a parent object – say, Campaign – and a second step that retrieves from a child object – say, Opportunity. With no filtering conditions, the resulting report will produce Campaign records even if they have no corresponding Opportunity records. This would be an example of a left join. If you wish to restrict the report to only produce Campaign records that have Opportunities (i.e., you want an inner join), you will have to filter the first step appropriately, e.g., using a quantified filter.
Alternatively, you can create just one step on the child Opportunity object, and retrieve any fields you need from its parent (Campaign) object within that same step. This is possible because you can extract fields from parent objects within the same step, as noted above. When you extract the parent object’s fields in a step for a child object, you will be producing an equi-join, i.e., your report will include only those records in the parent object that correspond to records in the child object.
With this model, the filtering criteria “flow” from earlier to later steps in a linkage chain. For instance, say you have three steps, A, B and C in that order, with step B linking to step A, and step C linking to step B. Then any filter criteria you apply in step A will of course restrict the records of step A. And because of the linkage from step B to step A, you are effectively limiting the records of step B based on those same criteria from step A. By extension, because of the linkage from step C to step B, you are effectively limiting the records in step C to those filtered based on both steps A and B.
Notice that if “true” inner joins were allowed, then the filter criteria would flow in both directions of the linkage chain; e.g., any filter conditions you apply in step C would potentially affect records in step A. This can lead to reports that are much less understandable and more difficult to debug. Hence the constraint of left joins only, and the workaround of using filters in earlier steps as needed.
Multiple linkages #
Sometimes we would want to enforce more than one set of linkages. For example, suppose you wish to identify the influential contacts in your database. So you want a list of those Contacts who are part of your “Spring Outreach” campaign who were also decision makers on one or more opportunities obtained from that campaign. You could create a multi-step report that produces this list, with steps as follows.
- Get the Campaign Members. In the first step, retrieve from the Campaign Member object the Contact ID values for all the contacts in the “Spring Outreach” campaign. You can do this by filtering on the Campaign field of the Campaign Member, and selecting only the Contact ID field for output.
- Get the Opportunity records. In the second step, retrieve from the Opportunity object the record IDs of the opportunity records that were obtained from that same campaign, by filtering in a similar manner.
- Get the Contact Roles. In the third step, use the Opportunity Contact Role object to retrieve the Contact ID values of the records with Role of “Decision Maker,” whose Opportunity IDs are linked to the Opportunity ID values of step 2 above.
- Find the target contacts. Finally, retrieve from the Contact object those contact records whose record IDs match the Contact ID values of step 1 as well as step 3. This will require two linkages.
When you create a step in the multi-step report builder, it automatically detects all the available linkages to previous steps, and lets you add as many linkages as you need for your report.
Negations in linkages #
The multi-step report builder lets you choose either positive (i.e., “matches”) or negative (i.e., “does not match”) polarity when setting up a linkage. To illustrate, consider the above example again, but this time, suppose you wanted the Decision Maker contacts who were not a part of the specified campaigns. In such a case, you could proceed essentially as outlined above, except with a change in the last step. There, you would select those contacts that match the Contact ID values of step 3, but do not match the Contact ID values of step 1.
“Or” conditions in multiple linkages #
When using multiple linkages in a particular step, you could also stipulate that the result of the step matches any one of the linkages, instead of all of them. This would be useful, for example, if you wanted (in the above example) to construct the list of contacts who are either Decision Makers or were part of the campaign in question.
Multiple output blocks #
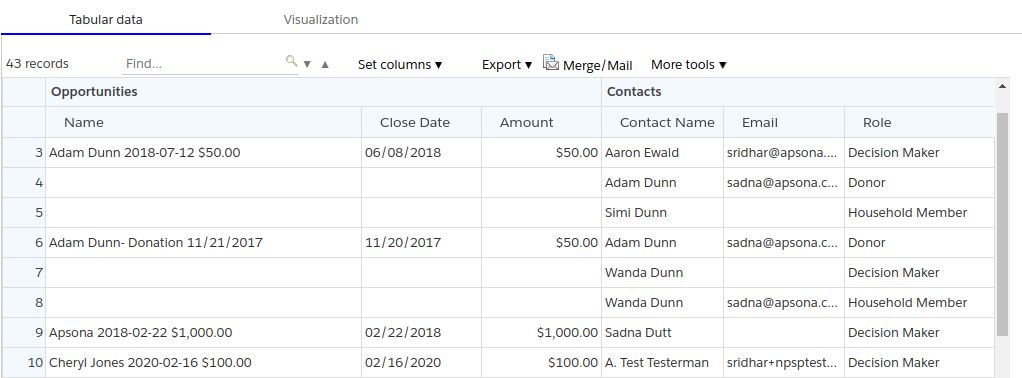
If you create a multi-step report in which every step is linked to exactly one earlier step, then you have essentially set up a linear chain of dependencies. So the results of all the steps can be laid out horizontally in one table (or “block”). If, however, a particular step is linked to more than one earlier step, or to none at all, then the records of that step cannot be naturally aligned with those of earlier steps. In such a situation, the report is displayed in multiple tables, one for each linear dependency chain in the report.
Controlling the record range and sort order #
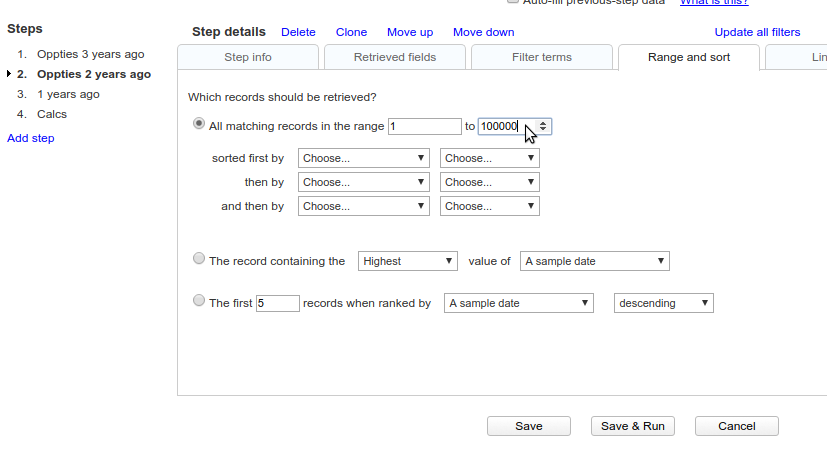
With each step of the report, you can specify – via the Range and Sort tab – the number of records to retrieve, and their ranked order relative to a previous step. This tab lets you make one three choices:
- All the matching records upto a specified maximum number, say 10,000. This is the default choice, and applies to the most common situation where we simply want all the records that match the filter conditions and linkages of the step. If you choose this option, the step’s records will be sorted in ascending order according to the order of the fields in the Retrieved fields tab. Therefore, if you want the step’s output to appear sorted on a particular field, simply make that field the first one in the list of retrieved fields by dragging and dropping it in the Retrieved fields tab.There can be a little confusion here: The maximum number you specify applies to the total number of records retrieved by the step, and not to the number of records linked to any particular record in a previous step. To illustrate, consider the short example we showed above, where we retrieved Contact Role records associated with Opportunity records. In that example, it might seem reasonable to say that since any given Opportunity does not carry more than (say) ten contact roles, we can limit the maximum number retrieved by step 2 to at most 10. But such is not the case, because step 2 executes only once, and independently of step 1, and therefore the limit we specify applies to the entire record range that it retrieves – not just to one particular parent-child linkage. In other words, the process is that Step 1 is executed first, and then Step 2 is executed with the specified record limit, and finally Apsona correlates the two record sets according to the specified linkage. So if we chose a limit of 10 for step 2, then it would retrieve only 10 Opportunity Contact Role records and try to correlate them with all the retrieved Contact records, so that quite a number of the Contact records would show no associated roles.
- The highest or lowest record when sorted according to a specified field. This choice applies in cases where, for each parent record, you want to retrieve just one child record that is “maximal” in some way. For example, for each Opportunity retrieved by a previous step, you might want to retrieve the most recent associated Activity record, i.e., the Activity record with the largest Start Date value. Along these lines, if you set a filter so that it retrieves only completed activities, then this choice would retrieve the most recent completed activity.
- The first n records when sorted according to a specified field, ascending or descending. This choice is similar to the previous one, except that it retrieves a specified number of “maximal” records instead of just one. For example, you might use this choice when you want to retrieve the five highest-value open Opportunities with each of your Partner Accounts.
Caveat #
In the second and third cases above, where we want the “first n” records according to a particular sort order, the linkage must be one in which both fields involved in the linkage are directly within their respective objects, i.e., linkages across fields in looked-up objects are not supported. Another way to state this constraint is to say that the two fields must be in objects which are one step away from each other via a lookup. If you try to create such a linkage, the report will fail validation. For example, if you have a step A that retrieves data from the Account object, you cannot create a later step B that retrieves the “first n” records from the Opportunity Contact Role object, since there is no direct lookup to the Account object. This constraint exists because of a technical limitation with Salesforce’s SOQL queries. Note, though, that you can create a step B that retrieves all matching records from the Opportunity Contact, since you can link the Contact’s Account ID field of the Opportunity Contact Role object of Step B to the Account ID field of step A.
Auto-filled output #
When a multi-step report involves two or more steps, and each record from an earlier step produces multiple records from later steps, the resulting output can be optionally auto-filled.
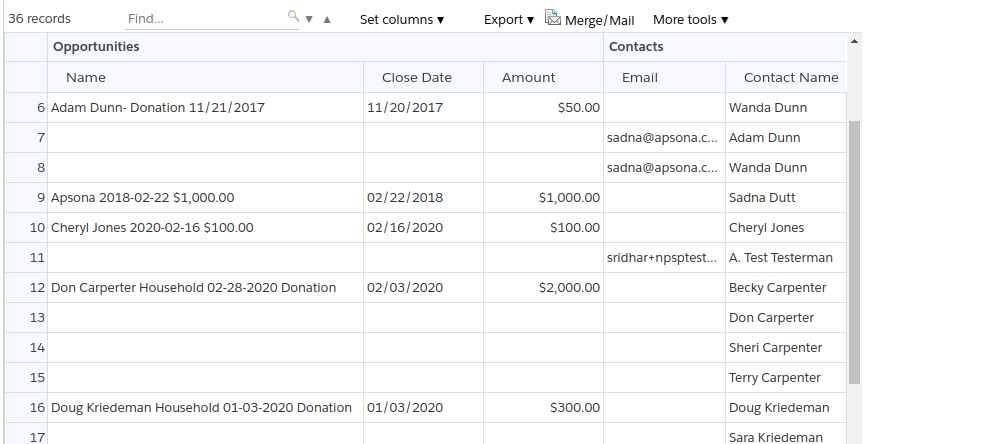
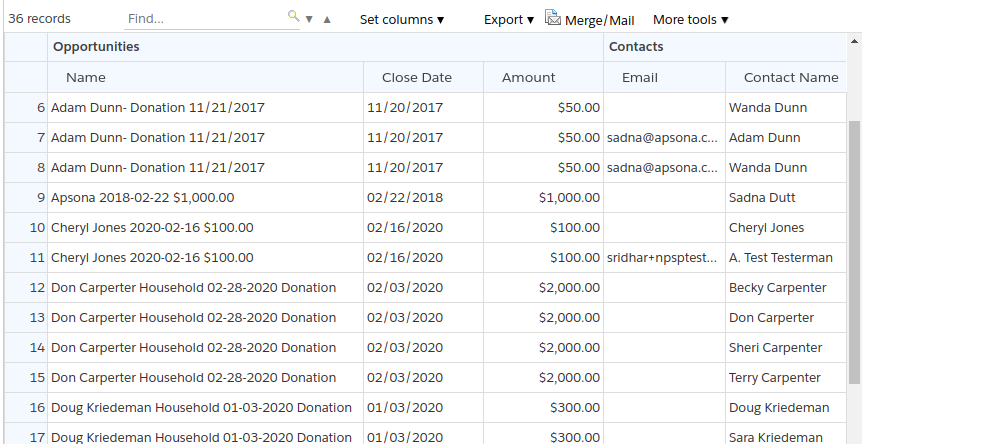
When creating or editing the multi-step report, you can specify which of these two layouts you want, as in the screen shot below. Note that if you use the non-auto-filled mode, you should not sort the report by clicking the column headers. Doing so will cause the rendering to be completely distorted. If you wish to retain the ability to sort, you must use the auto-filled option.
Some caveats:
- If you have numeric or currency columns in your report, the auto-filling will cause the totals at the bottom to be incorrect, because of the replication caused by the auto-fill.
- Record ID columns used in linkages will not be auto-filled, because of technical limitations with the auto-fill algorithm. In other words, you will still find gaps in such a record ID column where other columns will have been filled out.
- Auto-fill works only if you use exactly one linkage term, and that linkage term involves only Record ID or lookup fields. If you use non-lookup linkages, or you have more than one linkage term, auto-fill will not work.
Rendering rows as column blocks #
When displaying the list of records from the “many” part of a one-to-many relationship, it is sometimes useful to render the child records in column blocks rather than as rows. Consider, for example, a two-step report in which the first step displays your recent campaigns, and the second step shows the top three opportunities from those campaigns. Such a display might look like the one below. Notice the default rendering, in which up to three rows may be used for a single campaign record, displaying the top three opportunities from that campaign.
Sometimes, however, you might want to show the opportunities resulting from the campaign as column blocks rather than rows. In such a display, you would get just one row for each campaign, and the three opportunities will be shown in three blocks of columns – one block for each opportunity. Below is such a rendering of the same data.
The latter rendering is useful in several situations, e.g., when you want to generate a document from the multi-step report in which you want to include abbreviated information about each campaign.
To achieve this effect, you can set the check box labeled “Show this report’s records in column blocks” when editing the report (see screen shot below). Alongside, you specify the number of column blocks to be used for this rendering (three, in this example).
Some notes about column-block rendering:
- The “Show in column blocks” checkbox is only available for steps 2 and higher – it is not available in the first step.
- If you select this option for a particular step, you can have that step’s linkages depend on just one other earlier step. If it depends on more than one step, its output will appear in a separate block, so it does not make sense to allow this option in such a situation.
- Also, such a step cannot have any later steps linked to it, for technical reasons. This is usually not a serious limitation, however.
- Notice that the column block labels in column-block mode are derived from the name of the step, with numerals appended to the label to show different blocks. In the above example, the column block labels are “Opportunities 1”, “Opportunities 2” etc, derived from the step name “Opportunities.” This naming convention helps, for example, if you want to add a calculated field based on the values in these columns.
- The number of column blocks has to be specified in the report editor, and cannot be determined on an individual report basis. Thus, for example, if you set the number of column blocks to three, the report will always show three blocks, no matter how many opportunities are available for a given campaign.
Combining the results of two steps #
There are many practical situations where we will need the combined result of two steps which produce unrelated data. In database terminology, this is referred to as the union of two queries. Here are a few examples.
- Suppose, as is often the case, that there is a Primary Contact associated with each Opportunity record in your database, in addition to the usual Opportunity Contact Role that relates contacts and opportunities. Suppose that you wish to construct a list of contacts and their associated opportunities, regardless of whether the contact is a primary contact or an associated contact. Essentially, this means that you need a list of (primary contact, opportunity) pairs obtained directly from the Primary Contact lookup in the Opportunity, combined with a list of similar pairs obtained from the Opportunity Contact Role object.
- A similar situation arises when you have teams of Sales Associates who work together on Opportunities. The team is represented by the Opportunity Team Member object, but each Opportunity also includes an Owner lookup that indicates the Sales Associate who owns the Opportunity. The need here is to create a single combined list of Sales Associates and the Opportunities with which they are associated, whether via ownership or via team membership.
To construct a step that combines two previous steps, proceed as follows.
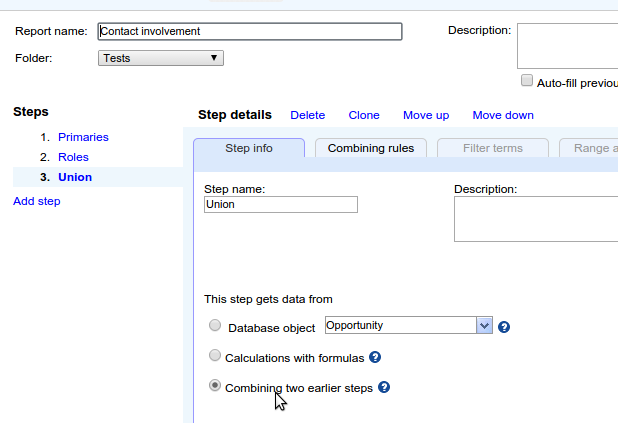
- In the Step Info tab, select the “Combining two earlier steps” radio button. This will cause the second tab to show “Combining rules”, and the remaining tabs will be inaccessible, as in the screen shot below.
- Click the “Combining rules” tab and select the two steps whose results you wish to combine. You can then set up the output columns of the combining step by “lining up” each retrieved field of the first selected step with a corresponding retrieved field of the second selected step, as in the example below.
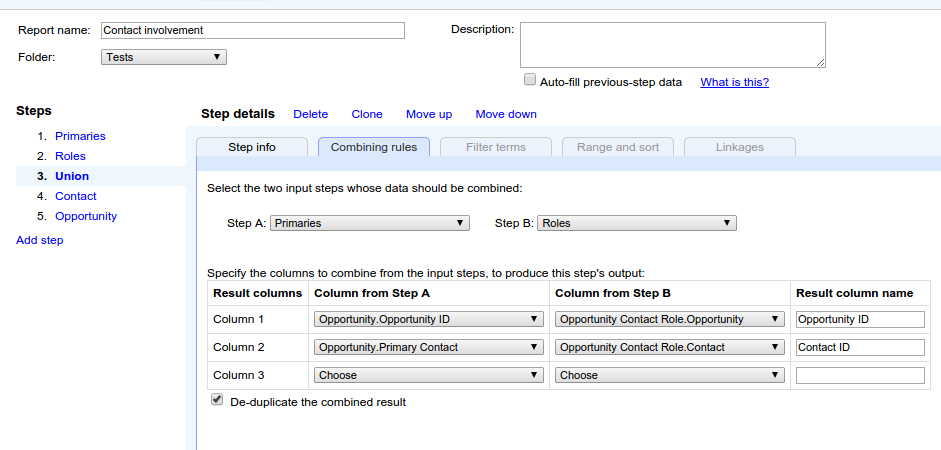
Note that you can only select matching types of fields to line up. For instance, in the above screen shot, we have set up the Opportunity Id field of the “Primaries” step to line up with the “Opportunity” field of the “Roles” step, ensuring that the two selected fields are of the same type, both being references to an Opportunity object. In general, the rule is that two input fields from the two input steps are allowed to be combined only if (a) they are of the same type (i.e., both dates, both numbers, both currencies), or (b) they both refer to the same object type (e.g., Opportunity or Contact).Note also that you can check the “De-duplicate” box to automatically de-duplicate the combined results
A tour of the report builder #
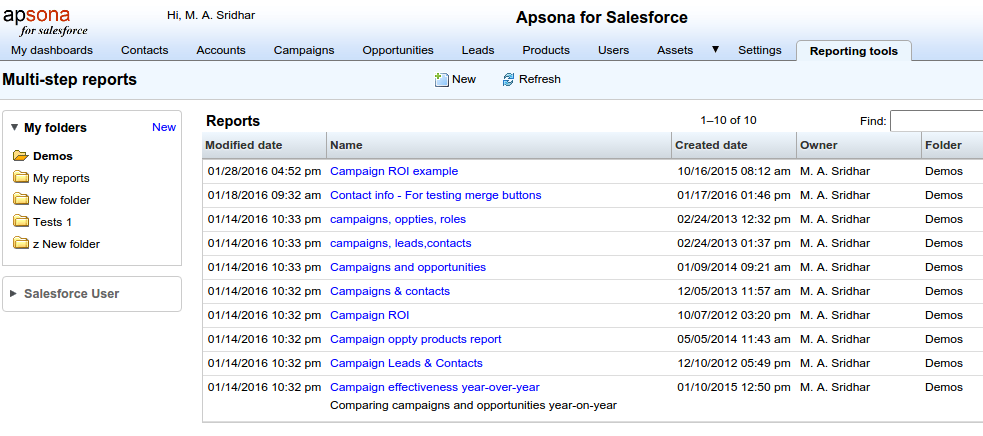
When you click the “Multi-step reports” tab you will see the list of reports on the right and the folder names on the left. “My folders” will display a list of all of your folders. Below your folders, you will see other users’ names and folders. You can run and clone other users’ reports, but you cannot edit their created reports. Under “Reports” you will see all the reports in the selected folder. You can move reports to different folders by clicking the red arrow. All the folder names will show up in the dropdown menu. Select a folder name and the report moves to that folder.
Click the “New” button to get started. The report wizard opens up. Start by giving the report a name and description. You can also select the folder to save the report. Click “Add step” to start building the report.
The Step Info tab #
In this tab, provide a logical name for the step that suggests what information will be retrieved by the step, and specify how the data is retrieved: from an object (i.e., it is a query step), a set of calculations (i.e., a calculation step, described here), or by combining the outputs of two previous steps (i.e., a union step). If it is a query step, you also select the object from which to retrieve the data for the step. Each step’s name will be shown as a header in the report’s output. (If you do not add a name for a step, it will be displayed as “New step” in the report output, and this will be non-intuitive.) You can also give the step a description. While a description is optional, it does come in handy when you run the report at a later time.
For a query step, you select the data source object by clicking the “Database object” drop down and then clicking the object you want. You will see all the objects available for your profile. Choose the required object by clicking on the object name in the dropdown. You can also type a few characters in the box, and when you do, the dropdown contents will be restricted to just the objects whose names match the characters you type.
Note, in the screen shot above, that
The Retrieved Fields tab #
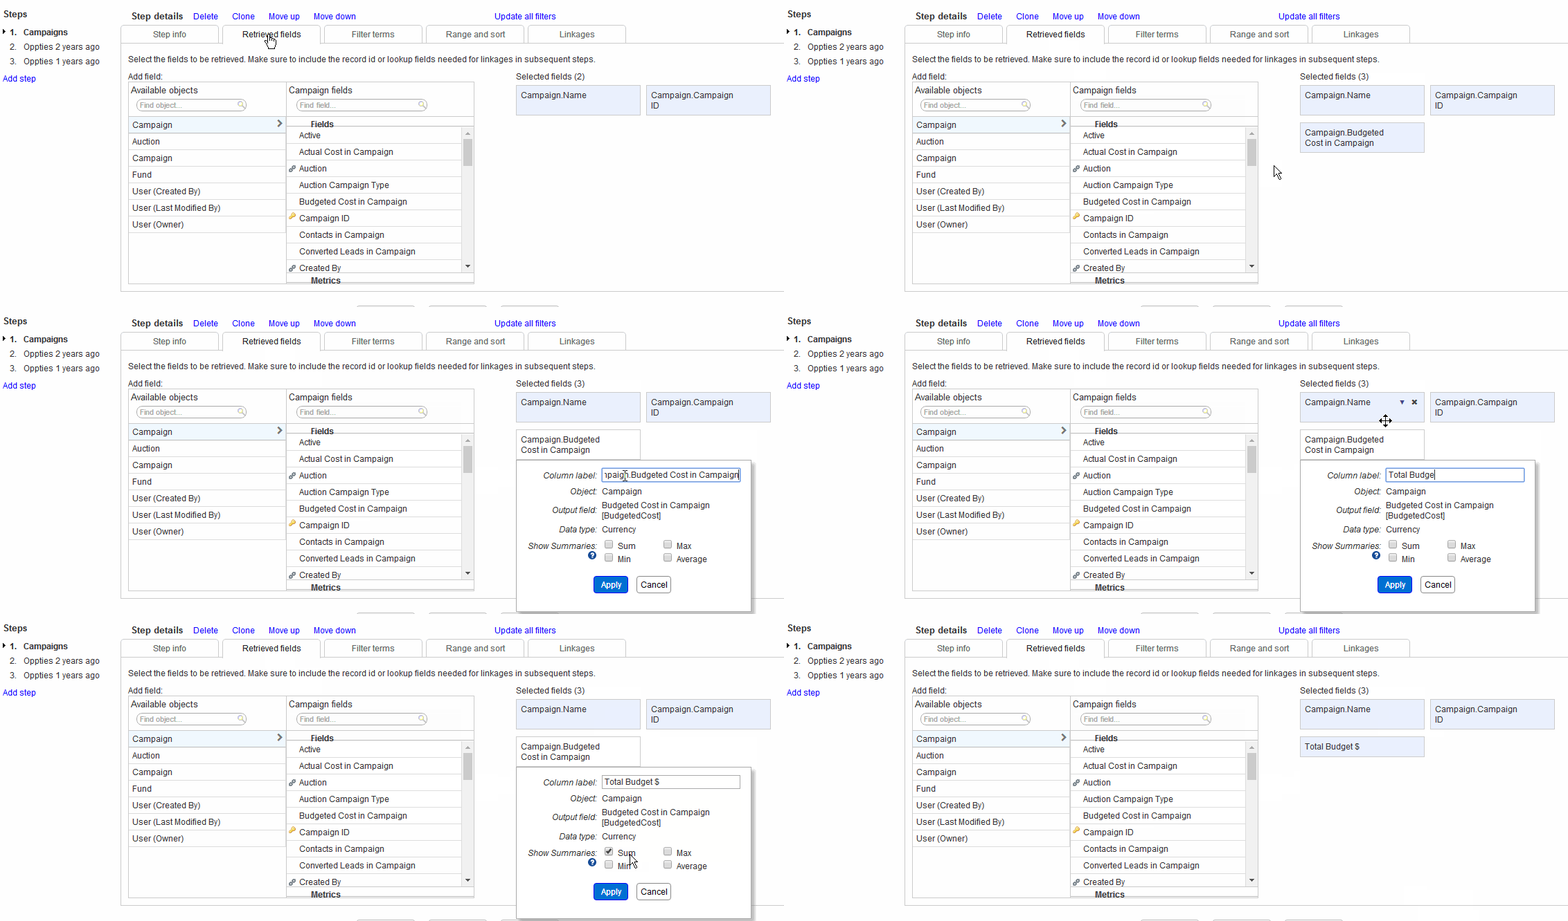
The “Retrieved Fields” tab lets you choose the fields of the object which will be retrieved by the step. To choose a field, simply click the field in the field selector – see animation below. You can choose fields and metrics from the chosen object as well its parents. The metrics section offers values for the number of records (count), sum, lowest, highest and average values for currency fields, and newest and oldest dates for date fields.
Bear in mind that, in each step, you will need to include the record id or lookup fields needed for linkages with other steps. The record id field is indicated by a key icon, and lookup fields are indicated by a link icon. Hovering your mouse over the link icon shows a tooltip displaying the object to which the lookup refers.
Producing column summaries for numeric fields #
When you edit a numeric field, such as a number, currency or integer field, the popup window includes checkboxes for “summary” functions Sum, Max, Min and Average. Checking one or more of these boxes will produce the corresponding summary value in the footer of the resulting report. For example, in the animation above, we have selected the Sum and Average functions to be shown in the report footer.
Rearranging and deleting fields #
You can rearrange fields by dragging and dropping them. You also can delete a field by clicking on the “delete” icon. The field search box allows you to search for fields in the object.
The Filters tab #
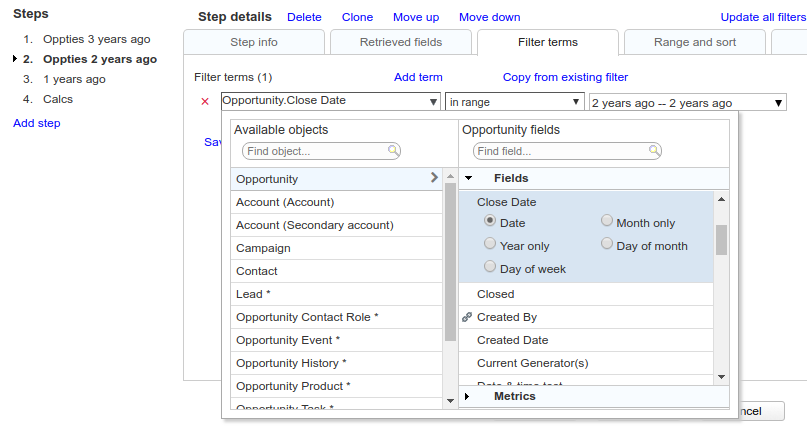
The filter terms tab is where you specify the filtering criteria to apply when retrieving data for the step. You can choose to use saved existing filters from the chosen object, or add new filter terms for the step. You can also choose filters click the Record id field of the related object and choose in filter as the operator. Please click the link for more details on filters.
The Range and sort tab #
You have three options, as follows:
- All matching records — You can specify all records or limit the number of records you want to see. Enter a number for the maximum number of records to be retrieved when the report runs.
- The record containing the highest or lowest value of a field — Fields can be of type date, currency and number (for example, the highest value of the Amount field in Opportunities).
- The top 10 records by a field in ascending or descending order. For example, retrieve the top 10 opportunities by field Amount ranked in descending order.
This tab allows you to limit the number of records you want to retrieve especially if you have a very large database and this helps in not hitting your API limits.
The Linkages tab #
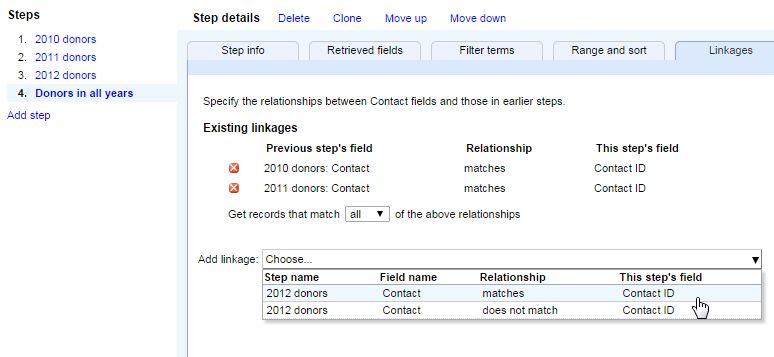
The Linkages tab lets you set up and manage the linkage relationships you need between the current step and one or more previous steps. It displays all the available linkages as well as the ones that you have selected. You can delete an existing linkage by clicking the red X button next to it. You can add new linkages by clicking the linkage chooser dropdown next to “Add linkage.”
The linkage chooser shows one row for each possible candidate linkage, with four columns:
- the name of the previous step,
- the name of the field in that step that can be matched,
- the relationship (“matches” or “does not match”), and
- the name of the field in the current step for the candidate linkage.
In the screen shot above, the step has used two linkages to the steps named “2010 donors” and “2011 donors”, and chooser shows only two candidate linkages for the current step.
Note that the chooser displays only those linkages that are actually available; in other words, only those cases where there is a field in a previous step whose type matches that of a field in the current step.
Running a report #
Tip: It is advisable to click “Save” after every step is completed.
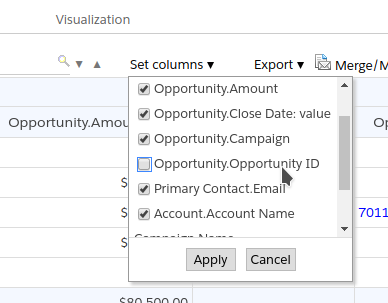
When you run a report, you will see the results in a tabular view. If the steps in the report link to previous steps, the blocks display in joined blocks. If the steps are not linked (negation linkages), steps will show up in different blocks. You can sort on each column and also change its width. You can choose to hide fields of the report by clicking on Set columns. All the fields in the report will show up. Uncheck the fields you would like to hide and click Apply. (Lookup fields show up with the Salesforce record id and such fields can be hidden once the report is run) . You can export data of a report into a CSV or XLS format by clicking the down arrow next to Export.
Temporarily changing filters #
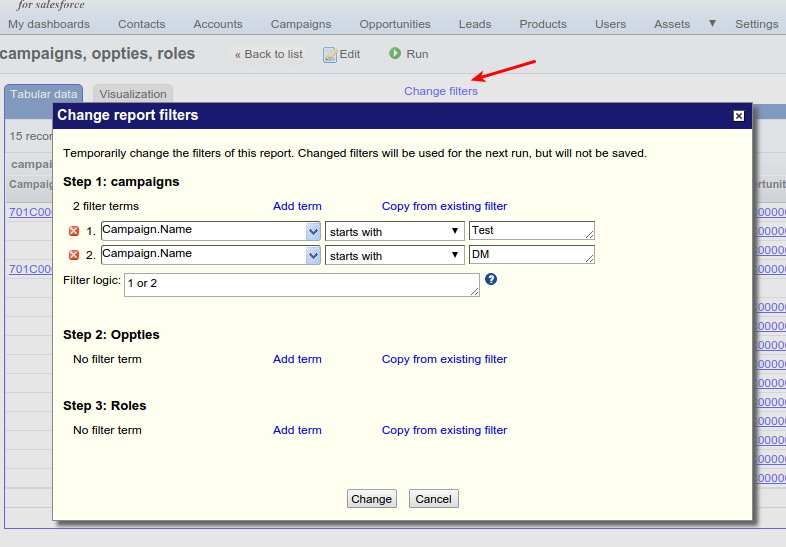
If you are the owner of the report, or have edit access to reports in general, you will have available a “Change filters” button at the top of the report table. Clicking this button will show a popup window via which you can temporarily change the filters of each step of the multi-step report, and then run it. When you change the filters in this way, you are overriding (i.e., replacing) the filter terms that are wired into the report. But Apsona will not save the changes you make to the filters, it will only use them to run the report when you click the Change button.
If you are not the owner of the report and you do not have edit rights, you will see a “Show filter builder” button via which you can add filters on top of the ones already wired into the report. Unlike with the “Change filters” button, you will not be able to override any filter terms in the report, you can only add new terms to it to further restrict it.
Selecting columns to show #
The “Set Columns” button offers a popup via which you can set the columns of the report that will be shown in the display. The usual need for this feature is when you have included lookup and key fields in your report because they are needed for linkages, but you don’t want to see those fields in the display. Using this popup, you can hide the irrelevant columns and show just the ones you need, and hide the ones you don’t need.
Exporting the report records #
The Export menu lets you export the report’s data records in either CSV or XLS format. The exported content does not include columns you set to hidden via the “Set Columns” menu.
Managing reports and folders #
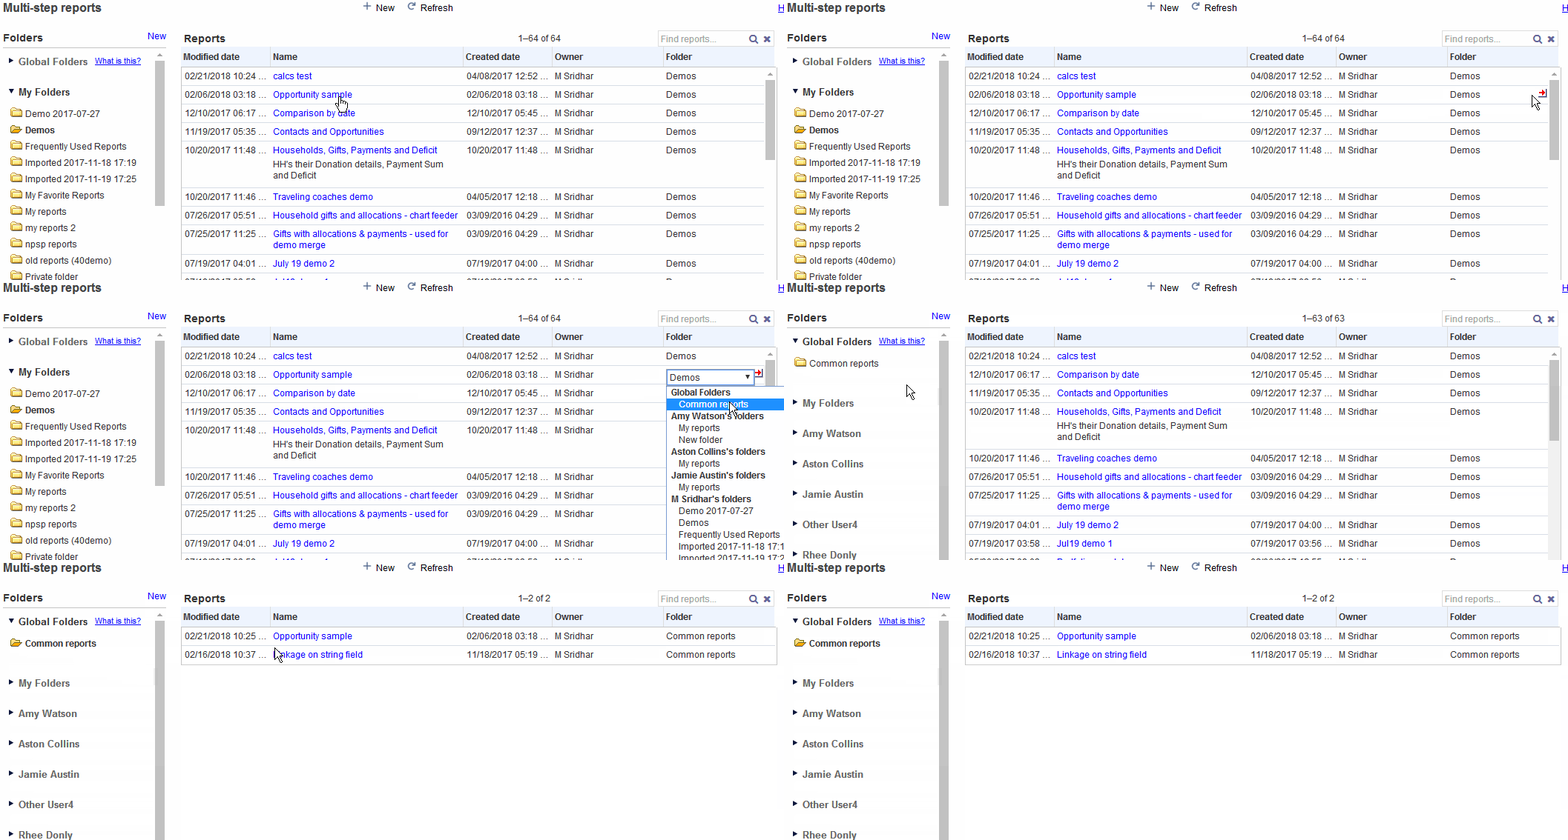
You can organize your reports into folders, grouped according to your needs. When you access your list of multi-step reports, you will see a list of folders on the left, and when you click one of the folders, the reports it contains will be shown in the report list.
- To rename or delete a folder, hover over the folder name, click the downward-arrow that appears, and then select the action you wish (rename or delete).
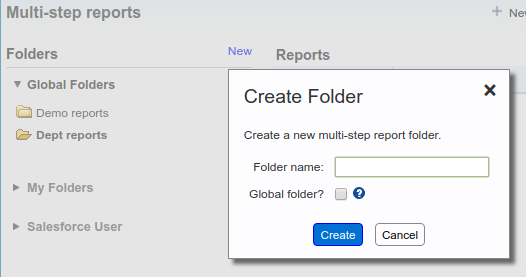
- To create a new folder, click the “New” button at the top of the folder list. This displays the popoup shown below, via which to create a folder.
- To move a report to another folder, hover over the report’s folder, click the right arrow, and select the target folder to which to move, as in the animation below.
Global folders #
As an administrator, you can create one or more global folders which will be shown at the top of the folder list (see screen shot above). Note that non-administrators cannot create global folders – the “Global folder” checkbox in the popup will be grayed out. All users who have access to multi-step reports will be able to access the reports in a global folder, so that they can run or clone such a report. But in order to be able to edit a report in a global folder, or to move it to another folder, you must be an administrator or the owner of the report.
Folder list organization #
The folder list is organized with Global Folders at the top, followed by your folders, and then by folders belonging to other users, in alphabetical order by user name. Under each user’s name will appear the list of the user’s folders which are visible to you. You can click any of those folders, examine the reports in it, and run it or clone it.
Finding a report #
You can also search for a report by name, via the “Find” box at the top of the report list. When you do so, the resulting list shows all the reports visible to you, each listed with its owner and folder. The matching is by substring, i.e., the result of such a search will include every report visible to you with a name or description containing the string you type.
Folder visibility #
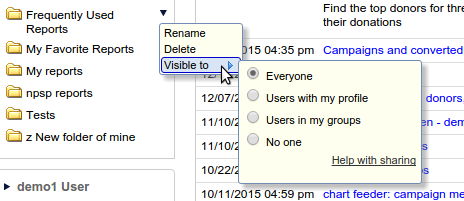
You can set the visibility of each of your multi-step report folders to one of four choices:
- Everyone (the default access level), meaning that the folder and its contents are visible to every other user who has a multi-step report license;
- Profile, meaning that the folder and its contents are only visible to other users who have the same profile as you;
- Public groups, meaning that it is visible only to other users who share at least one public group with you; or
- No one, meaning that only you can see the folder and its contents, no one else.
Note that even if a folder of yours is visible to another user, the user will not be able to edit or delete the report since she does not own the report. The user can only run a report in the folder or clone the report. But an administrator can view and edit all folders and reports. Thus the above visibility levels are enforced only among users who are not administrators.
When you create a folder, its access level is automatically set to “Public”. If you wish to change its access level, hover over the folder name and click its menu. Then hover over the “Visible to” menu item, and you will see a sub-menu that displays the folder’s current access level. Click the access level you wish to use.
Allowing non-administrators to manage multi-step reports #
In some situations, you might need one of your non-administrator users to be able to manage multi-step reports, i.e., to be able to edit all other users’ reports, or be able to move reports between folders without being the report’s or folder’s owner. For example, your primary administrator is on vacation, and a stand-in administrator will manage the multi-step reports for that duration. You can achieve this by creating a Permission Set with API name Apsona_Allow_MSR_Full_Access and assigning it to the user. (See this article for how to create a Permission Set.) Note also that the API name must exactly match the above name, although you can use any label you like. When that user uses Apsona, she is then able to edit or move all multi-step reports, even those that she does not own.
Bear in mind, however, that this permission set assignment does not in any way affect the user’s ability to access Salesforce objects or data records. Those access rights are still governed by the standard administration parameters, such as the user’s Salesforce profile, any sharing rules in effect, and their Apsona Configuration. Thus, for example, if the user tries to run a report that uses an object they cannot access, she will see an error stating that the object is inaccessible.
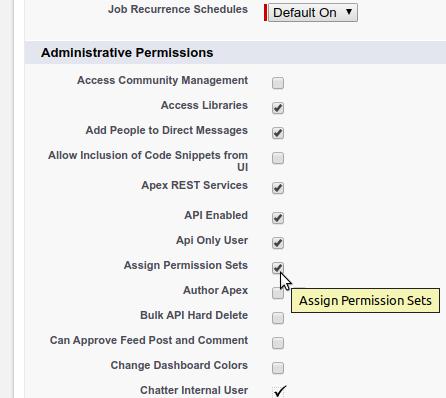
As of the Winter ’20 Salesforce release, the user’s profile also needs the “Assign Permission Sets” permission. See screenshot below.
Notes #
- When you create a multi-step report, the report builder stores the API names of the fields within the report representation, for the columns you have selected and for the fields in the filter criteria. This is because Apsona relies on the API name to uniquely identify the field. So if you subsequently change the API name, the report will be unable to find the field and will fail to run.
Troubleshooting #
Error messages about missing fields or objects #
You might run into errors when running multi-step reports, saying that Apsona can’t find a particular field, or a particular object. To resolve these errors, request your administrator to take these steps:
- Ensure that all of the objects and fields in question are accessible to your Salesforce profile.
- If any of the fields causing the errors is a lookup field, ensure that the object to which the lookup refers is accessible to your Salesforce profile.
- In the Apsona Configuration for your profile, ensure that all of the objects and fields are marked as visible. See related documentation for more info about this.
- After the above steps have been carried out, log out and back in, access the Apsona window, and click Settings – Clear cache to ensure that your browser rebuilds its local information about the objects and fields that you can access.

