Prerequisites #
To use the mail merge tool, please make sure the Apsona configuration for your profile (described here) includes the access to the following Salesforce objects.
- The
Email TemplateandLetterheadobjects must be included. These objects contain the data records for the email templates needed for generating email. - If your merge action creates Task records as part of its logging, make sure your Apsona configuration includes the Task object as well as the Task surrogate for the specific object for which you are adding Task records. E.g., if you are adding Opportunity tasks, make sure that your configuration includes the Task and the Opportunity Task object.
- If your merge action stores the resulting attachments in Salesforce, your Apsona configuration must include access to both the Attachment object and the corresponding surrogate, e.g., the Contact Attachment if you are attaching to the Contact record.
Preparing your email template #
Apsona can use as email template any of the templates available when you click Setup – Communication Templates – Email Templates in Salesforce. In the Lightning experience, you click Administration – Email – Classic Email Templates. Apsona can use either plain text or HTML templates.
Naming your merge fields #
Merge field names in email templates are surrounded by double curly braces and can contain alphabets, numerals or underscores, but may not include any other characters (such as punctuations or embedded spaces) in them. For example, {{CustomerName}} is a valid merge field name, but {{Street Address}} is not (because of the embedded space).
Text, HTML or Custom? #
When you create a Classic Email Template in Salesforce, you can set up the template type to be one of Text, HTML, Custom, or Visualforce. (The Visualforce template type isn’t used by Apsona.)
- With a a Custom template (without Letterhead), you can include niceties like clickable links, font styles (boldface, underline and so on), bullet lists, images, colors and the like.
- An HTML template (with Letterhead) is similar, but it accommodates an additional header and footer area.
- With a Text template, you are sending plain text without any of the HTML niceties.
Any of these template types can be used with the Apsona Document Generator. You can use the Salesforce screens for editing your email templates, or you can use the one in Apsona. The latter doesn’t support Letterhead templates, however.
Images in HTML templates #
You can include images in your HTML and Custom templates in the same way that you would in any HTML file. Typically, an image you need included in an email would have to be stored on a server somewhere, and accessible via a public URL, You could also store your image in your Salesforce org as a Document, and ensure that the “Externally Visible Image” checkbox on the document record is checked. There are other ways (such as CID or data URLs) to include images in HTML email, but these are less reliable (i.e., the recipient might not be able to view the image), so we don’t recommend them.
Technically, you would be using an HTML IMG tag to include your image, something like this (where https://myServer.com/myimage.png is the image’s URL):<img src="https://myServer.com/myimage.png" />
You can also create dynamic images in your email, by varying the URL of the image tag. For example, suppose you have stored images in your Salesforce Document object, and your org ID is 00D360012345678 and the “my domain” URL for your org is https://example.my.salesforce.com. You can then create an image reference in your HTML like this:<img src="https://example.my.salesforce.com/servlet/servlet.ImageServer?id={{DocumentID}}&oid=00D360012345678Here, the id parameter uses a template merge field called DocumentID, that you can map to a suitable field in your data source that contains the record ID of the document.
Template attachments #
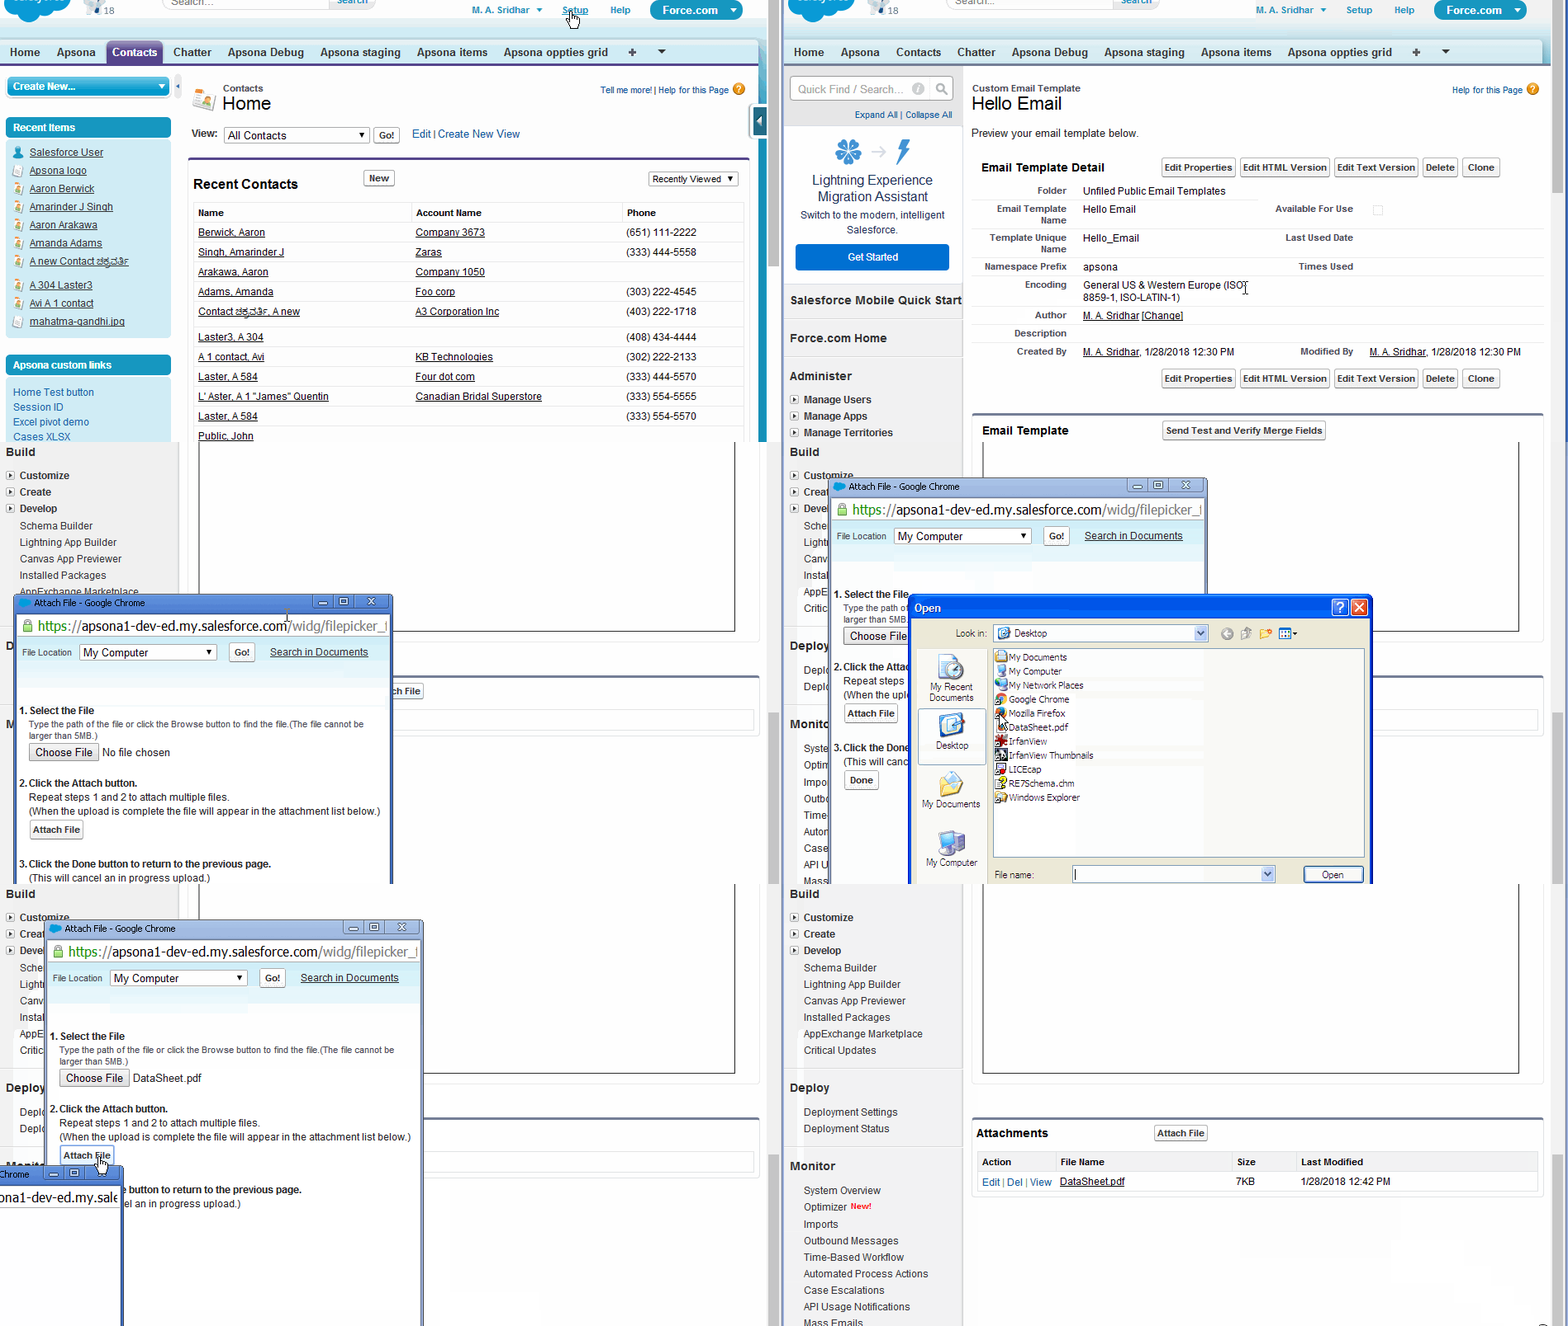
Salesforce lets you create attachments to email templates, so that you can attach to an email any non-dynamic file such as data sheets, white papers or prospectuses – content that isn’t personalized for the email’s recipient. To attach such a file to an email template, find the template in Salesforce via Setup – Communication Templates – Email Templates, scroll down to the bottom and use the “Attach File” button as shown in the animation below.
If you select “My Computer” in the File Location dropdown, the file is attached directly to the email template. When such an email template is used, Apsona picks up its attachments and includes them with each email that is sent out.
Apsona does not support attachments linked to the Document object or the folders in Salesforce – it only supports attachments uploaded via the “My Computer” choice in the File Location dropdown.
Generating email messages without attachments #
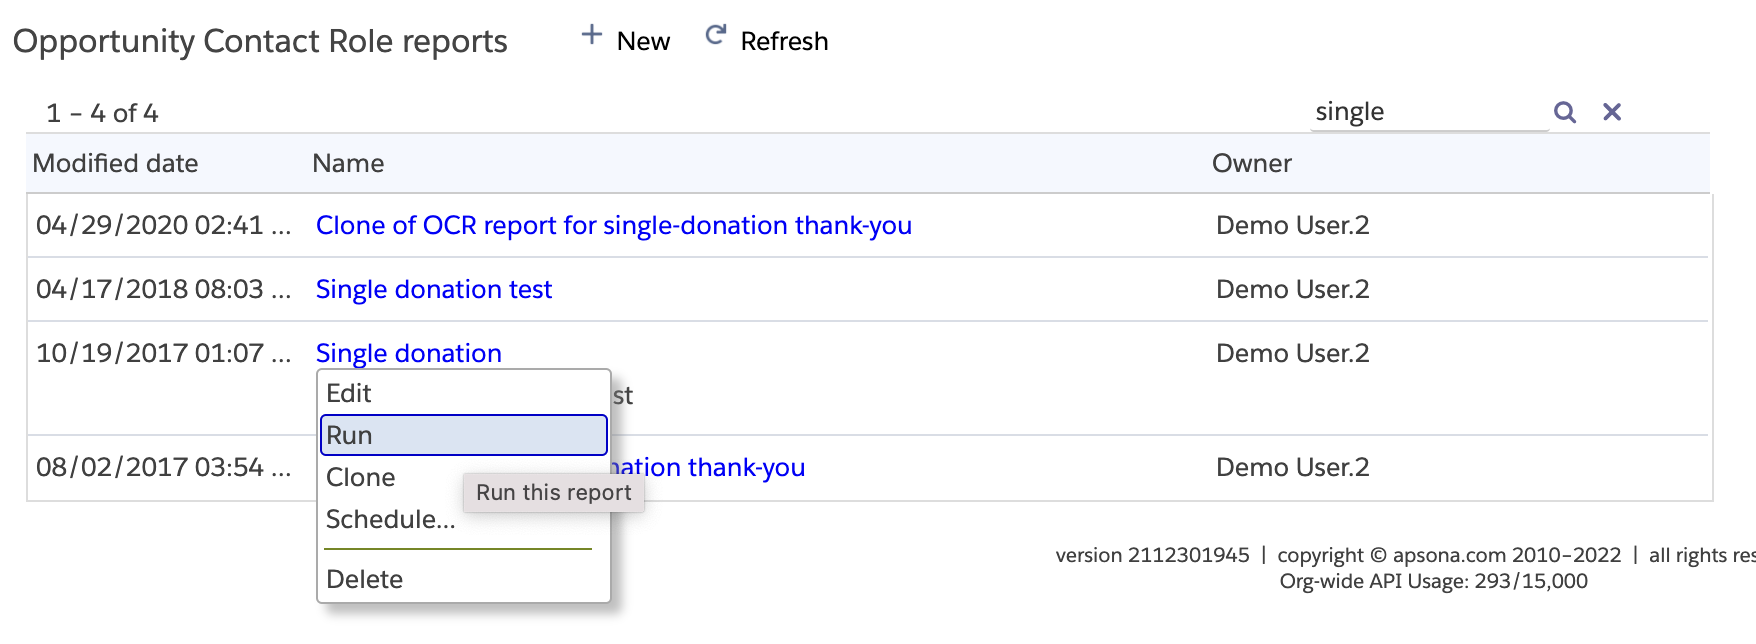
Select and run the report for the email merge #
Selecting a subset of records from a report #
Once the report is run, you can select one or more rows from the report result using either click, shift-click or ctrl-click. With such a selection, each selected row will generate one email message. If you do not make such a selection, all of the rows in the report will be used, and each row will generate one email message.
Set the merge options #
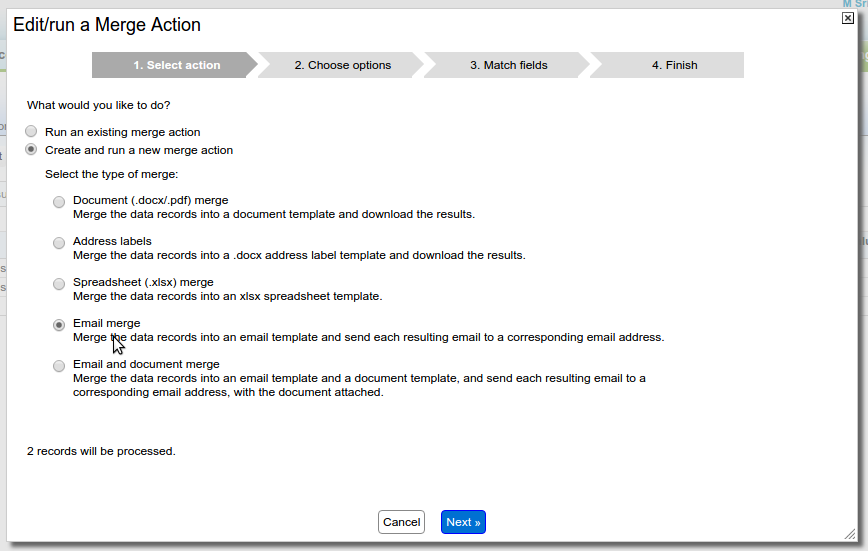
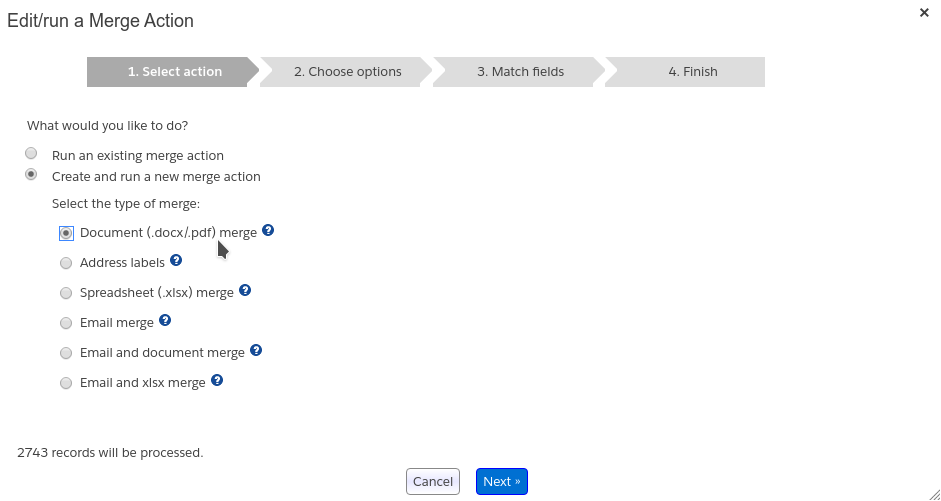
Here you can select the type of action you need. In this example, we will select Email merge, and click the Next button. Notice that the popup shows the number of records to be processed.
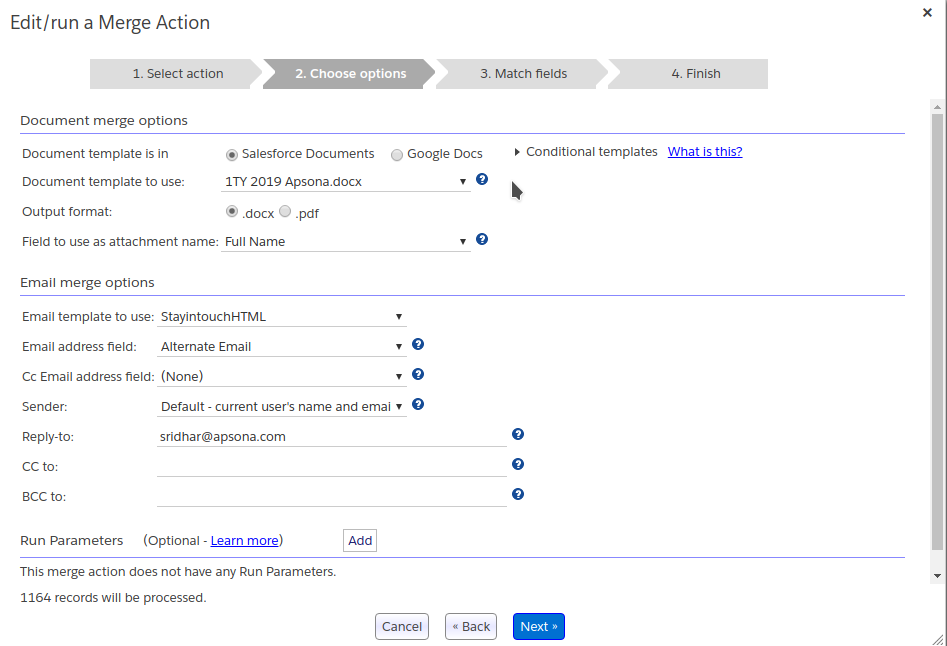
Set template-related options #
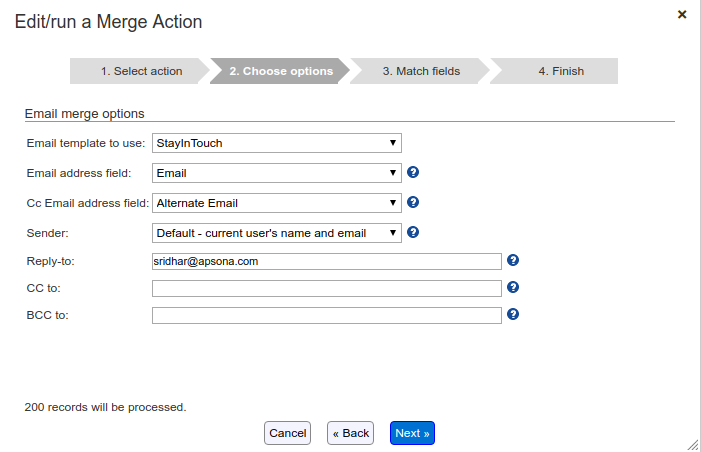
- In the “Email template” selector, select the email template to use. All the email templates stored under Communication Templates in Salesforce will be shown in this dropdown.
- In the “Email address field” selector, select the field or column containing the recipient’s email address. This dropdown displays all email or text fields in the object or report from which you are sending the emails. Thus each data record produces one email message to be sent to the address contained in the field you select here.Note: Apsona allows the mapped field to contain multiple email addresses separated by commas. When a field has multiple addresses in this way, all of the email addresses are included in the “To” list of the email message.
- In the “Cc email address field” selector, optionally select the field or column containing the CC recipient’s email address. If you select a field here, the generated message will be cc’ed to the email address(es) in the field. The field must contain either a single email address, or multiple email addresses separated by commas, semicolons or spaces.
- The “Sender” dropdown lets you choose the name and email that the recipient of your email will see as the origin of the email. The default value is always the name and email of the user who runs the merge action. If you wish, you can set up org-wide email addresses, and any such addresses will be available as options in the dropdown. For example, you might use this feature if you want all emails to appear as having been sent from
The CEO <ceo@mycompany.com>, regardless of which user actually sends the emails. - Enter an email address in the Reply-to box. This email address will be used as the “reply-to” field in all the outbound email messages.
- Optionally, you can provide CC and BCC addresses. Within the CC address box, you can provide a list of email addresses separated by commas, and if you do so, all of those email addresses will be CC’ed on every email sent. Similarly any addresses in the BCC box will be BCC’ed on every email message.
Click Next.
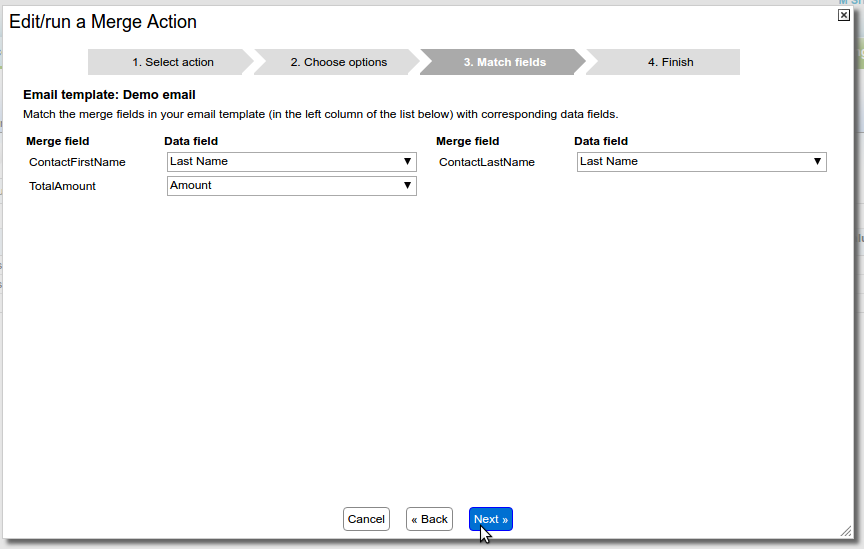
Match merge fields #
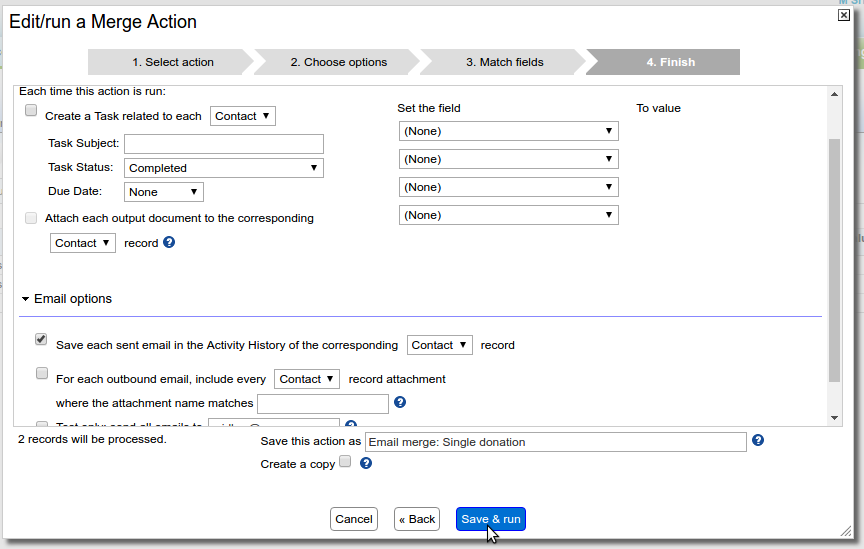
Set options for logging #
In Step 4 of the merge wizard, you can select a few different logging options specifying what will happen each time the merge is executed. You can select one or more logging options, or none at all.
- You can set a specific field to a specific value.
- You can add a Task record to a particular object.
- If you are attaching a generated document to each sent email, you can attach that document to a corresponding record in Salesforce.
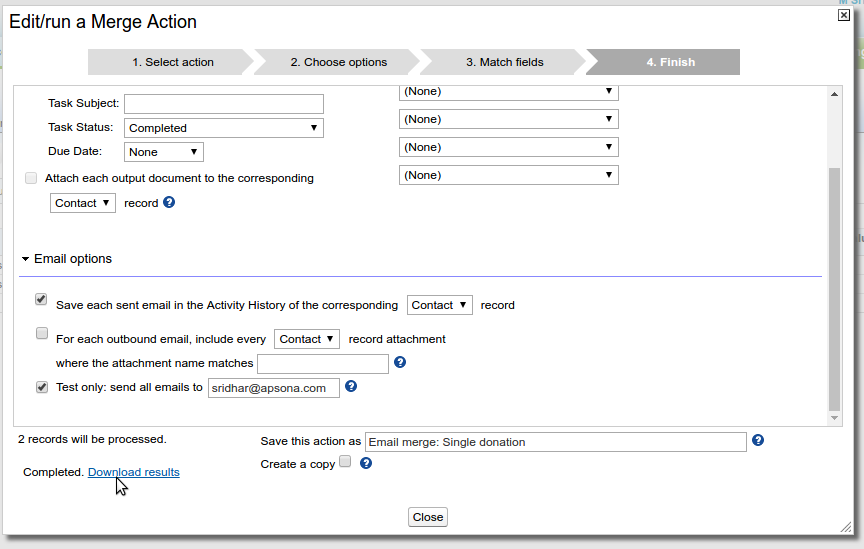
The merging process checks for any errors that might have occurred in sending the email. For example, if a record has a malformatted email address, then the email cannot be sent. In such a case, the logging action will not be taken for that record; in other words, the logging actions will be taken only for those records for which Salesforce indicates a successful email transmission. Note, though, that this does not mean that all the emails were successfully delivered; for example if an email address looks valid but points to a non-existent domain or one whose mail server is down, or if the mail server refuses the email, the message will not be delivered even though Salesforce has indicated success.
Testing your merge action #
When you initally create your merge action, you may want to test just the merge itself, and not run any of the logging actions or send any emails. There are two ways to do this, based on if you are creating a new merge action or if you are editing / running an existing one.
For new merge actions #
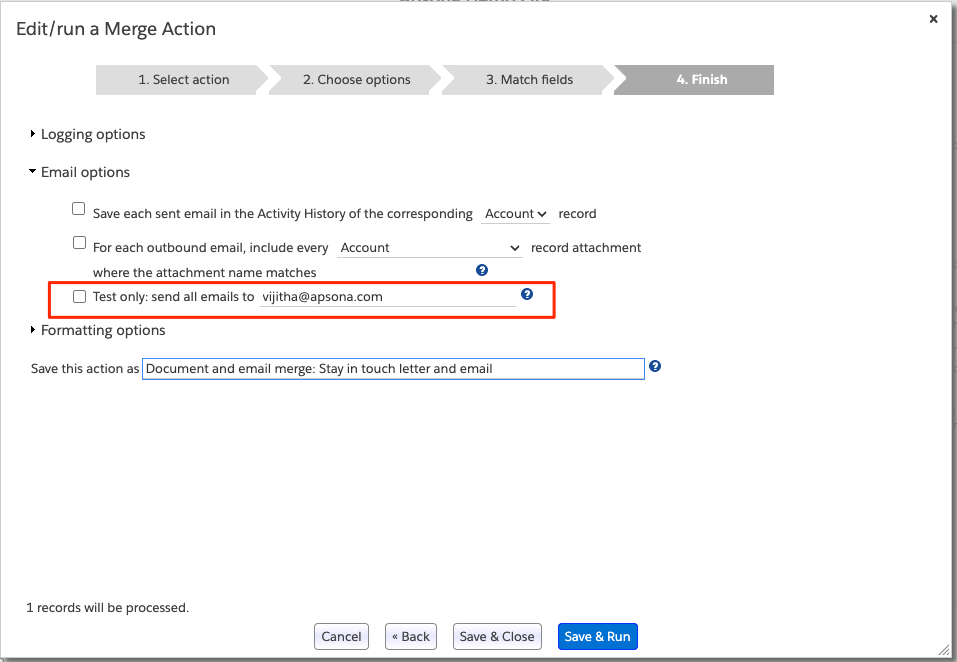
The “Test only” check box can be used if you need to test a template by sending emails to a particular address:
Enter an email address in the box. If you choose this option, all the generated emails will be sent to the email address you specify, regardless of the actual email addresses in the data records. You can use this to test your merge templates.
Note, though, that setting the test-only checkbox will only (temporarily) affect the To address of the emails being sent out. It does not affect the Cc or Bcc settings in your merge action. Therefore, when testing your merge action, it is best to use a small set of records with known To, Cc and Bcc email addresses. (See above directions for how to select a subset of records from a report.)
Also note that this will not affect the logging actions set in the merge action. Those logging actions will still run, even if you have the “Test only” checkbox checked. To prevent logging actions from running while testing, see the next section on testing for existing merge actions.
For existing merge actions #
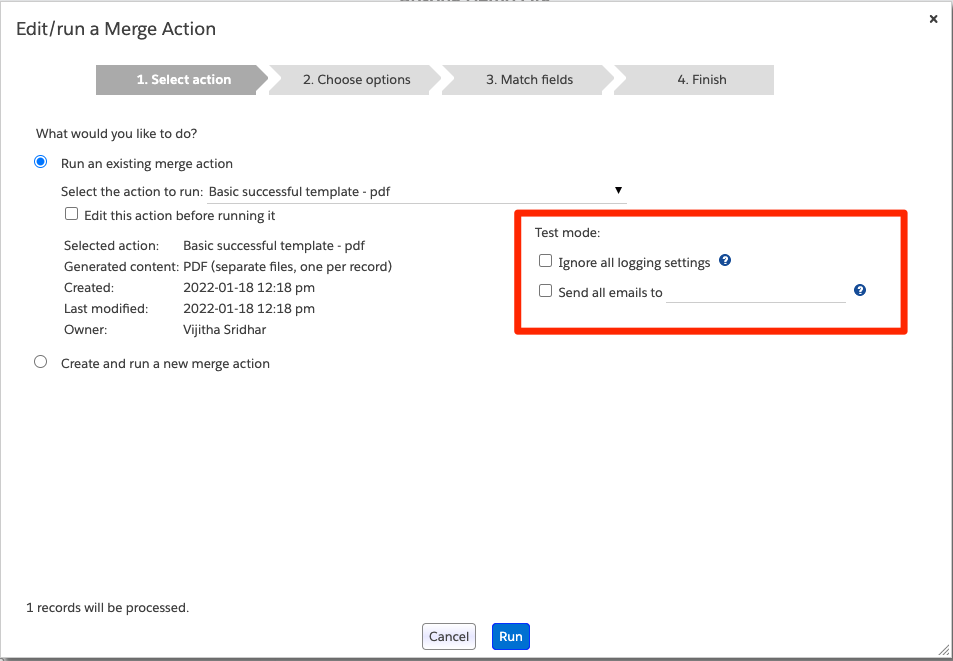
When you select an existing merge action, you will see a “Test mode” section appear, as in the following screenshot:
This allows you to prevent logging actions (such as updating fields or creating tasks) from running, and send all emails to a specified address. This way, you can test out your merge action without any side effects to your data in Salesforce, and without emailing anyone unintended.
You will also still see the “Test only” checkbox in Step 4. If you are okay with logging actions running, and only need to ensure that emails go to a particular address, you can use either this checkbox or the “Send all emails to” checkbox in Step 1.
Download results #
You can click the Download results button to see the result of each record in the email merge batch. If the email was successfully sent to the recipient it will show as Success. If the email was not sent to a particular record that will be recorded as well.
Click close.
Email messages with generated attachments #
You can also send email messages with personalized content in the email body as well as a personalized attachment. The attachment can be either a .docx or a .pdf file. To do this, use the four-step merge action builder, as follows.
Selecting the action type #
In the first step of the merge action popup, select “Email and document merge” as the action if you want to generate docx or pdf attachments, or “Email and xlsx merge” if you want to generate xlsx attachments to your email. Click Next.
Selecting templates #
In this step, you select the document or spreadsheet template for the attachment, and the email template used for the email body. In the Document template selector, Apsona displays all the .docx files available in the Document object in Salesforce. (If you selected Email and xlsx merge in step 1, it displays all the .xlsx files in the Document object.) In the Email Template selector, Apsona displays all the email templates available in Salesforce (the ones displayed via Setup – Communication Templates – Email Templates).
Notice that In the Document merge options area, you can select a field to use as attachment name. This gives you a way to provide a customized name for the attachment to each sent email. For example, when sending a document to your vendors, you might want the attachment to be named something like “Acme Corp.docx” where Acme Corp is the name of the recipient company. To achieve this, you specify a field in your data source – e.g., the Account Name field – as the one that provides the attachment name.
If you run the merge action from a report, you can create a calculated value in the report and use it for producing the attachment name. This way, your attachment names can be customized to your exact needs, e.g., Acme Corp - Purchase Order - Jan 2017.pdf.
Click Next.
Mapping fields #
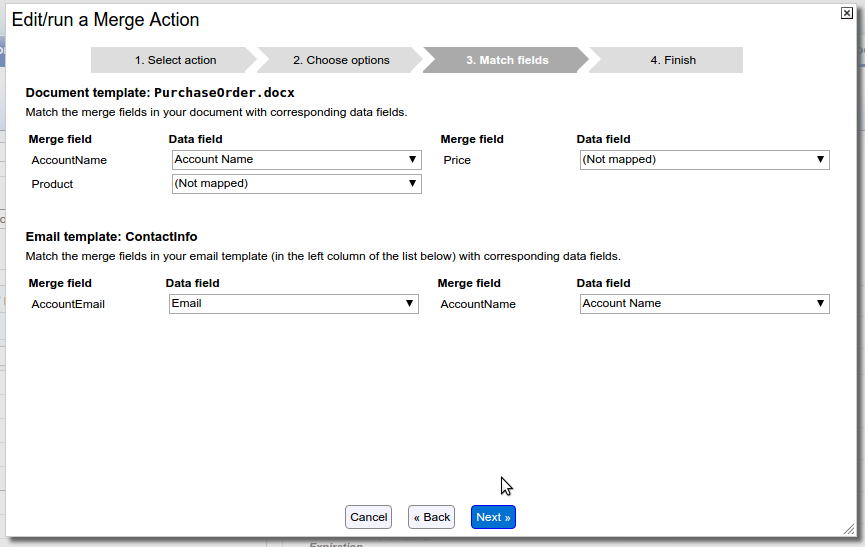
In Step 3, you set up the mappings between the fields in your data sources and the merge fields in your templates. This step is similar to the one for simple email merges, except that there is a “Document template” section as well as an “Email template” section for setting up the mappings in each of the templates.
After setting up the field mappings, click Next.
Setting options #
Finally in step 4, you can set up any options you need for logging to occur each time the merge action is run. 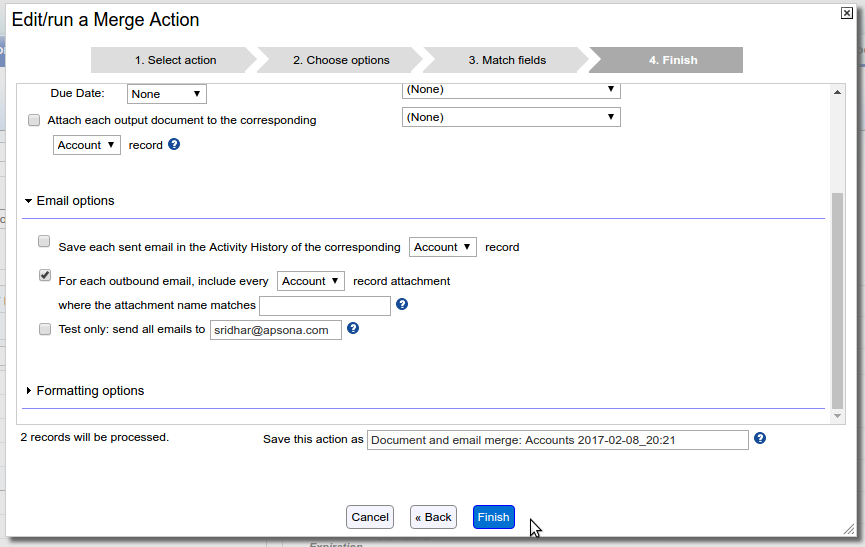
Troubleshooting #
The Email Address Field dropdown is empty in step 2 of the merge builder popup #
The Email Address Field dropdown contains the names of all the fields of data type email in the data source. For example, if you are running the merge from the Contact object, the dropdown might contain the Email, Personal Email and Work Email fields. But if merging from an object that has no email fields (e.g., Opportunity), the dropdown will be empty. In this case, you will need to create a single-step or multi-step report that extracts the necessary Email fields from related objects, and use that report to generate your document.
