Overview #
Apsona offers a connector to iATS payments for credit-card payment processing. Using this connector, you can process credit card payments for gifts in via Apsona’s Batch Gift Entry tool.
Functionality #
The connector offers the following functionality.
- When entering a gift as a batch item, you can include the credit card information alongside. When you save such a batch item, the connector makes a “place-holder” charge on the card, and saves a corresponding token with the batch item.
- When the batch is committed, all of the “place-holder” charges in the batch are executed, i.e., the cards are charged and the funds transferred to your account via the iATS payment gateway.
User interface #
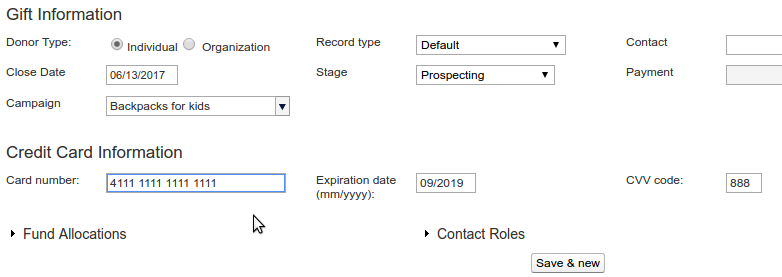
With the iATS connector enabled, an additional panel containing fields for credit card information appears in the batch item screen, as shown in the screen shot below. Notice that you can use spaces or dashes in the credit card number, so that it is more readable.
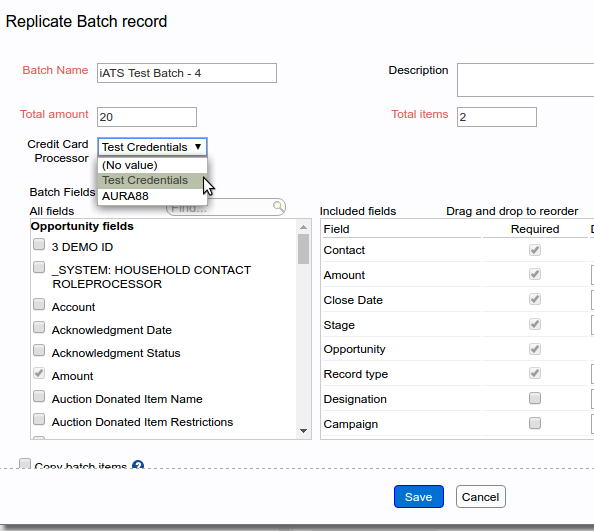
In addition, when creating or cloning a batch, you will be able to select the “Credit Card Processor” option for the iATS credentials to use with the batch, as in the screen shot below. The entries in the dropdown list contain the values of the Name field of the custom setting. When you select a particular name, the agent code and password associated with that name in the custom setting will be used for that batch.
Missing card info fields #
The Credit Card Information region of the batch entry screen which includes the card number, CVV code and expiration date, will be visible to you only if (a) your organization has a license for the iATS connector, and (b) the batch in question includes a valid value for the Credit Card Processor field described above.
Card validation #
During data entry, the card number is validated using the well-known LUHN check algorithm to prevent inadvertent user errors. Any errors that iATS generates when creating the place-holder charge are also reported immediately, so that when the batch is actually committed, the likelihood of errors is minimized.
Charge amount #
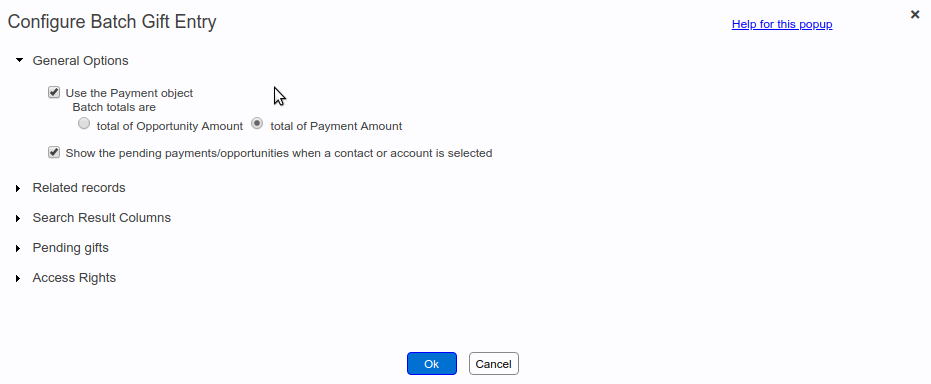
The amount field whose value is used to charge the card depends on the payment settings in your Batch Gift Entry setup. See screenshot below.
- If you have unchecked the “Use the Payment object” box, or if your batch totals are set to “total of Opportunity Amount”, then the amount field used will be the Opportunity Amount field.
- If, however, you have checked the “Use the Payment object” box and set the batch totals to be those of the Payment Amount field, the amount field used will be the Payment Amount field.
Optional items #
Not every item in a given batch is required to have credit card information. If, for example, a particular gift in your batch is not paid via credit card, simply do not enter any values into the credit card fields for that item, and the batch tool will ensure not to access iATS for that item.
Editing items after entry #
The list of items in a currently-open batch can be edited via the grid below. But with credit card charges enabled, you cannot change the amount of the charge after the batch item has been saved, because that amount is associated with the iATS token stored with the batch item.
Inspecting card info #
Also, once the batch item has been saved, you cannot inspect its contents to find the credit card number or CVV code used when creating it – those fields are not stored in Salesforce, as noted above.
Error processing #
During the commit process, the charge for each item is executed on the iATS server only after all of the other data from the batch item have been created or updated in Salesforce. Therefore, if there is an error in committing any of the other data, the charge will not be executed. Note, though, that because of this sequence, the batch item data will appear in Salesforce even if an error occurs when the charge is executed.
Storing credit card information #
As part of each batch item, we store the three-digit CVV code for the credit card if one is provided (so we will need to save it between saving and committing). However, we specifically ensure that, when the batch item is saved, the actual credit card number and expiration date are merely transmitted to iATS, never saved with the batch item or anywhere else in Salesforce. This choice is so that the card processing remains fully secure, with no data leakage, and relies on the PCI DSS compliance that iATS offers.
Transaction logging #
The connector includes a custom object named Apsona iATS Transaction that is used for logging. Every time a charge is committed, a new record is created in this object, and its fields are set to the data returned from the iATS server for that commit. In addition, the object contains two lookup fields, one to the Opportunity object and a second to the NPSP Payment object. These fields are set to the Opportunity or Payment record that caused the transaction. You can therefore use this object to report on all transactions, or to track failed or refundable transactions. Consult the iATS documentation for details about these fields.
To use the Apsona iATS Transaction object, your administrator must ensure that it is made visible in your Apsona Configuration. (See this article for information about visible objects.) If this object is not visible, no log records will be written.
Managing iATS credentials #
When connecting to iATS, it is necessary to specify credentials, i.e., agent code and password associated with the account to which cards will be charged. The Apsona iATS connector allows for multiple credential sets, e.g., separate credentials used for development testing, user acceptance testing, and production use. The iATS connector looks for a custom setting with API name apsona_be__iATS_Connection__c containing these credential sets. (That custom setting is included in the connector managed package that you will need to install – see below.) Each credential set includes the name, the agent code and the password for the corresponding iATS account. As an administrator, you can manage the contents of this custom setting as needed for your organization. You can install this custom setting by installing the corresponding package, as described later below.
Installation and setup #
To install the connector, please follow these steps:
- Install the Batch Gift Entry package version 1.5 or later, from our AppExchange listing.
- Install the iATS connector package from one of the links below, as appropriate:
- Please contact us to obtain a license, or for a trial of the connector.
Post-installation steps #
Once the connector is installed:
- Ensure that the Custom Setting named iATS Connection (API name: apsona_be_iats__iATS_Connection__c) is set up as a visible object in the Apsona Configuration for every user profile that needs the connector. The process for doing so is described in this article.
- Remove any existing Apsona console view layouts for the Apsona Batch object. This ensures that the Batch tool will create a new layout with the iATS Connector fields added. To do this:
- Navigate to Settings – Apsona Items.
- Use the filtered search to find any items whose Item Type is Console View, and whose object is apsona_be__Batch__c.
- Select the checkboxes next to those items, and click Tools – Delete checked.
Pricing #
Please our non-profits page for pricing information.


