- Prerequisites
- Getting started
- Merging from a report
- Merging from an object's views
- Merge actions
- Document templates
- Data sources
- A tour of the document generator
- Testing your merge action
- Managing merge actions
- Copying or replicating a merge action
- Deleting merge actions
- Sharing a merge action
- Troubleshooting
- Cannot find document template(s)
- Generating documents with tables/sublists: a separate document is generated for each sublist item
- Can't find the object ObjectName
- When generating a document with sub-lists, some of the generated sub-lists are empty or partially filled.
- In step 4 (logging), some dropdowns are empty or incomplete.
- In step 4, the "Attach" button is grayed out or unavailable.
- When merging from a button, "merge failed" appears.
- Word documents are generated with pages in incorrect order.
- Viewing the debug log
Apsona’s merge tool offers Excel merge, Word merge and Email merge in a single package. It enables you to create pretty-looking Word and Excel documents containing data extracted from your Salesforce database. For example:
- With Word merge, you can create a template document for your top partners, listing each partner’s contact information, the list of products they sold in the last year, and the list of opportunities they have currently open. You can produce a single Word document containing multiple pages, one for each partner’s information. Or you can produce multiple Word documents, one for each partner.
- With Excel merge, you can harness the power of Excel for creating spreadsheets with multiple tabs, including dashboards, visually pleasing charts and informative pivot tables. Create an Excel template laid out exactly the way you want, and use Apsona’s reporting and data extraction features to populate the fields of the template. The result is a complete report with all the power of Excel combined with your Salesforce data.
- With Email merge, you can create custom email templates in your Salesforce system. You can use Apsona’s filtering features to select just the premium partners whom you wish to target, generate the emails and send them off. You can even attach to each outbound email the Word documents you have created using the Word merge feature.
More specific information is available:
Generating .docx documents
Generating .xlsx spreadsheets
Generating email messages
Prerequisites #
If you are not an administrator, make sure that your Apsona configuration includes access to the Document object in Salesforce. To see how this is done, please look at the documentation about Apsona configurations.
Getting started #
To use the merge tool, you will need to (a) create a template that specifies the layout of the generated output, and (b) identify the data source that will be used to generate the output.
What is a template? #
If you are generating Word or PDF documents, the template will be just a plain old Word .docx file. If you want Excel output, the template will be an .xlsx file. In either of those cases, you would store the template in your Salesforce Document object. And if you are generating e-mail, you will use a Salesforce email template created via Setup – Communication Templates – Email Templates in Salesforce.
What is the data source? #
The data source is where the merge data comes from. The data source can be a Salesforce object (such as Contact, Lead, Account, or a custom object), or an Apsona report or multi-step report. You can merge directly from an object if
- all the merge fields you need are available in that object; e.g., you do not need any calculated fields such as sums, averages, or custom calculations;
- the sort order in which the documents are generated doesn’t matter; and
- you wish to filter the data records from the object each time you run the merge, e.g., you create the merge once, and then produce a batch of documents for partners and another for customers, using the same merge, with two different filters – one for partners and the other for customers.
If you want to hard-wire the filtering conditions into the merge action (e.g., when you want to run the action from a button or a sidebar link in Salesforce), or you want the documents generated in a specific order (e.g., by the zip code value), or you want to include either calculated fields or fields from multiple objects, you would use either a report or a multi-step report.
You cannot use Salesforce reports as data sources for merge actions. Only Apsona single-step reports, Apsona multi-step reports, and Salesforce objects are supported as data sources.
Merging from a report #
To generate documents or send email from a report, you would:
- Create a report containing all the fields you would like to include in your email or document. For example, if you are sending a summary letter containing a Contact’s name, address, email and total opportunity value, you create an Apsona report on the Opportunity Contact Role object containing all the needed fields from the Contact object and the sum of the Amount values from the Opportunity object.
- If sending an email, set up an email template containing place-holder merge fields which will be replaced with the actual data values.
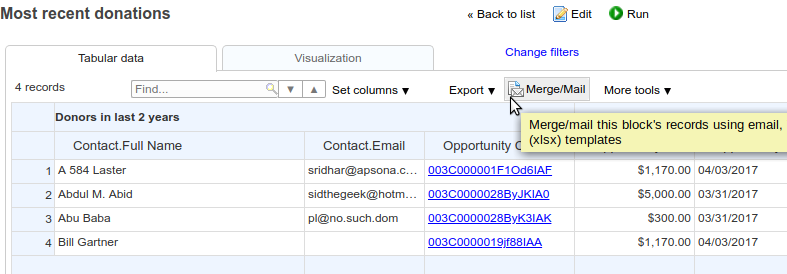
- Run the report, and click the “Merge/Mail” button in the report’s tool bar.
- Step through the resulting popup window.
You can also run merges from multi-step reports, if you have that feature available.
Merging from an object’s views #
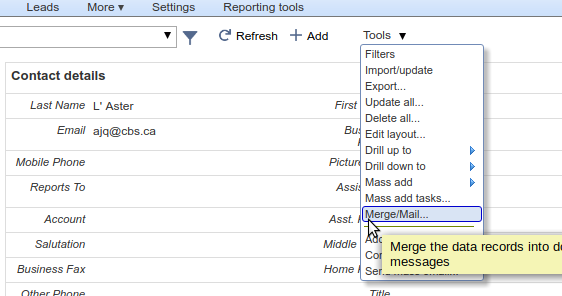
You can also run a merge from any of Apsona’s console views (the view available via the object’s “All records” menu item) or tabular views. To use this feature, click the Tools menu and then the “Merge/Mail” item. You will see the same popup that appears for merging, but in this case it will apply only to the filtered set of records in your current view.
- If you have selected some records via the check boxes in the list, the merge will apply only to the checked records.
- If you do not select any check boxes in the list, the merge will apply to all the records in the filter. Specifically, if the console or tabular view shows (say) just 100 records in a screenful but your filter contains (say) 5,000 records, the merge will apply to all 5,000 records in the filter.
Merge actions #
To perform a merge, you will create what we call a merge action, which specifies three things:
- a document template, which is any .docx or .xlsx file containing place-holders called merge fields;
- one or more data sources, which provide the data records used to fill the template; and
- field mappings, which set up the correspondence between the merge fields in the template and the field names provided by the data source(s).
With Apsona’s merge tool, you can create and edit merge actions, and save them with specific names. You can then run an existing merge action simply by providing its name, so that you don’t have to rebuild or re-edit the merge action. Thus you can have your more-knowledgeable users perform a one-time setup of all the merge actions you need, and other users can simply run the merge action of their choice, without having to delve into the complexities of the template and mapping mechanisms.
Document templates #
Where are templates stored? #
The Document Generator can use templates stored either in your Salesforce Document object, or as a Google Doc. If you want to use the Salesforce Document object, your first step would be to open the Document tab in Salesforce (or use the Apsona Document page) and upload your template there.
- If you select the Salesforce Document object as your template store, the Document Generato shows a list of all the
.docxor.xlsxfiles it finds in that object, for use as a template. - If you select a Google Doc as your template, you will need to provide the id of the Google doc in step 2 of the merge builder, as described below. Also see how to create a Google Doc template.
What about Lightning? #
If you are using the Lightning experience, the Document object is not available in the Salesforce UI. To work around this situation, you can do the following:
- First, create a few folders in the Document object. This is a one-time-only step that requires a temporary switch to the Classic experience.
- From this point forward, use the Documents console view within Apsona to manage documents, as described in this article.
Template file formats #
The Document Generator does not support the older .doc and .xls format used by Office 2003 or earlier; it requires the newer formats supported by Microsoft’s Office 2007 and later versions as well as OpenOffice and LibreOffice applications. If you use the older Office products, you can get around this problem by installing Microsoft’s Office Compatibility Pack.
As far as formatting or layout constraints, there are virtually none: you can use almost any .docx file or .xlsx file containing merge fields. Simply edit your file and set it up the way you want to look, and upload it into your Salesforce Documents object to make it available for Apsona’s merge tool.
Naming your merge fields #
In general, there are very few requirements as to how you should name your merge fields. They do not, for example, have to be the same as – or bear any relationship to – any existing field anywhere in your system. So when you create your template, you can simply make up any merge field names you want. This way, during the template creation, you can choose mnemonic names indicating what they mean to you, and your primary concern will be the way the template is laid out rather than what to name the fields. Later, when you actually create the merge action which uses the template, Apsona’s merge tool will open up your template, extract the merge field names it finds there, and let you set up the name mapping.
Data sources #
The data source for a merge action can be a Salesforce object (such as Account, Opportunity, or any custom object), an Apsona report, or an Apsona multi-step report.
Objects as data sources #
When using a Salesforce object as a data source, you create the merge action navigating to the object’s tab in Apsona and clicking Tools – Merge/Mail. In this case, when you set up the field mapping, Apsona will offer you all the fields in the object as candidates with which you can match each merge field. Also, when running a merge action whose data source is a Salesforce object, you can run a filter to select just some of the data records in the object for the merge action. You can also use the tabular view, and check one or more the checkboxes next to the records before running the merge action. If you do so, only the checked records will be included for the merge.
Single-step reports as data sources #
When using an Apsona object report as data source, you run the report, and then click the Merge/Mail button in the tool bar at the top. In this case, Apsona will show you the fields output by the report as match candidates. Also, unlike when using an object as data source, running a merge action on a report will include all of the report’s records in the merge results; you cannot, for example, use any checkboxes to select the records to include.
Multi-step reports as data sources #
When using an Apsona multi-step report as data source, you run the report and then click the Merge/Mail button in the tool bar at the top of the grid result. In this case, Apsona will show you the fields output by the grid as match candidates. And as with the Apsona object report, running a merge action on a multi-step report’s grid will include all of the grid’s records in the merge results; you cannot, for example, use any checkboxes to select the records to include.
Selecting a subset of records #
By default, when you invoke the merge popup, it will use all the records in the current data source for generating documents. But in some situations, you might want to select just some of the records. For example, when using the Contact object as data source, you might run a filter on the Contact object to obtain your most important contacts, and in looking through the list, you see a few contacts who have already been contacted and must be omitted from the generated list. A similar need for omitting some records arises on occasion when running the document merge from a report or multi-step report.
When running the merge from a list or tabular view of an object, you can simply use the check boxes at the left of the result list to select the records you wish to merge.
When generating documents from a report or multi-step report, however, check boxes are not available. But you can still select a subset of the generated list, as follows.
- Clicking any of the records selects it and draws a highlight on it. If it is already selected, it is de-selected and the highlight is removed.
- You can select multiple records via ctrl-click (i.e., holding the ctrl key when clicking) or shift-click (i.e., holding down the shift key when clicking). The ctrl-click action selects or de-selects the row you click, while leaving the rest of selection unaltered. The shift-click action selects the current row and all the rows above it up to the next selected row above.
More info about generating .docx documents
More info about generating .xlsx spreadsheets
A tour of the document generator #
When you invoke the document generator by clicking the “Merge/mail” button, a popup window appears, within which you create and manage a single merge action. This popup window contains a four-step wizard. In the following description, we use the term “data source” to mean the object or report from which you have invoked the document generator popup.
Step 1: Selecting the action #
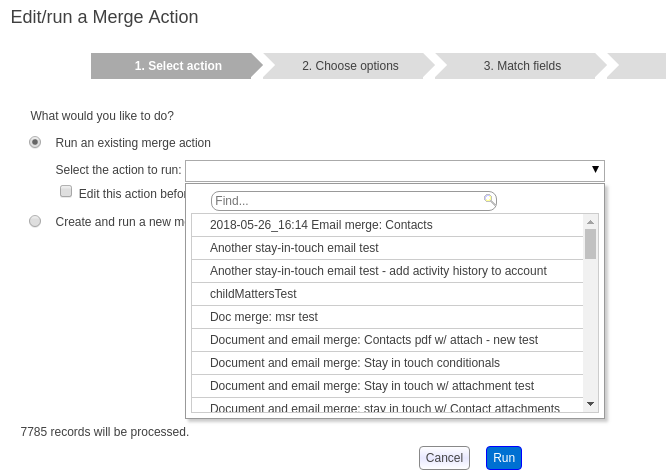
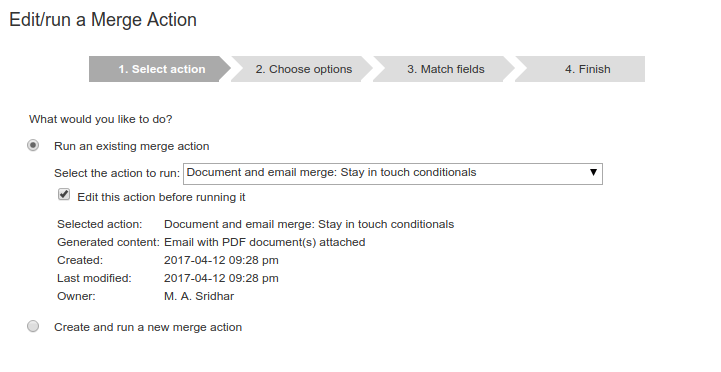
In the first step, you select what you want to do: either run an existing merge action or create a new one. If you choose to create a new merge action, you then specify the kind of merge action you want to create, as in the screen shot below.
If you elect to run an existing action, a dropdown appears, listing all the merge actions applicable to the object or report from which you are running the merge action. A “Run” button is shown at the bottom, which you can click to run the action.
Side-note: Available actions #
The list of available actions includes only the actions created specifically for the current data source, i.e., the current object or report. For example, when running from the Contact object, you will only see merge actions built for the Contact object, not for any Contact reports or for any other objects or reports. This is because the merge action incudes field mappings, and those fields come from the current data source, so they cannot be retargeted to some other data source.
In this first step, you also have the option to edit the merge action before running it, by checking the “Edit this action” box. If you do not choose to edit, clicking the “Next” button causes selected merge action to run immediately. If, however, you choose to edit the merge action, you will be stepped through the wizard just as if you were creating a new merge action, except that the settings of the selected merge action will be preset in every step of the wizard.
Step 2: Setting up options #
The choices in this step depend on the kind of action you selected in step 1.
Generating docx or pdf documents #
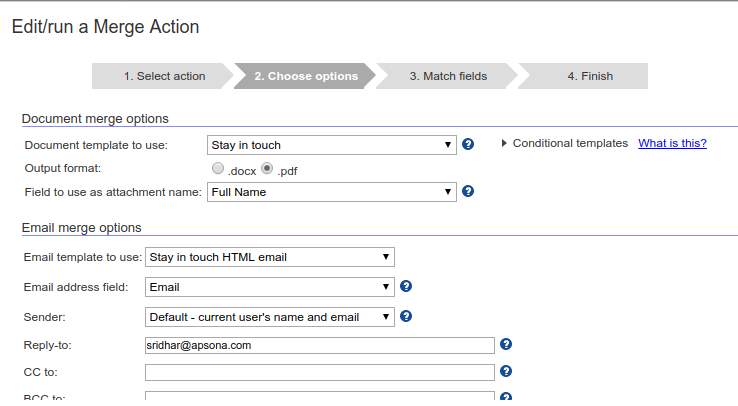
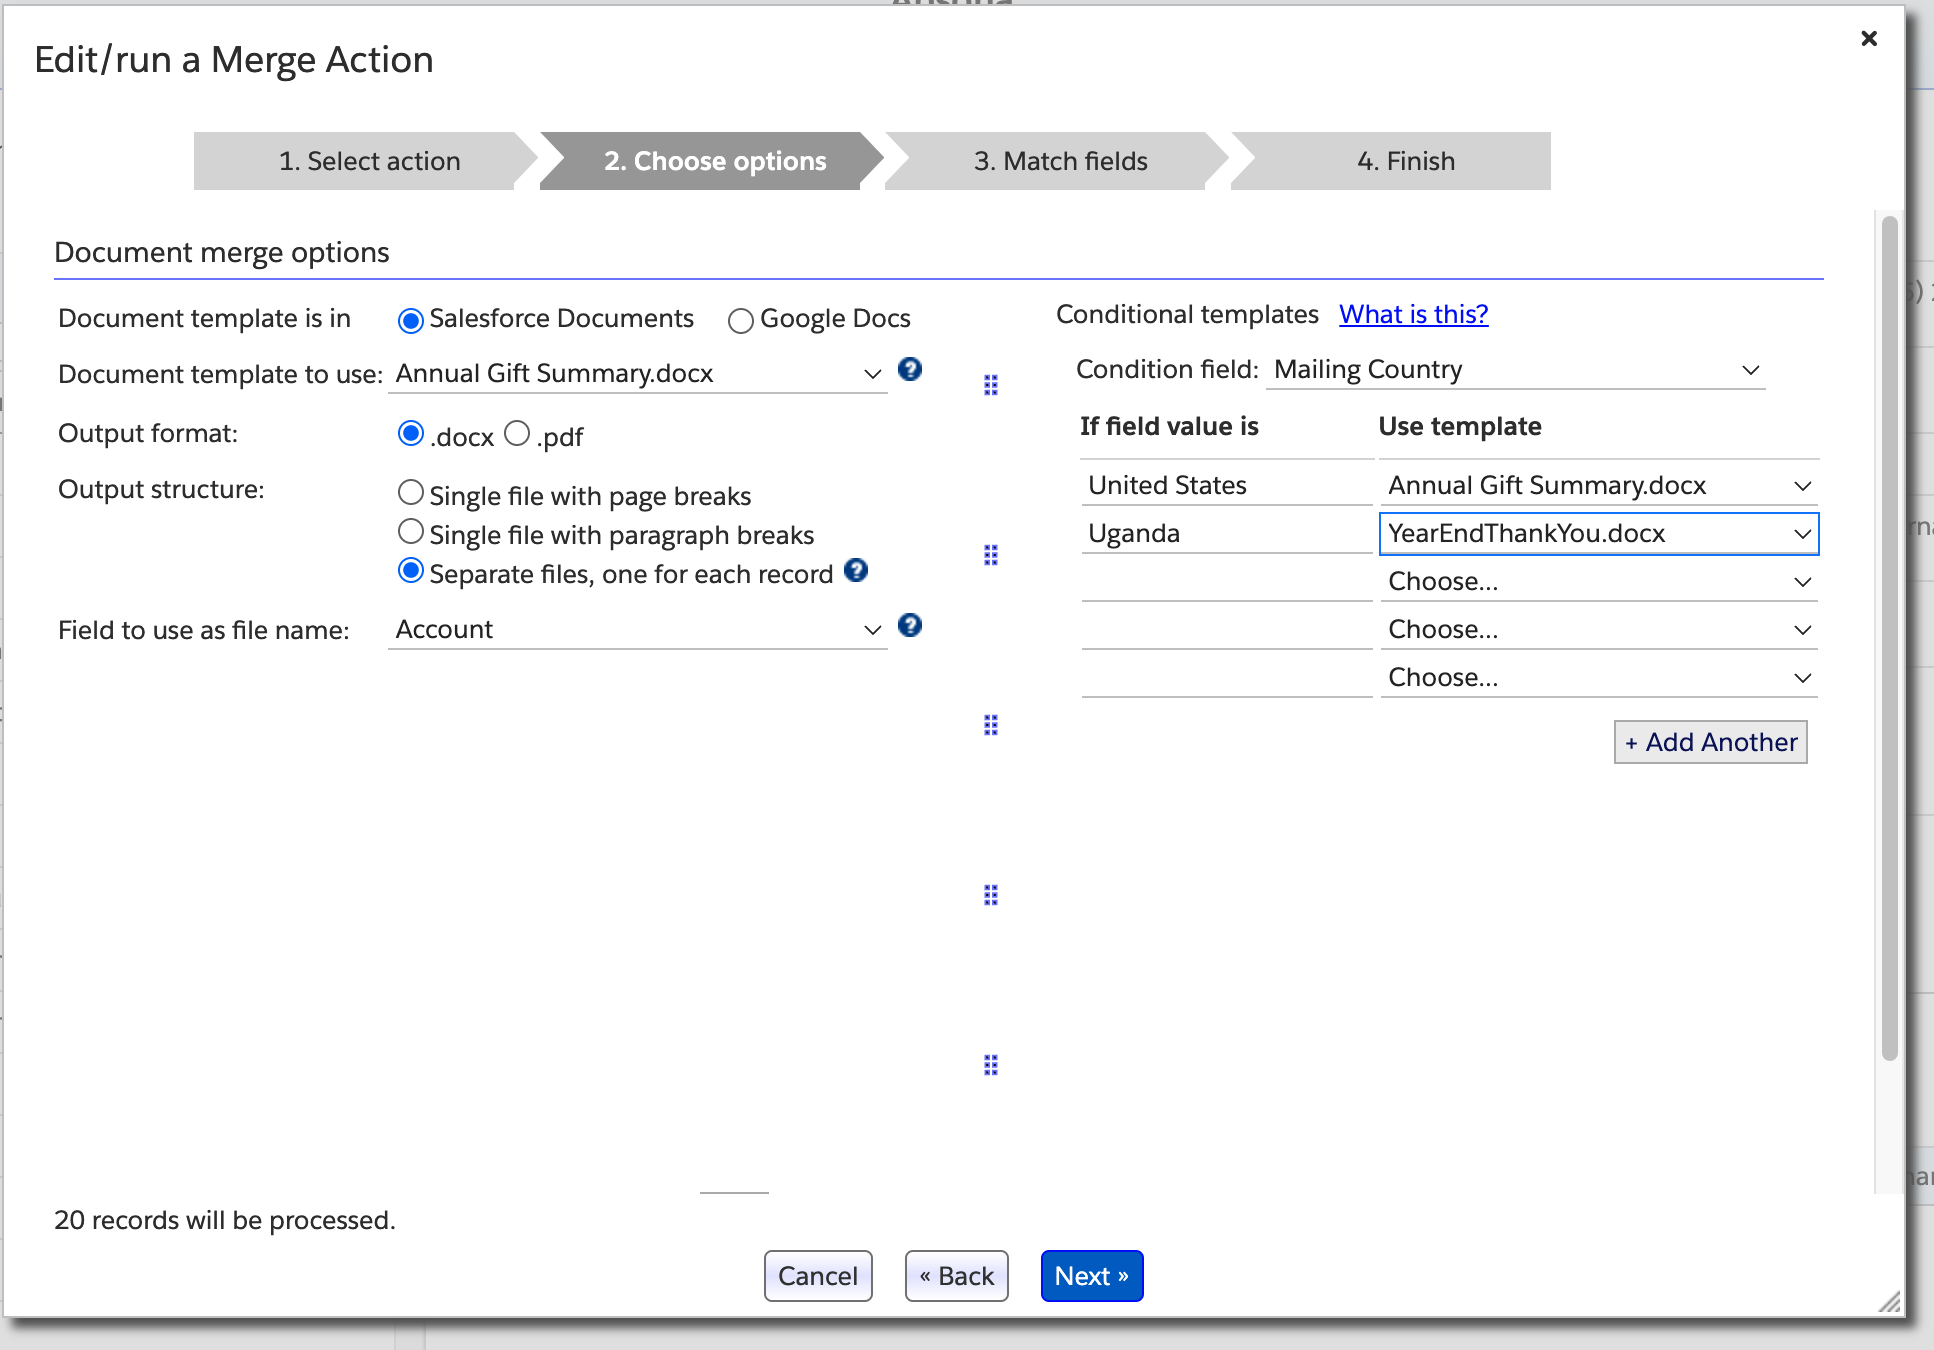
If you chose either to generate a .docx or .pdf document, or to generate address labels, you can use a template from your Salesforce Documents object, or from a Google Doc.
- If you use the former (by selecting “Salesforce Documents” for your template store – see screen shot below), the “Document template to use” popup will show all the .docx documents available in your Salesforce Document object.
- If you want to use a Google Doc as your template, select the “Google Docs” radio button as your template store, and paste the id of the Google Doc into the corresponding box. Read this article for more about creating a Google Doc template and getting its id.
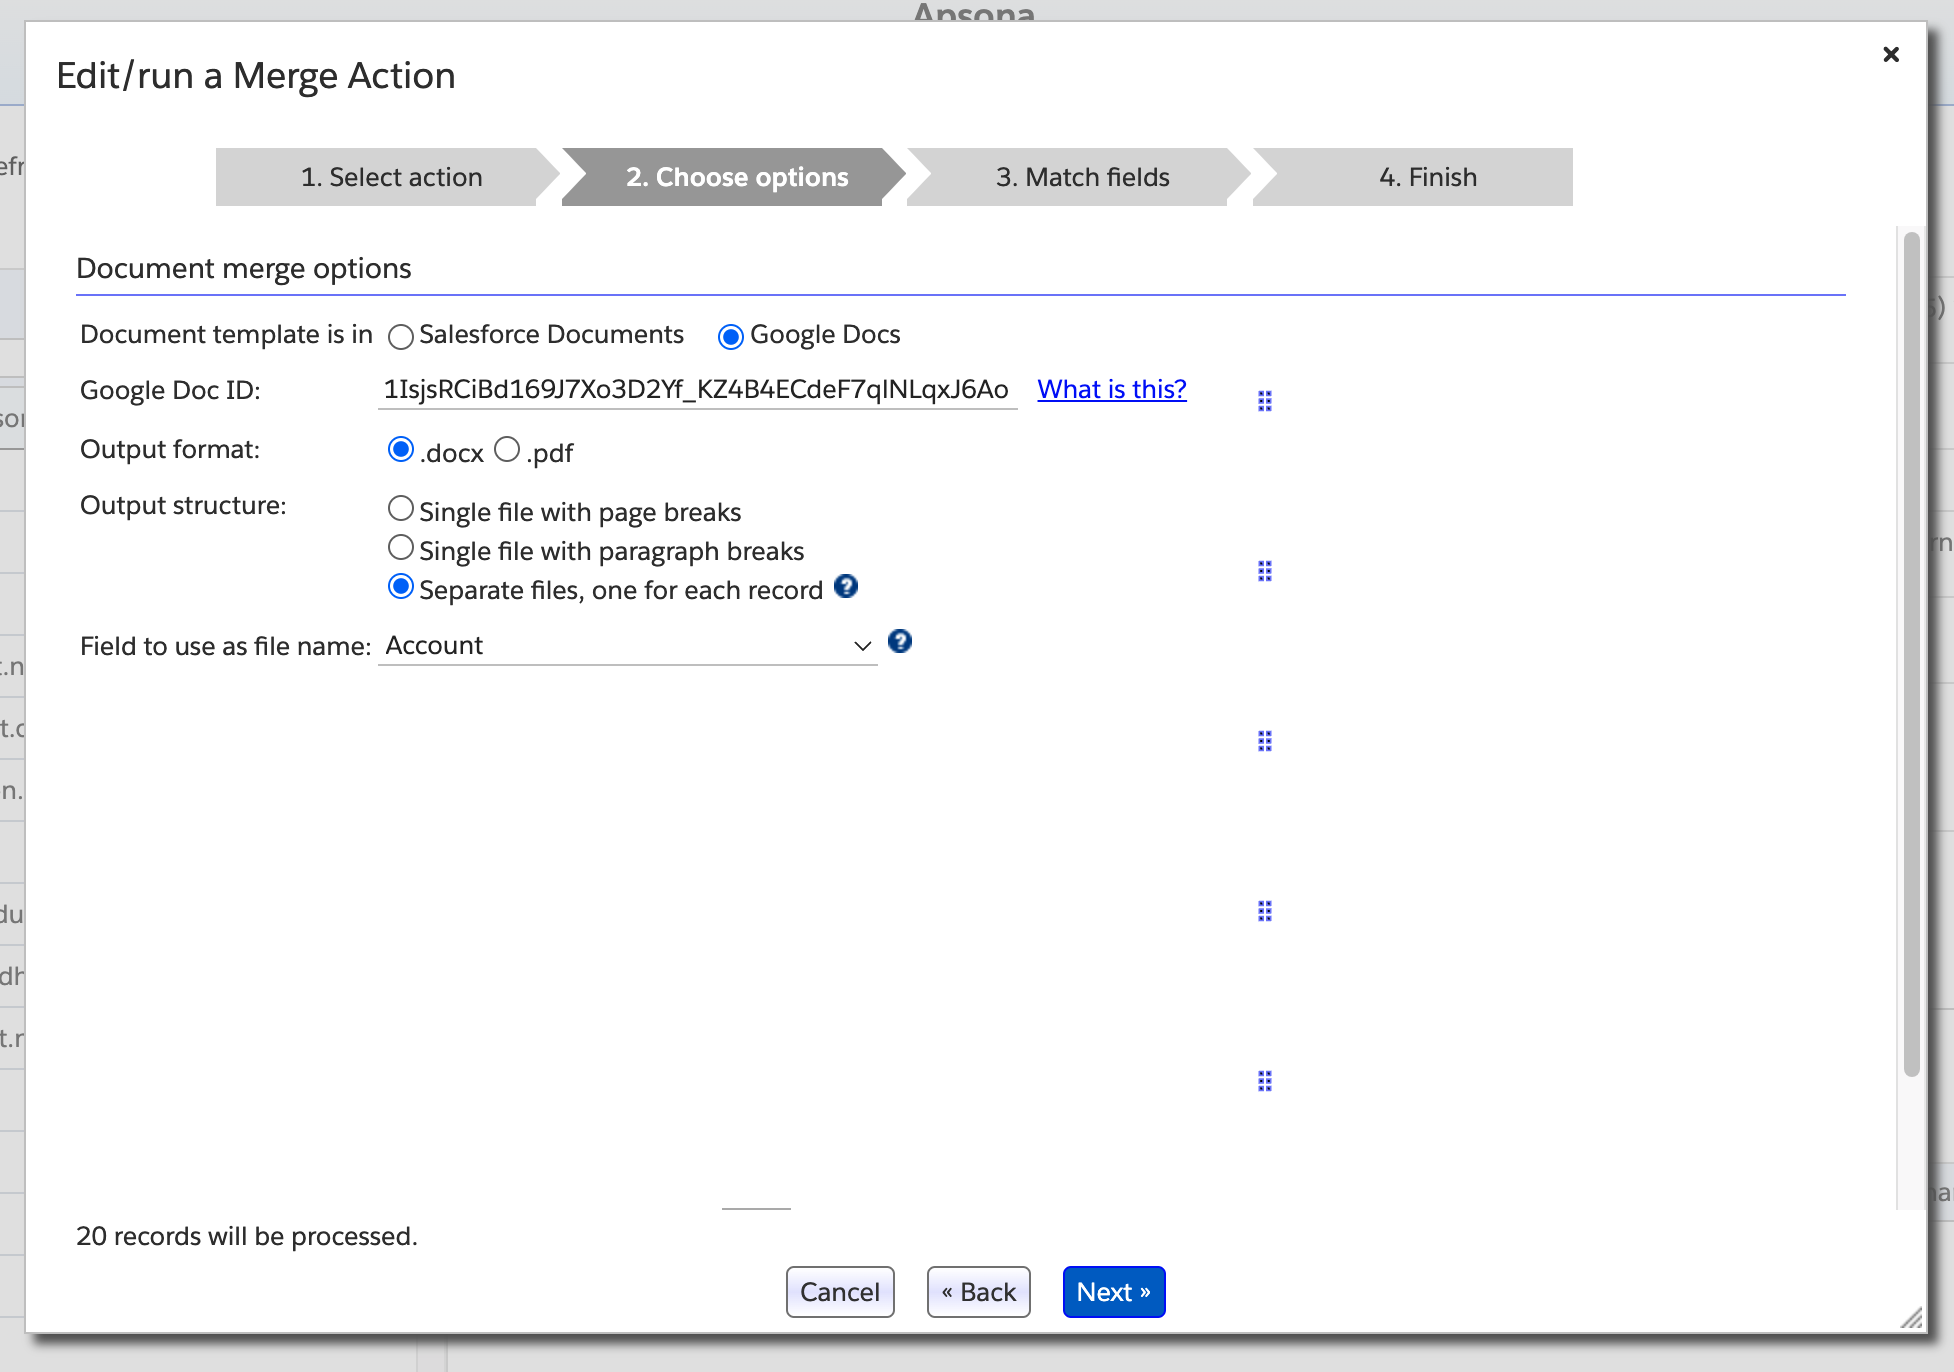
- If generating a .docx, the merge action produces one document for each data record in your data source. You can choose to generate separate .docx files, one per record in your data source, or just one single .docx file containing the all of the merged documents, separated by page breaks.
- If generating address labels, the merge action will be generating just one .docx file containing all of the address labels – one address label for the address part of each record in your data source. You must select a template that is suited for that task, as described in the address labels documentation. In this case, the .pdf option is not available.
Specifying the output file name #
If you select the output structure to be “Separate files, one for each record” as in the above screenshot, the produced result is a zip file containing one .docx or .pdf file for each row in your data. The names of the files in the zip file are controlled by the “Field to use as file name” option (see the screenshot above). For instance, if you are generating one document per Account record, you can select the Account Name as this field. If you do so, and you have accounts named, e.g., Burlington Coat Factory and Universal Containers, the generated zip file will contain files named, Burlington Coat Factory.docx or Universal Containers.docx.
Note that you can use any field in the object as the file name field, including Salesforce formula fields. So you can set up a Salesforce formula field to control the file name. If you run the document generator from an Apsona report, you can include calculated values in the report, which offer very powerful features for calculations.
If you are generating .docx or .pdf attachments to generated email messages, you would use this same mechanism for controlling the name of the attachment being sent out.
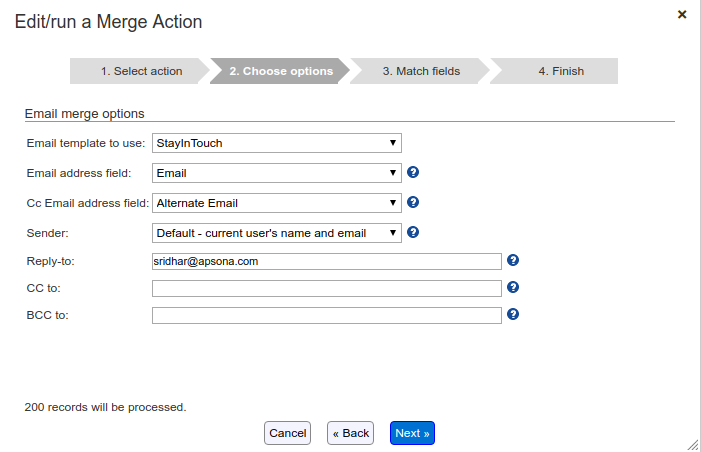
Generating email #
If you chose to generate email messages, your merge action will generate one email message for each data record in your data source. That email message will be sent to an email address obtained from the corresponding record in the data source.
This popup includes several options for setting up your email generation:
- An “Email template to use” dropdown that lists all of the email templates available in your Salesforce Email Templates object. (Within Salesforce, you can manage email templates via Setup – Communication Templates – Email Templates.) You can select one of those templates as the one from which to generate email messages.
- An “Email address field” dropdown showing all fields of type
email addressorstringin your data source. You can select one of these fields, and its values are the email addresses to which the generated messages will be sent. - A “Cc email address field” dropdown shpwing all fields of type
email addressorstringin your data source. You can select one of these fields, and its values are the email addresses to which the generated messages will be sent.
See this article for more information about generating email messages.
Generating email with docx or pdf attachments #
If you choose to generate email messages with attached documents, the available options are essentially a combination of the ones available for email messages and the ones available for .docx documents.
Generating Excel documents #
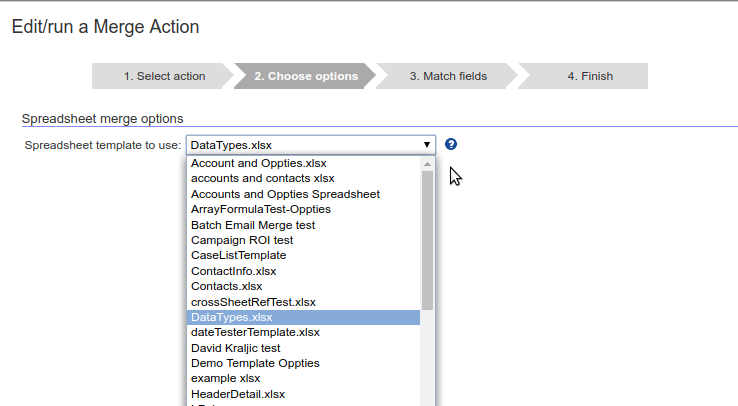
If you are generating an Excel document, the popup shows a dropdown containing all the .xlsx files available in your Salesforce Document object, as in the screen shot below. Note that, unlike when generating .docx, the merge action in this case will produce just one .xlsx document containing all of the data records available in your data source.
Step 3: Mapping the fields, filters, and linkages #
In this step, the document generator popup displays all of the placeholder fields it finds in the template. Alongside each such field, the popup shows a dropdown that lists all the fields available in your data source. So you can specify, for each field in the template, the corresponding field in your data source that will provide its data.
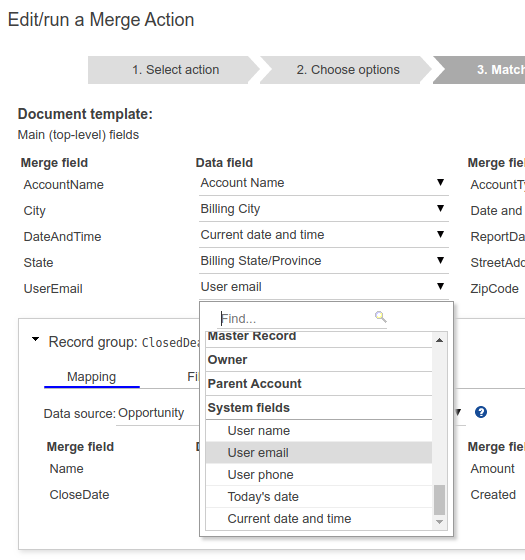
In the simple case where your document template does not contain any sub-lists (i.e., record groups), this popup will contain all the available template fields in one group. If, however, your template includes sub-lists, the template placeholder fields of each record group will be listed separately in its own region, underneath its record group name, e.g., the way the ClosedDeals record group appears in the above screen shot. For more details about record groups, see the detailed documentation.
Built-in fields #
In addition to the fields from the data source you have selected, the merge tool includes some built-in “System” fields such as the name, email or phone number of the current user, the current date and the current time. These fields are shown at the bottom of the dropdown containing the available fields, as in the screenshot below. In this context, the “current user” is the one who runs the merge, not (necessarily) the one who created or owns it. Also, the current date and time are those at the time at which the merge is run, and that could be well after the time at which the merge action was created.
Step 4: Setting up logging #
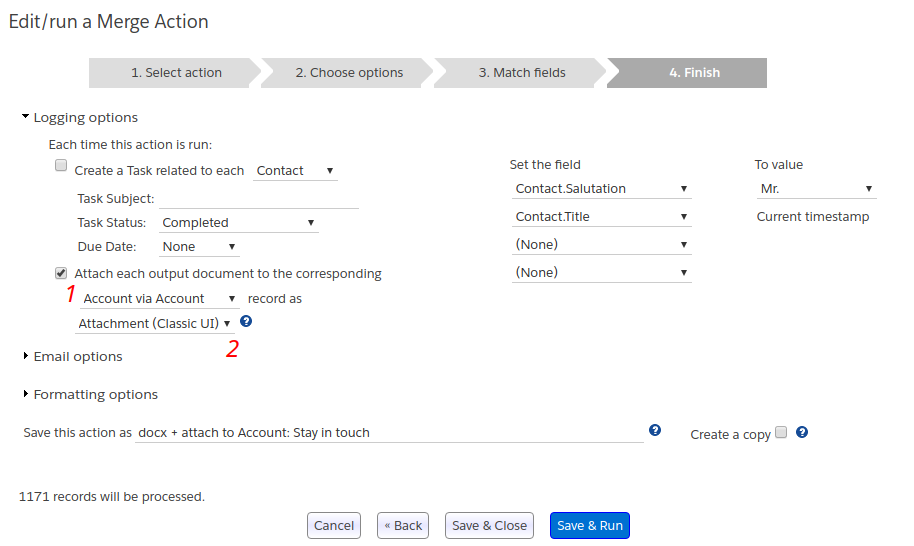
This is the last step of the merge action creator wizard, and here, you can set up logging options specifying additional actions to be taken when the merge action is run, as shown in this animation.
You can, for example:
- Add a task to a specific object.
- Set up to four fields to specified values. You can set Date fields to the current date and time, yes/no fields (checkboxes) to “Yes”, text fields to the current time stamp, or picklist fields to a value you specify in the popup.
- If you are generating documents, you can attach the generated documents to the corresponding data records – see below.
You cannot perform any of these without the required record ID fields.
See the subsequent paragraph.
Attaching generated documents to data records #
When attaching the generated documents to corresponding Salesforce records, you can specify the object records to which you want them attached (via the selector marked 1 in the screen shot below), and whether to use Salesforce Classic’s Attachment object or Lightning’s File object (via the selector marked 2 in the screen shot below).
Updating fields #
You can also update selected fields on your data records from which the documents were generated. This is useful, for instance, when you want the document generator to produce a bunch of acknowledgement letters for unacknowledged Opportunity records, and automatically update the Acknowledged field of those records to true, so that they are not generated for the same records again. You can set this up in the “Set the field” area in the right side – see the above screenshot.
The field types currently supported for updates are date, datetime, picklist, boolean, number, and text. For text fields, there is some special treatment: if you enter “Current timestamp” as the value for a text field update, at runtime, Apsona will store the current timestamp in the text field. If you put any other text in the input box, that text will be stored as is.
Selecting a parent object for attachment #
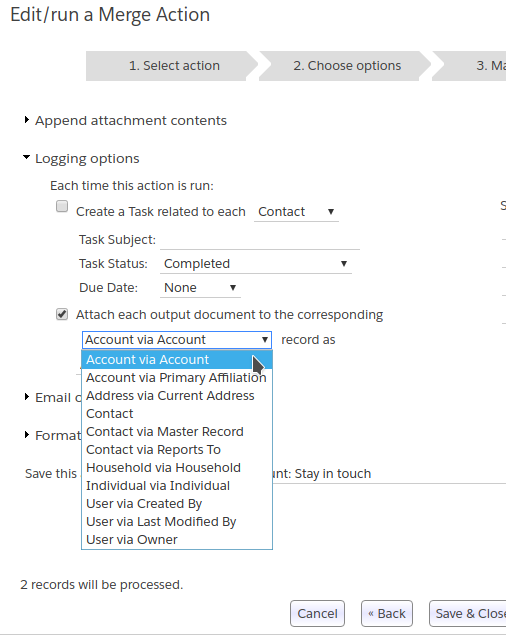
You can select either the current object (the one for which the merge action is created) or a parent object to which to attach the generated document. If the current object has multiple lookups to its parent, you would want to select the one that makes the most sense. For example, suppose you are generating documents for the Contact object, and want to attach the document to the parent Account object. Suppose also that the Contact object has two lookups to Account – the standard Account lookup and another called Primary Affiliation. In such a situation, you want to ensure that the attachment is made to the correct Account parent record, i.e., the one via the standard Account lookup. To facilitate this choice, the lookup chooser shows all the possible lookups from the current object to its parents, and lets you select the right one. See screenshot below.
Naming your attachments #
The name of the attachment or file will be determined by your choice of the “Field to use as file name” in step 2 of the merge builder – see the screen shot in the section above on setting up options. This gives you control over the exact name to use for the attachment. For example, suppose you are generating letters to Contacts, and you want them attached to the corresponding Contact record with attachment name in the format John Smith - Initial Contact. To achieve this, you simply need to map the “Field to use as file name” column to a suitable field. You could either (a) create a Salesforce formula field on the Contact object that produces the attachment name, or (b) create an Apsona report with a calculated value that produces the attachment name, and use that report as the base from which to generate your letters.
Required record ID fields #
To perform any of these logging actions, Apsona needs to be able to access the corresponding data records uniquely. For this reason, you can only perform a logging action on a particular object if the record id field of that object is available in your data source. For example, if you have created a report from which you are generating documents, and you want the generated documents to be attached to corresponding Contact records, then your report must include a field containing the Contact Id. Similarly, if you wish to add a task to the Account object indicating that the document generation was completed, your data source must include an Account Id field.
Formatting options #
You can also specify a the format for Date and Currency values when generating .docx or .pdf files.
Email error conditions #
This section applies if your merge action sends email. The email send process can fail for one or more of your data source records, e.g., if the record contains no email address, or if the email bounced. In the cases where Apsona can detect the error — specifically, if the email address is absent, or if the Salesforce send operation reports an error — the Document Generator will refrain from updating fields or attaching to those records. But if the email bounces, or if a delayed error happens in delivery, then Apsona cannot know of the error, so it will proceed with any field updates or attachments you have set up in your merge action.
Testing your merge action #
When you initally create your merge action, you may want to test just the merge itself, and not run any of the logging actions or send any emails. There are two ways to do this, based on if you are creating a new merge action or if you are editing / running an existing one.
For new merge actions #
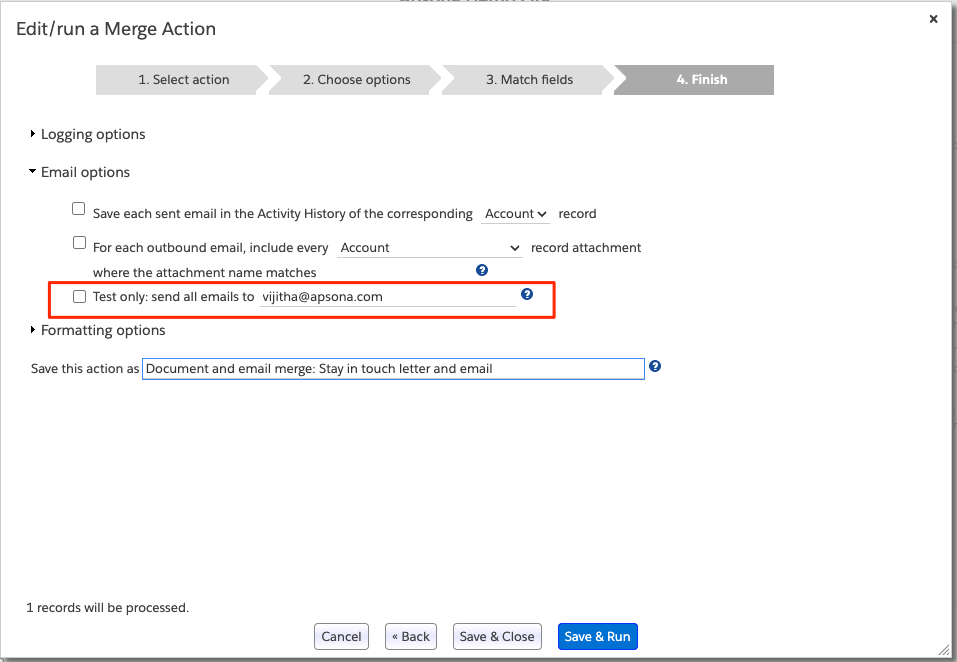
If your merge action includes emails, and you want to test by only sending emails to a particular address, you can use the “Test only” checkbox in Step 4:
Enter an email address in the box. If you choose this option, all the generated emails will be sent to the email address you specify, regardless of the actual email addresses in the data records. You can use this to test your merge templates.
Note, though, that setting the test-only checkbox will only (temporarily) affect the To address of the emails being sent out. It does not affect the Cc or Bcc settings in your merge action. Therefore, when testing your merge action, it is best to use a small set of records with known To, Cc and Bcc email addresses. (See the directions for how to select a subset of records from a report.)
Also note that this will not affect the logging actions set in the merge action. Those logging actions will still run, even if you have the “Test only” checkbox checked. To prevent logging actions from running while testing, see the next section on testing for existing merge actions.
For existing merge actions #
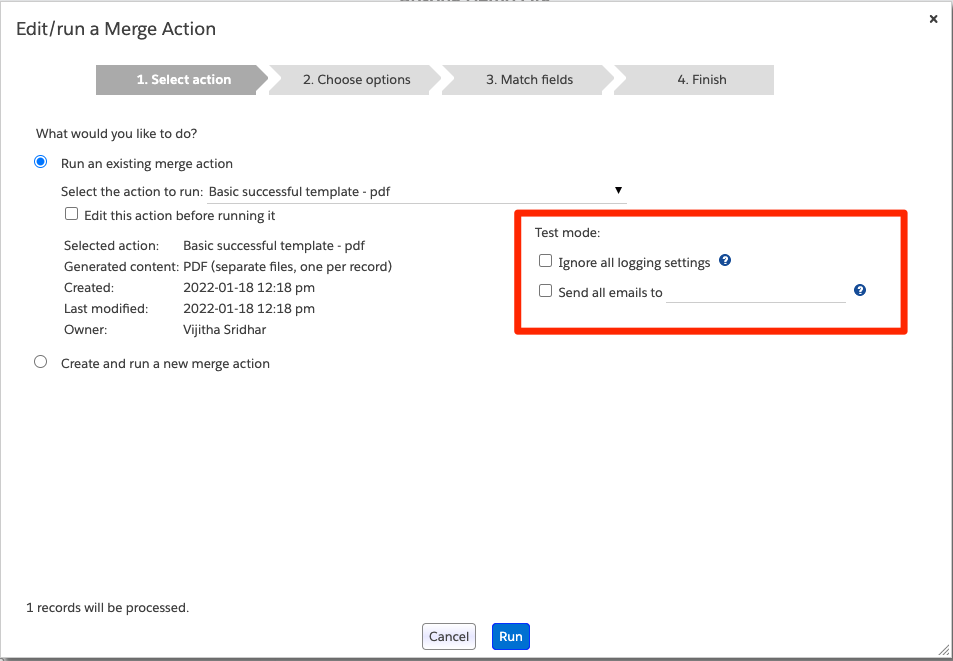
When you select an existing merge action, you will see a “Test mode” section appear, as in the following screenshot:
This allows you to prevent logging actions (such as updating fields or creating tasks) from running, and send all emails to a specified address. This way, you can test out your merge action without any side effects to your data in Salesforce, and without emailing anyone unintended.
You will also still see the “Test only” checkbox in Step 4. If you are okay with logging actions running, and only need to ensure that emails go to a particular address, you can use either this checkbox or the “Send all emails to” checkbox in Step 1.
Managing merge actions #
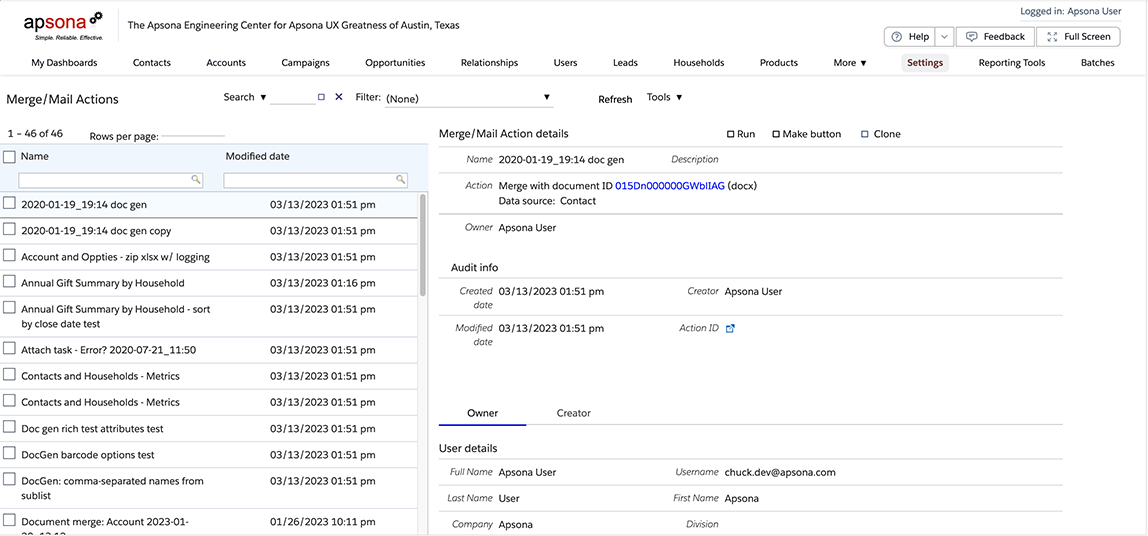
As an admin, you can click Settings – Merge Actions, and you will see a list of all the Merge Actions created in your org, presented in the usual Console View, with the list on the left and a detail area on the right. Here you can examine the name, created date, owner and similar details, as well as the data sources used by each merge action and its sublists. You can also use the usual filtering tools to quickly find any actions you need. You can use the Tools menu to delete them or reassign ownership.
Copying or replicating a merge action #
On occasion, you might need to copy or replicate a merge action. There are two somewhat different use cases that occur in this regard: copying the merge action for the same data source, or for a different data source.
Using the same data source #
Suppose you have created a merge action PremiumCustomerInvoice that uses the template named PremiumCustomerInvoice.docx, and now you wish to create a similar merge action for the template StandardCustomerInvoice.docx, which is a variation of PremiumCustomerInvoice.docx. Perhaps most of the template merge fields in the two templates are similarly named, with perhaps some slight variations. Here are the steps for replicating the merge action. This assumes that the template StandardCustomerInvoice.docx has been uploaded into the Salesforce Document object.
- Click the Merge/Mail item to start the merge action builder, and select the
PremiumCustomerInvoicemerge action via “Run an existing merge action.” Check the “Edit this action” box. - In step 2, Apsona pre-selects the
PremiumCustomerInvoice.docxtemplate. Change this template toStandardCustomerInvoice.docx, and click Next. - In step 3, Apsona pre-fills the mappings for the fields that have identical names between the two templates. Modify the mappings as necessary to suit the needs of the new
StandardCustomerInvoice.docxtemplate. Then click Next. - In the last step, after setting up any logging options you need, ensure that the “Create a copy” check box is checked, and change the name of the merge action to
StandardCustomerInvoice. Because of the “Create a copy” option, Apsona now creates a new merge action with the name you specify. - Click Save and Run.
The key idea is that we reuse as much as possible of the work done in creating the first PremiumCustomerInvoice merge action by stepping through the merge action builder with it, but using the “Create a copy” checkbox functionality so as to produce a new merge action instead of overwriting the existing one.
Using a different data source #
In some situations, you might want to re-target a merge action so that it uses a different main data source. Ordinarily, when you create a merge action for (say) an Opportunity report, that action will only appear as an option when merging from that specific report, because that report is its main data source. But you might want to create a copy of that report with a minor variation, and then replicate the merge action to apply to the copied report. When making the copy of the merge action, you obviously want to preserve as much of the mappings as possible, so that you don’t have to rebuild the merge action.
To achieve this goal, you click Settings – Merge Actions, find the merge action you want to replicate, and click the Clone button.
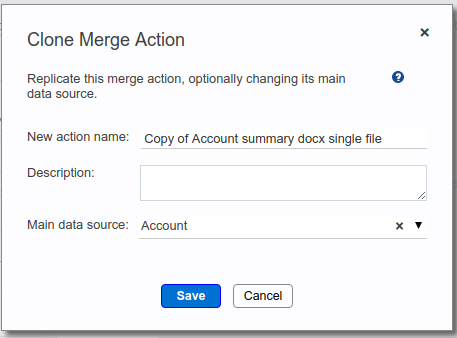
Apsona then displays the popup shown below, in which you can:
- select a name for the new merge action,
- give it a description, and
- (crucially) select its main data source, to be the new one to which you want the merge action targeted
and click Save.
Deleting merge actions #
If you wish to remove unneeded merge actions (you will need to be an administrator to do this):
- Click Settings – Merge actions to see the list of merge actions in your org
- Use the filtering mechanisms to find the ones you wish to delete
- Check the boxes next to them, and click Tools – Delete checked
Note that the Merge actions item in the Settings menu is available only if you are an administrator.
Sharing a merge action #
Available merge actions #
If a user has a license to the Document and Email Merge add-on, she is able to see all the merge actions created in the system, no matter who created it. She is therefore able to run any of those actions. However, as an administrator, if you wish to exercise finer control over what merge actions are visible (i.e., you want to restrict so that some merge actions are not visible to all users), you can enable sharing of Apsona Item records. By enabling sharing, you can select exactly what merge actions are visible to each user or group, as described in the article on sharing.
Edit access to merge actions #
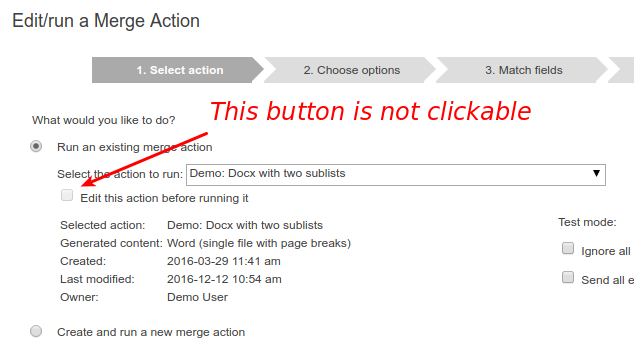
Ordinarily, a merge action is editable only by the owner of the merge action or by a System Administrator (i.e., any user whose profile includes the “Manage Users” and “Modify All Data” permissions). If a non-admin user selects a merge action in the popup, and the user does not own the merge action, the “Edit this action” checkbox will be unavailable (see screen shot below), so the user will not be able to edit the action.
There are, however, cases where you (as an admin) would want to allow certain non-admin users the ability to edit all merge actions. To make this possible, you would follow these steps:
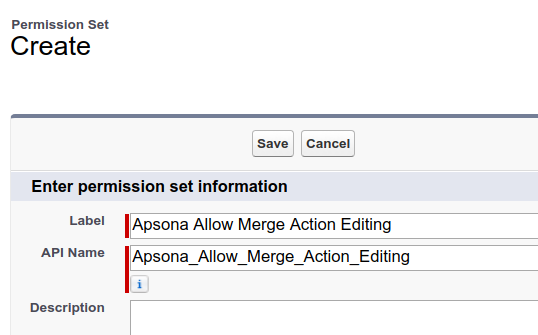
- Create a Permission Set in Salesforce, with the API name
Apsona_Allow_Merge_Action_Editing. See screen shot below. (See this article for how to create a Permission Set.) Note that the API name must exactly match the above name, although you can use any label you like.
- Assign this Permission Set to each user who needs full edit access to merge actions.
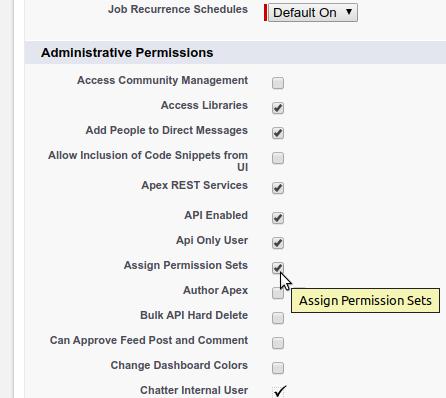
- As of the Winter ’20 Salesforce release, the user’s profile also needs the “Assign Permission Sets” permission. See screenshot below.
Troubleshooting #
Here are some common issues that arise, and some tips on how to resolve them.
Cannot find document template(s) #
This error message looks like this:Cannot find document template(s) for merging (looking for Document with ID(s) ...It includes the IDs of the Document records that it cannot find. The error happens if the document template is deleted and/or stored in a folder which is not accessible to the user running the merge action. To remedy this error:
- If you (as an admin) can find the document template among your Documents (using the manage documents feature), you can click its record ID to open it in Salesforce, and move it to a folder that the user can access.
- If the document has been deleted, you can either reinstate it from the Recycle Bin (if possible), or you will have to re-upload the document and re-edit the merge action to use the newly uploaded document.
Generating documents with tables/sublists: a separate document is generated for each sublist item #
When generating a document containing sublists, e.g., a letter to a Contact that should contain a list of their gifts, Apsona might produce a separate document for each gift, instead of one document per Contact. This is typically because the merge isn’t set up correctly: You must obtain the top-level single-occurrence fields (e.g., the Contact fields) from one data source (e.g., a report or the Contact object), and the sublist’s fields from a different data source (e.g., an Opportunity report, or the Opportunity object). See this link for full details.
Can’t find the object ObjectName #
You might see a popup error saying that (the metadata for) a certain object is not available. The error message will include the API name of the object. This typically means that the merge action, or one of the objects or reports it relies on, requires access to the specified object. To remedy this situation, carry out the following steps:
- Ensure that your Salesforce user profile has access to the object indicated in the error message. Your administrator can make this happen, via the Salesforce Setup screens. Note that the BrandTemplate object is actually labeled Letterhead in Salesforce.
- Ensure that the Apsona Configuration for your user profile includes the object in question as a visible object. Follow the directions described in our documentation about object access.
- If the error message is about an
Attachmentobject, it could refer toFoo_Attachment, whereFoois another native or custom object. In this case, make sure that both the objectsAttachmentandFoo_Attachmentare included in the configuration. - After the above steps are carried out, clear your Apsona cache by clicking Settings – Clear cache in Apsona, as described in our documentation.
When generating a document with sub-lists, some of the generated sub-lists are empty or partially filled. #
Two possible reasons:
- The data source report that feeds the sub-lists has a limited record range (see more about record ranges). Keep in mind that the document generator runs just one query to extract the records for all of the sub-lists needed by all of the generated documents. So if you limit your report’s record range to, say, 100, then any sub-list data that needs records past the 100 limit will not be populated.
- Records in the sublist report are just the distinct ones, because they are being automatically deduplicated by the sublist report. So you will need to add the record ID to the sublist report. See this link for details.
In step 4 (logging), some dropdowns are empty or incomplete. #
The usual reason is the absence of the necessary record ID fields in the source report. See the above description related to setting up logging for more details.
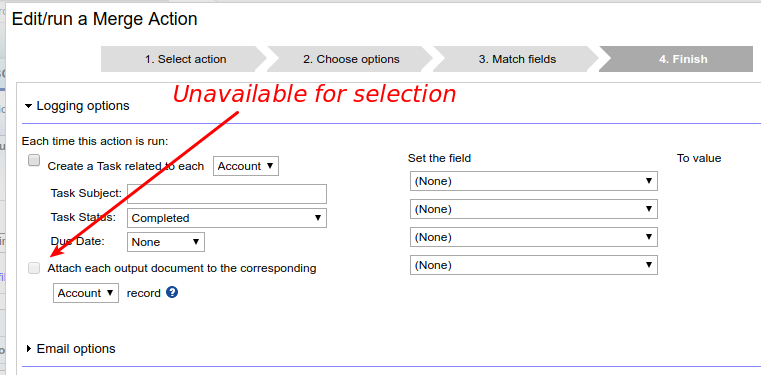
In step 4, the “Attach” button is grayed out or unavailable. #
When generating .docx or .pdf files, if you have elected — in step 2 of the merge action popup — to produce a single file for all your output documents (with either paragraph or page breaks) instead of separate files for each document, the “Attach each output…” checkbox will be unavailable. This is because, once Apsona produces a single file for all your records, it is not able to break them out into individual files for attaching to individual records. Therefore, if you wish to attach the generated documents to the records, you will need the “Separate files” option in step 2.
When merging from a button, “merge failed” appears. #
When generating a document from a button, you might see an error that says “Merge failed: No data records available for merging.” This happens if the merge action being invoked involves a report that excludes the current record. Consider a specific example to illustrate. Suppose you that have created a merge action on an Opportunity report that produces an acknowledgement letter, and that you have created a button on the Opportunity detail page for generating the letter. Suppose also that you have a filter on the report that produces only Closed/Won opportunities. If you then click the button on a detail page for a non-closed opportunity, that Opportunity record will not qualify for the report’s filter, so there will be no data available for merging. You will then see this error.
The key point to note is that any filters you have in the report will apply when the merge button is pressed. There is no way to override them on a one-off basis in the merge button. But the button knows the record ID of the record it lives on, so if you remove the report filter, it will generate the merge based on the report contents with step 1 filtered by that record ID.
Word documents are generated with pages in incorrect order. #
If you generate multiple Word documents (or address labels, or a single document with page breaks) you would expect that the documents (or pages) are generated in the order that they appear in the browser. However, there are technical limitations that make this impractical. If you generate documents from a report or multi-step report, the order of the documents will be consistent with the order in which they appear in the report. But if you generate them directly from an object, the specific field mappings will determine the sort order, so it is not always possible to generate the documents in the order of record occurrence in the browser.
Therefore, if you wish to generate documents in a specific order, you would want to generate them from a report created for that purpose.
Viewing the debug log #
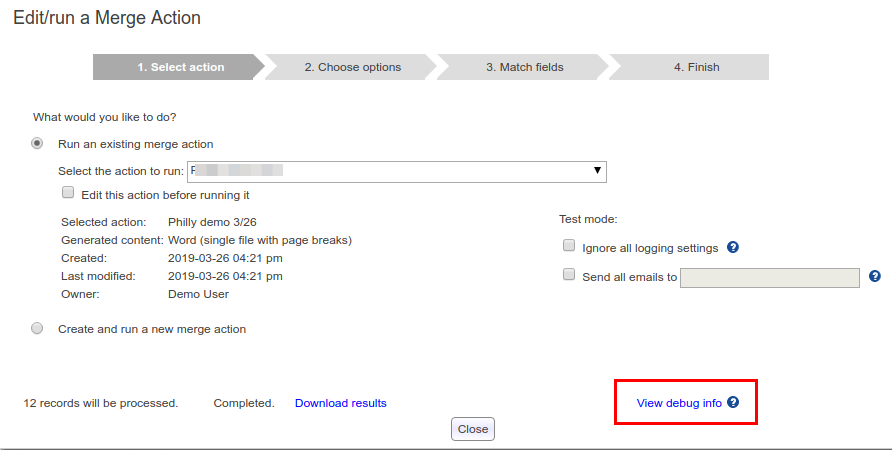
After completing a document generation run, you can view debug information via the “View debug info” link in the popup. Clicking this link shows a screen containing all the fields in your template and the corresponding data values used to populate those fields in the generated document. In situations where you aren’t seeing the data you expect, you can use this information to help understand the cause of the anomaly.
