Apsona for Salesforce supports data import (also called uploading) into all Salesforce objects, both native and custom. The import facility requires data records in comma-separated (CSV) or tab-separated (TSV) format, with a header row specifying column names. You can use it to:

- upload new records
- “upsert” records, i.e., add new records while updating existing records
- update selected fields of existing records matched by your matching conditions.
Apsona’s import facility includes several commonly-needed features:
- Column name mapping: The column names in the header row need not be in any particular order, nor do they need to correspond to Salesforce field names. You can map the columns to fields during the import process. You can also de-select (i.e., omit) any fields you wish to exclude from the import. This gives you the most flexibility with the format of the input CSV data.
- Duplicate checking: It can detect duplicate records, both within the CSV data and between the CSV data and the Salesforce database. You can choose the fields you wish to use for duplicate matching.
- Data validation: It validates your data against your Salesforce object fields. It ensures, for example, that dates, numbers, pick lists and e-mail addresses conform to valid values.
- Interactive error correction: You can quickly fix data errors right in your browser, before the data is ever submitted for import. This makes the entire import process much smoother and more reliable.
- Handling lookup fields: When importing into lookup fields (e.g., the Account ID field of a Contact), you can specify either the record ID or the name of the lookup, or any external ID, unique, or auto-number field. The importer will look up the related record automatically. For example, when importing contact records, you can specify either the account name or the account ID, and the importer will look it up automatically before importing. This facility is available for all fields in all objects, both native and custom.
- Echo of rejected records: You can optionally choose to have the importer reject all erroneous records and return them as a separate CSV file. This file contains an additional column with detailed information about the errors, so that you can correct them and re-import just the erroneous data.
- Automatic record linking – no more “vlookup”: After importing an object’s records, Apsona’s importer provides an “echo-back” of your data records along with the record ID values for the newly-added records. Using this feature, coupled with the duplicate elimination, you can import into multiple related objects using a single CSV data set, as we will describe below. For example, you can use a single CSV data file to import all your leads and add them into a campaign. Or you can use create Account and related Contact records from one CSV file. This eliminates a key pain point associated with data imports. With many other data loaders, you need to import into one object, export the results, extract the record IDs, link them to the records of the second object, and then import the second object’s records. With Apsona’s automatic lookup, this is not needed. You can get more information about this feature, along with an example of how to use it, in this page.
A tour of the import wizard #
Apsona’s import wizard is available for all objects. It can be accessed via the Tools – Import/update menu item.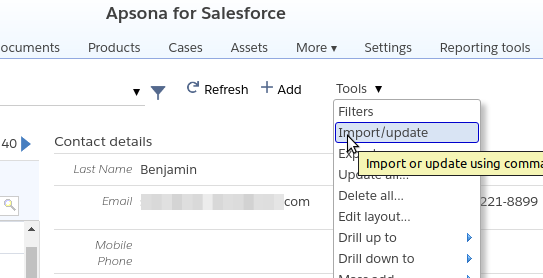 The import wizard provides three steps:
- Provide CSV data and set up CSV options;
- Set up the CSV columns to data fields and correct errors if needed;
- Import the data and save the results.
It is important to emphasize that the importer looks the same for all objects, even custom objects. The present description uses the Contact object for illustrative purposes only.
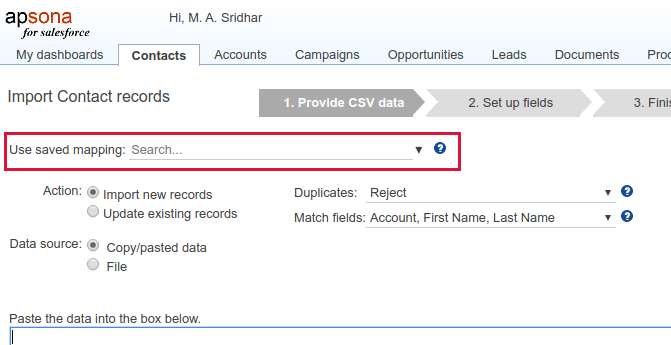
Step 1: Provide CSV data #
In this first step, you provide the CSV data for import and specify a few options on how to handle the data.
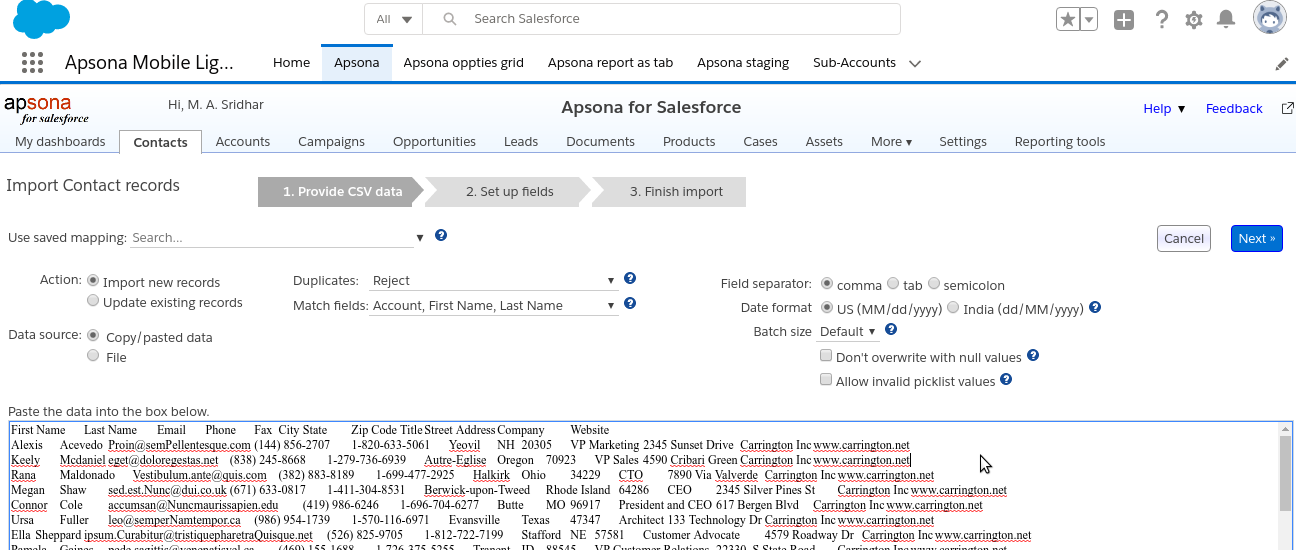
You can either provide the CSV data from a CSV file, or paste it into the text box, as indicated by the radio buttons in the screen shot above. In addition, you can tell the importer what to do with the data, via the “Action” option: either import new records or update existing records.
Importing new records #
Here you can specify how to detect duplicates, and what to do with them. In this context, we say that two records are duplicates of each other if their values match on a specific set of match fields. You can choose the match fields from the “Match fields” dropdown. For example, when importing Contacts, you might specify the Phone, First name, and Last name as the match fields. This means that if two Contact records match in their values of these three fields, they are deemed duplicates. Matching is case-independent, and the matching check is carried out on the data within your CSV file as well as between the CSV file and the database.
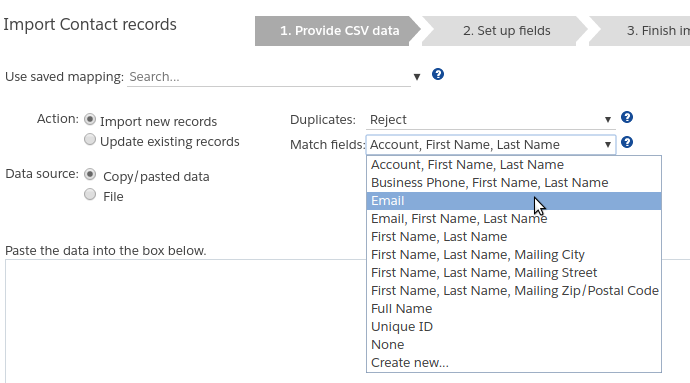
- The “Match fields” dropdown lets you choose the set of fields that the importer will use for detecting duplicates. The available field sets varies depending on the object into which you are importing. For example, the Contact object includes sets of fields such as “Email” + “First name” + “Last name” and “Account name” + “First name” + “Last name”, while the Account object includes “Name” + “Phone” and “Name” + “Website”.
-

The “Duplicates” dropdown lets you choose how duplicates are handled: either reject the duplicate record, update the database, or simply add the record to the database, ignoring the duplicate.- If you choose “Reject”, then any records in the CSV data that are duplicates of records in the database (i.e., that match on the match fields, as described above) will be rejected in Step 2.
- If you choose “Update” in the dropdown, you are doing what is commonly called an “upsert” – if a record in the CSV data matches one in the database, the former will be used to update the latter. This means that any fields you have specified in the CSV data record will overwrite the corresponding fields in the database record. Note that if there is more than one CSV data record that matches, the last one in the CSV data prevails.
- If you choose “Add”, then there is no duplicate checking: all your CSV data will be added into the database.
Updating existing records #
To update existing records, you will (naturally) need to specify
- the records to be updated, and
- the fields to be updated and their values for those records.
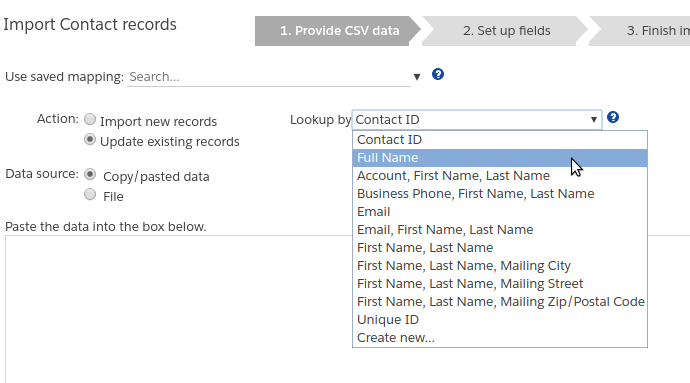
The value in the “Lookup by” dropdown specifies the criteria that Apsona should use for finding the records to be updated. For example:
- You can choose the “Contact ID” option, and include the contact ID column in your CSV data. In this case, each record in your CSV data will be used to update the database record with the matching contact id value.
- Similarly, if you choose “Business Phone, First Name, Last Name”, you must include those three fields in your CSV data. In this case, each record in your CSV data will be used to update the database record that contains the same business phone, first name and last name.
In each case, Apsona’s importer will flag an error if there is no database record matching the data in the “lookup by” fields you specify.The main difference between the “upsert” case (with importing new records, above) and “update” is that when updating, you need only specify the “lookup by” fields, and the fields you wish to update. For instance, if you want to update the phone numbers of a bunch of contacts, you can provide just two columns in your CSV data: the Contact ID (for lookup) and the Phone number column (for update). But in the “upsert” case, you must specify all the mandatory fields in the object to which you are importing. Also, in the update case, if a match on the “lookup by” fields fails, the record will be rejected, but in the upsert case, the record will be added to the database.
Customizing the match fields #
>Apsona shows a predefined list of match field sets in the “Match fields” and “Lookup by” dropdowns, enabling you to select a set of fields that will act as match key. For example, when importing contacts, if you select the match field set Email, First Name, Last Name (shown in the above screen shots), Apsona will treat two records as identical whenever they match on those three fields. This enables you to identify duplicates based on those fields. If a field is marked in Salesforce as an External ID or as unique, Apsona will include that field in the list of match field sets.Sometimes, particularly when importing into custom objects, the field sets that Apsona provides will not be enough, and you need to create your own match field set for matching during the import or update. To serve this need, Apsona includes a “Create new…” option in the dropdown, as in the screen shots above. If you select that option, a popup window appears, from which you can select one or more fields that you wish to act as a temporary match field set.
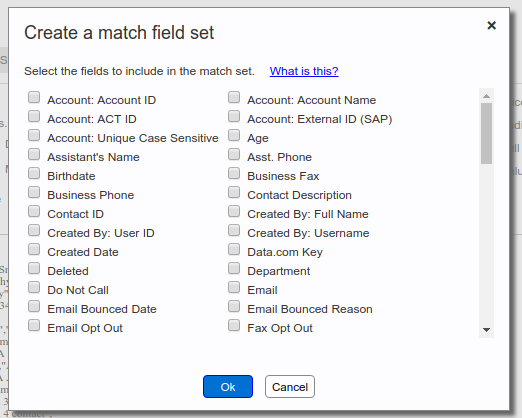
The fields you select will appear as an option in the match field selector. You can then choose the newly-created option and proceed with the import process.
Matching unique or external ID fields #
A common need is to be able to link imported records with parent records in Salesforce. For example, you might want to import Contact records which you wish to link to existing Account records. To help with such cross-object matching, the match field set is allowed to include the Record ID field, the display field, or any field in the looked-up-to object that is marked as unique. For example, again consider Contacts linking to existing Accounts. Since the Contact object has a lookup to the Account object, you can add to the match field set either the Account ID (which is the record ID), the Account Name (which is the display field), or any fields marked as unique in the Account object. In the screen shot above, we see that there are four candidate fields, Account: Account ID, Account: Account Name, Account: ACT ID and Account: External ID (SAP) available. This is because this example org includes two unique ID fields named ACT ID and External ID (SAP) on the Account object, so they can both be used in a match field set, in addition to the Account ID and the Account Name.
Matching phone number fields #
Salesforce usually stores North American phone numbers in the format (877) 555-1212, i.e., the area code in parentheses, a space, and then the seven-digit number with a dash after the third digit. But when importing CSV data, you might have phone numbers in your data that don’t conform to this format. So if you map a CSV column to a phoe number field, the import tool normalizes any 10-digit numbers in that column to this format, and then checks against the Salesforce data. This way, duplicates will be caught (or existing records will be matched) even if the CSV data provides phone numbers in a nonstandard format.
Note, though, that this applies only to 10-digit North American numbers. If the input CSV data cannot be normalized in this manner, the importer simply tries to match the CSV data as-is, without any changes.
Selecting an existing mapping #
In Step 1, you can also select a saved mapping – one that you have set up and saved earlier. More about saved mappings further down in this article.
Step 2: Set up columns #
In this step, you match the columns in your CSV data with the fields in the Salesforce object to which you are importing.
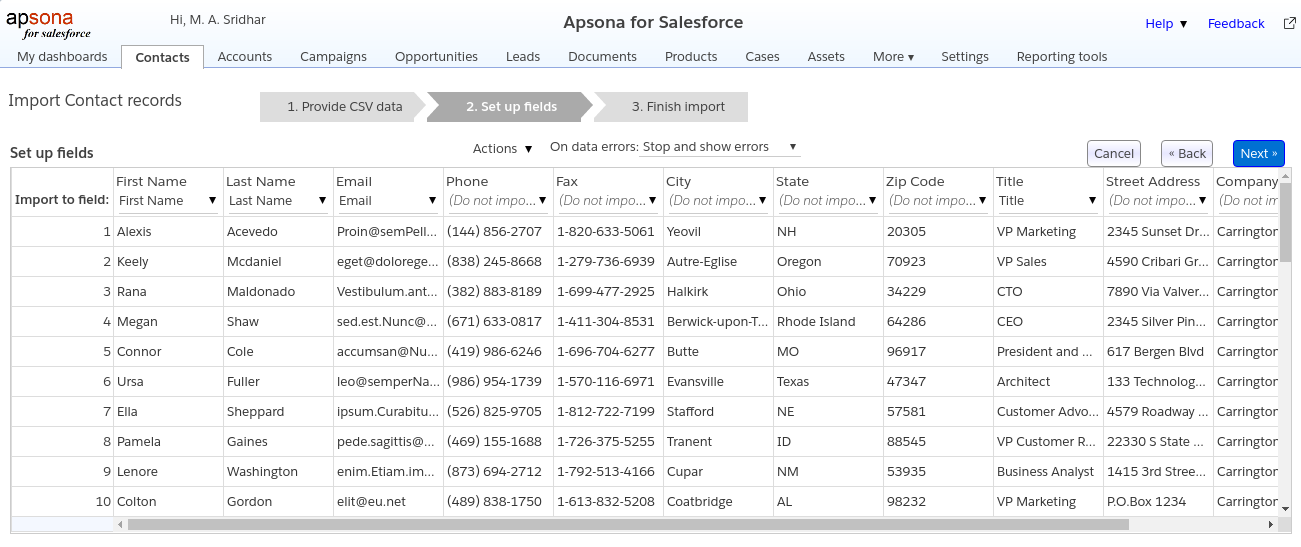
Here, Apsona displays your data in grid form, with dropdowns at the top of each column.
- Each dropdown contains the fields of the Salesforce object. For each column, you can either choose one of the fields, or choose “Do not import” to omit the column.
- If your CSV data contains headers that match the Salesforce field names, Apsona selects the matching fields automatically.
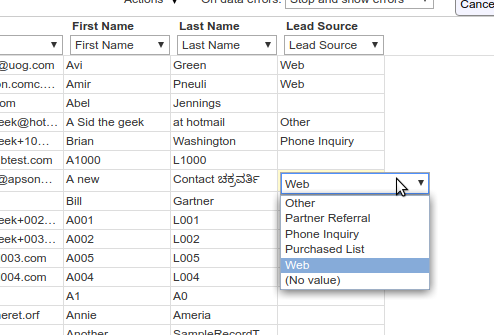
- If you click a cell in a column that has been matched to a field, the cell becomes editable, and you can change its contents in-place (see screen shot at right). The editor shown depends on the the matched field: for example, if you have matched the column to a picklist field, the editor shows a dropdown containing the valid values for that picklist. This provides a quick way to correct errors.
- When you click “Next” after matching the columns to fields, the importer validates all the data against the corresponding Salesforce object fields, and if any errors are found, it displays a popup containing the list of errors. You can optionally choose to ignore the erroneous records and proceed to the next step, in which case those records will appear as rejected in Step 3.
Fields available for mapping #
Each of the dropdowns contains a list of the fields available for mapping. This list of fields is subject to the following rules:
- If you selected “Insert new records” as the operation, only modifiable fields are shown. Non-modifiable fields, such as formula fields, audit fields (e.g., Created Date, Last Modified Date, Created By, Last Modified By), the record ID field, or any field marked read-only in your Salesforce Profile, are not shown in the list. This is of course because you can’t change those fields anyway. (But if you have enabled audit field modification, then the Created Date field will also be shown.)
- If you selected “Update existing records”, you might have chosen one or more non-modifiable fields (such as the record ID, a formula field or an external ID field) among your “lookup by” fields. So in this case, the fields you selected for “Lookup by” will all be shown in the dropdown, since you want to be able to map them to your data columns. (But the importer will ensure that it won’t try to modify the non-modifiable fields.) However, if a field is not modifiable and is not among the “lookup by” fields, it will not appear in the dropdown choices.
The “actions” menu #
Step 2 provides an Actions menu via which you can add a new column, remove an existing column, or find and replace values within a column. All of these are changes you can make to the workspace containing your CSV data – they will only affect the data imported next, but will not affect the original CSV file.
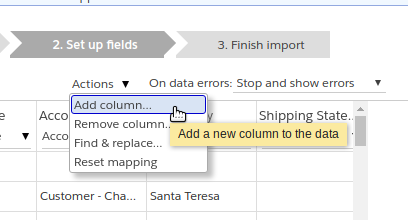
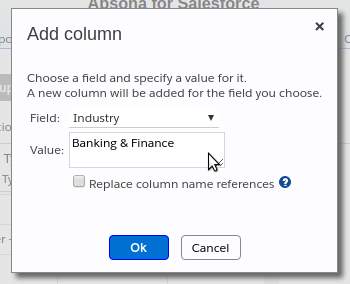
Adding a column #
You can add a new column to your CSV data, in two ways. You can select a field of the object that the new column should map to, and then:
- Specify a fixed value for all the rows in the data. The screenshot below shows how to add an
Industrycolumn with valueBanking & Finance.
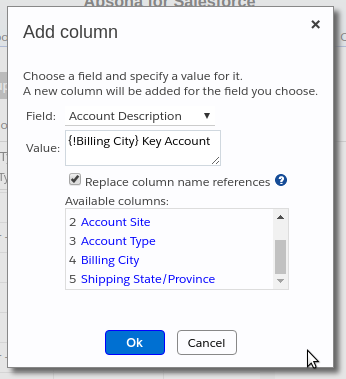
- Create a composite value made of the values of other fields in the CSV data. The example below shows how to create an Account Description column whose value is the value of the Billing City column followed by the text
Key Account.
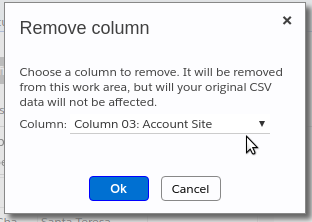
Removing a column #
You can use the “Remove column” menu item in the Actions menu to invoke the popup shown below. Using this popup, you can remove any of the columns from your CSV data. Note, however, that this removal affects only the import process – it does not affect your original CSV file.
Find-and-replace #
The “Find and replace” menu item invokes the popup below. You can use this function to find and replace a specific string in a particular column with a different string. The example screenshot shows how to correct a spelling error by replacing all occurrences of San Jse with San Jose in the Billing City column.
Step 3: Finish and save results #
In the last step, the importer displays a summary of the field mappings and the statistics available at that point, just before proceeding with the import, as in the screen shown below. You can also save the mapping for the import by clicking on Save mapping. This mapping can be reused for future imports if required.
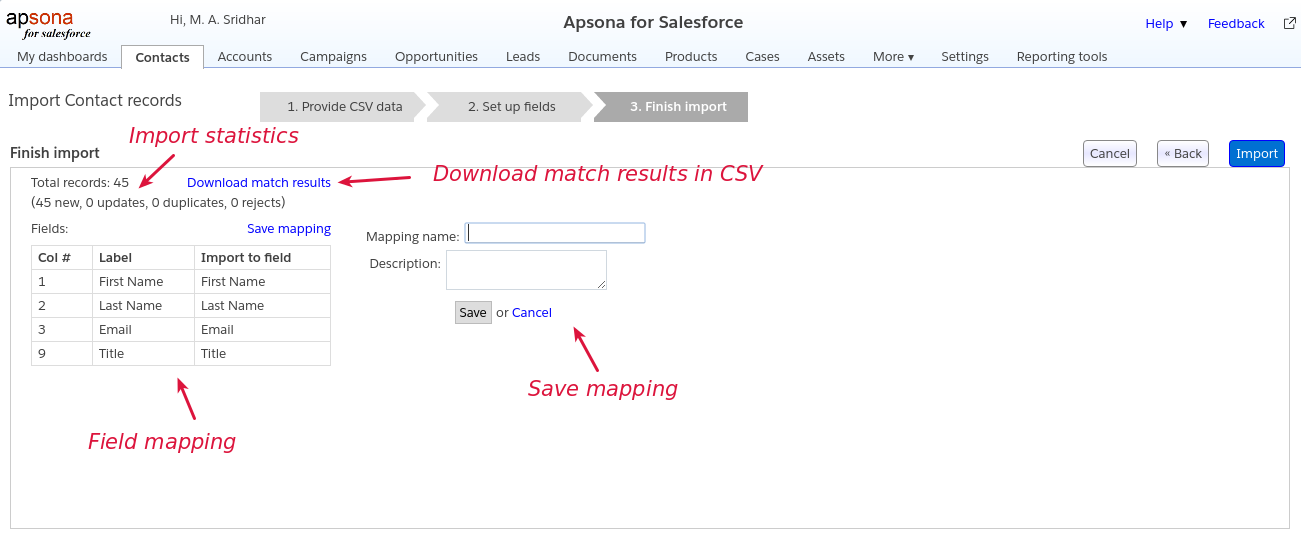
Note that the actual saving of data into your Salesforce database begins only after you click the “Import” button in this step. Until then, no data is actually saved into your Salesforce database. So you can click the “Download match results” link to obtain the results of matching your CSV data against the Salesforce database.
When you click the “Import” button, a progress bar appears, and the import process begins.
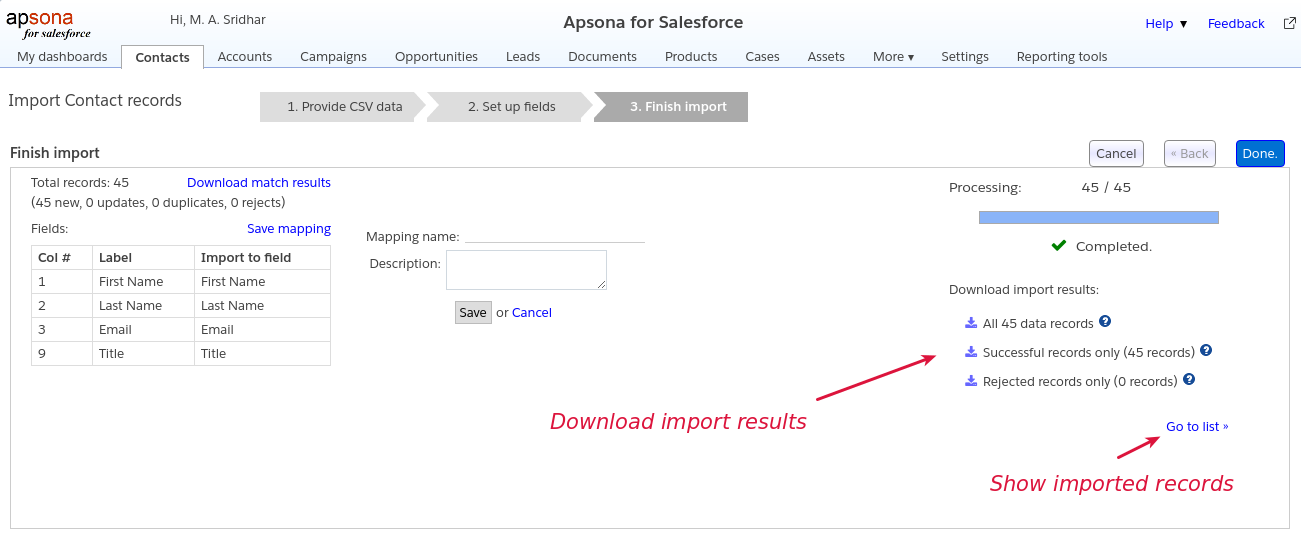
Downloading or viewing import results #
When the import is complete, the importer displays a panel containing the results of the import. From there, you can:
- download the data records imported, along with their record ID values, by selecting the “all records” radio button and then clicking Download
- download the rejected records, if any (so that you can correct the errors and import them), by selecting the “Rejected records” radio button and then clicking Download
- click the “Go to list” link to take you to the console view showing just the records you imported. You can then save the result as a filter, or perhaps – if you just imported Contact or Lead records – add them all to a Campaign as described in this article.
Saving your mapping #
The third step includes the ability to save your mapping and choices into an “import mapping”. To do so, you click the Save mapping button in the third step (see screenshot above). When you save a mapping, the import tool takes all your choices for the import – the action type (import or update), the match fields, the date options, and the field mapping from step 2 – and puts them together into an “import mapping” record, which is saved in your Apsona Items custom object.
- If you had selected a saved mapping when you begin the import (in step 1), the name and description of that mapping will be pre-filled in the Save mapping panel, so that you can overwrite it with the new choices you have made during the current import.
- If you added any columns in step 2 (via Actions – Add column), those added columns are saved in the import mapping, so that when you use the same mapping, those columns are automatically added during step 2.
- You can view and manage all the saved import mappings in your org via the Apsona Items screen. The list of saved mappings shown in step 1 includes all the mappings for the current object, saved by any user in your org.
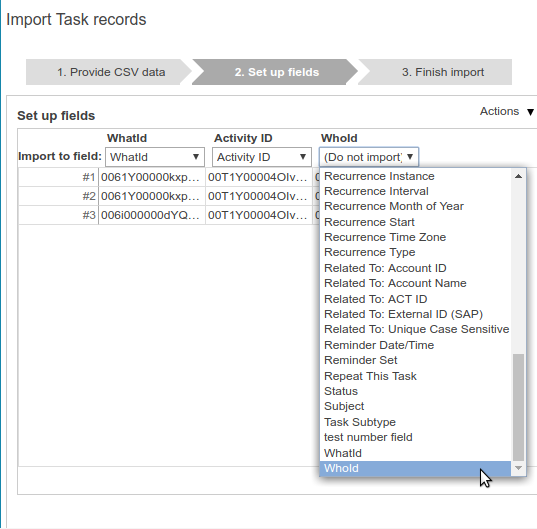
Special case: Importing Task records #
Salesforce’s Task object has two unusual fields,
WhoId and WhatId: They are “polymorphic” lookup fields that can refer to more than one object. The WhoId field is allowed to refer to the Lead or Contact object, and the WhatId field is allowed to refer to almost any native or custom object. This “polymorphic” feature makes it much more difficult for Apsona to validate the contents of these fields when importing or updating records. But users often need to import record IDs into these fields. So Apsona shows these two fields in the Task import list as special cases. So using this feature, you can import or update these two fields of the Task object just like you would any other object. One caveat, though: unlike with other lookup fields, Apsona does not validate the contents of these fields against any Salesforce field contents. See screen shot below.
Notes about data types and validation #
Step 2 of the import wizard includes data validation, as noted above.
- Date values can be in one of several formats. If the data is in
mm/dd/yyyyformat, there can be ambiguity between English and American dates (e.g., the date 11/10/2012 means Nov 10th in the US, and 11th October in the UK). In such a situation, the choice of date format in step 1 (see screen shot above) is used to disambiguate the date value. But if your date is inyyyy-mm-ddformat, there is no ambiguity. Both formats are acceptable, even within the same CSV file. - Multi-select picklist values must be separated by semicolons.
- With picklist values, Usually Apsona requires that a data value in a column mapped to a picklist field (or multi-select picklist field) must match a valid value for that picklist. Sometimes it might be necessary to allow invalid values, and in such a situation, you can check the “Allow invalid picklist values” checkbox in step 1 of the import wizard.
- When importing into a Record Type field, you must uncheck the “Allow invalid picklist” values checkbox. This is because, when mapping picklist values, Apsona takes the value you specify and maps it to the corresponding Salesforce-internal picklist value, which is usually (but not always) the same. And Apsona treats the RecordType as a picklist, not as a lookup, for historical reasons. When you check the box that says “allow invalid picklist values,” you’re basically telling it to trust you with whatever you put in there, and not bother to map it – in particular, not replace the Record Type name with the corresponding Record Type ID. And that in turn causes a Salesforce error saying “Record Type ID value of incorrect type”, because Salesforce finds the name of a Record Type where it is expecting the ID of a Record Type.
Matching CSV records #
One common situation is where you would want to match a set of data records in CSV format against your Salesforce data, and obtain the record ID for each record, if one is available. For example, you might have available a list of contact names and email addresses in CSV format, which you obtained from a trade show, and you wish to match the list against your Salesforce database, obtain their record IDs, and add them to a particular Campaign. The import tool allows you to do this. You can take advantage of the fact that the import tool does the matching of CSV data records against Salesforce data in steps 1 and 2, but does not actually import the records until you click the Import button in step 3. So, to find your matching record IDs, simply walk through the first two steps of the import wizard, as described above, using the “upsert” option for importing (add new records, updating existing records). When you get to step 3, click the “Download match results” link at the top of the panel. The resulting download will contain your original CSV data, with an additional first (leftmost) column containing the record IDs of the matched records.