Overview #
The Apsona Scheduler add-on enables you to:
- Schedule your Apsona reports and multi-step reports to run periodically, and e-mail the results to a specified list of contacts.
- Schedule runs of merge actions from your Apsona Email and Document Generator add-on, to generate and email documents. Note: Excel merge and address label merge are currently unsupported.
For example, you can:
- Schedule your weekly sales summary report to run every Sunday at midnight and be delivered to all of your sales managers.
- Run a merge action once a week, e.g., Friday at 6 pm, and generate all your pending invoices for the previous week and email them to the appropriate recipients.
- Run a merge action every day at 6 am, generate and send an email containing the day’s schedule for each of your field service personnel.
This add-on requires Apsona for Salesforce. To schedule multi-step reports, you will need the additional Multi-step Reporting add-on. To schedule merge actions, you will need the additional Email and Document Generator add-on.
Pricing #
Scheduled Reports and Scheduled Document and Email merge are two separate products that come in one install. On your Apsona Invoice, they will appear as two separate line items (for Renewals and mid-year Add-Ons). See below for our pricing tiers:
Scheduled Reports Runs #
| runs per year | Cost per Run (as of Jan 1, 2024) |
|
|---|---|---|
| Tier 1 | 1000 – 9,999 | $0.28 |
| Tier 2 | 10,000-24,999 | $0.16 |
| Tier 3 | 25000+ | $0.12 |
| Enterprise | Contact us for pricing |
A “run” is one report sent to unlimited email addresses.
Scheduled Document and Email Merges #
| merges per year | Cost per merge (as of Jan 1, 2024) |
|
|---|---|---|
| Tier 1 | 600 – 1,999 | $0.46 |
| Tier 2 | 2,000 – 4,999 | $0.35 |
| Tier 3 | 5,000 – 10,000 | $0.28 |
| Enterprise | Contact us for pricing |
Each generated document or email counts as one merge.
Merges and Runs do not carry over into the next year. Therefore, you will want to purchase only what you think you will need between now and your renewal date.
Proration is available upon request based on your renewal date. Contact us here for a quote.
NOTE: These plans apply only for merges or reports invoked via the Scheduler. Documents or emails you generate interactively via the browser are not subject to these prices, since they are included in the add-on prices shown on our pricing page.
For non-profits #
We offer a 20% discount on the above prices for non-profit organizations.
How the limits work #
General guidelines:
- Once you purchase a plan, you may schedule your reports and merge actions to run at any time, as you need.
- When your usage exceeds 75% of your plan’s limit, we will notify you of its impending expiry by email. You can purchase a new plan if you run over the limits of your current plan.
- Once you have used up the merges or runs in your plan, the scheduler will not run further merge actions or reports until you purchase a new plan. When you do so, you can change to another plan if you like.
Trial periods #
We offer free trials of the Scheduler add-on. During the trial period, you may send up to 20 Scheduled Reports, and up to 20 runs of document or email merge actions.
Installing and enabling the Scheduler #
To install this add-on:
- Visit our AppExchange listing and click the “Get It Now” button. Then proceed through the on-screen directions to install the add-on into your org.
- Contact us for a license for the add-on for your org.
Existing Scheduler users: If you already have the Scheduler add-on installed in your org, please make sure to update it to version 1.2 or better. You can do this by visiting our AppExchange listing and clicking the “Get It Now” button. This version update enables you to track your usage (for accounting purposes), and is also required for the Scheduled Document/Email feature.
Once the scheduler is installed into your org, each user who has an Apsona for Salesforce license can enable it for their use. The scheduler adds two menu items in your Reporting Tools menu, named “Scheduled Reports” and “Scheduled Report Runs”.

Before you can use the scheduler, you must enable it to access Salesforce as you, so that it can fetch data and run reports on your behalf. Do this as follows.
- Click Reporting tools – Scheduled Reports. In the main tool bar, the scheduler’s status button shows as OFF if you have not yet enabled access for yourself.

- Click the status button. A popup window appears. (If you have disabled popup windows in your browser, you will need to enable them at least temporarily.) This popup will walk you through three steps and set up your account for the Scheduler.


- After this step is complete, the scheduler status button will show as ON.

- Click Settings – Clear cache in Apsona, so that your metadata becomes available to the scheduler when it runs next.
How it works #
The Apsona Scheduler relies primarily on the Salesforce Oauth 2.0 facility for authentication, and the Salesforce SOAP API for data retrieval. The scheduler is simply a service that repeatedly runs these steps in order:
- Wake up every six hours (midnight, 6 am, noon, etc.)
- Log in to your org with the Oauth credentials you enabled
- Check for any scheduled tasks that should be run
- Run the tasks, process the results and send any necessary emails
- Go back to sleep.
Scheduling a report #
Once the Scheduler is available for your account, you will see a “Schedule…” menu item in each report’s menu within Apsona.

Clicking the menu item displays a popup window via which you can set up the scheduled runs for your report.

Here you can provide
- a name and description for the schedule
- the format in which the report should be delivered (HTML in-line, HTML attachment, or CSV)
- the email addresses to which the scheduled report should be delivered (you can specify multiple email addresses separated by commas or newlines)
- the subject of the email
- the frequency of runs, e.g., daily, weekly, or monthly, and the specific days of week or month when the report should be run
- the time of day when it should be run, which is either midnight, 6 am, noon or 6 pm (all times specified in the Pacific Time Zone).
You can also specify a Start Date and an End Date for the schedule. A scheduled report is run only if, at the instant when the scheduler examines the schedule, its Start Date is in the past, and its End Date is in the future. Note that if a Start Date is not specified, it is assumed to be in the past. Similarly, if an End Date is not specified, it is assumed to be in the future.
The Active checkbox specifies whether the schedule is currently active. Only active schedules are actually executed. So if you want to temporarily disable the schedule runs for a particular report, you can simply un-check the Active box and click Save.
Data produced by a scheduled report #
Bear in mind that the scheduled report runs with the credentials of the user who set up the schedule. It therefore respects any object, field or data constraints of that user’s profile. For example, if record sharing is set up so that certain records are not visible to that user, then those records will not be retrieved by the scheduled report.
Scheduling a merge action #
To schedule merge actions, you will need the Document Generator add-on, which enables you to create merge actions via the browser. Once a merge action is created and available for use, you can set up a schedule for the merge action as follows.
-
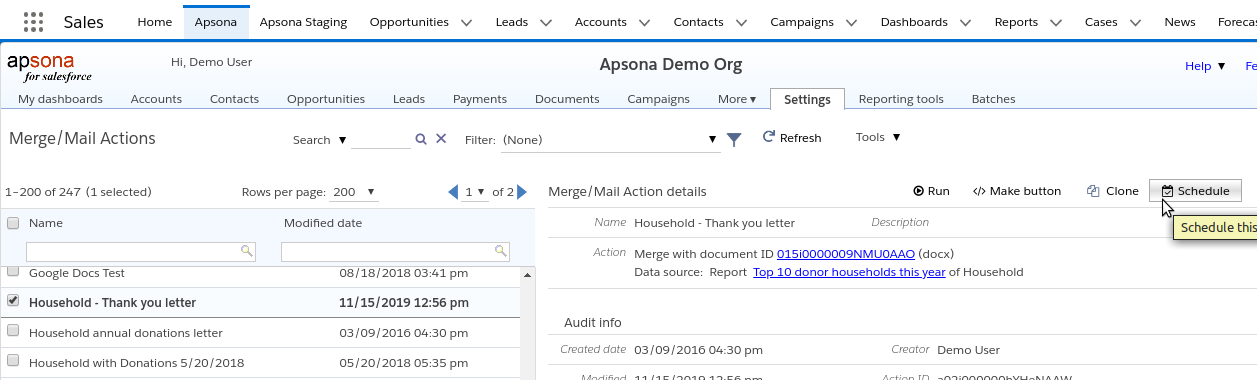
Navigate to Settings – Merge actions in Apsona, where you can view and manage all the merge actions that have been set up in your org. Click the row for the merge action you wish to schedule. With the Scheduled Document Generator add-on license enabled, a “Schedule” button will be available on the detail record of the merge action, as in the screen shot below.
-
Click the Schedule button to bring up the scheduler popup, shown below.

In this popup, you can set the parameters for the schedule, including the start and end date, frequency (Daily, Weekly, Monthly, etc.), and the preferred start time.When you click Save in this popup, you will create a record in the Apsona Scheduled Job object, which is part of the Scheduler managed package. If you are creating a new schedule for a merge action, the caption for the popup is shown as “Add Apsona Scheduled Job record”. But if there is already a Scheduled Job record created for this merge action, the caption is shown as “Add Apsona Scheduled Job record”.
How a scheduled merge action is run #
To run a merge action, the scheduer follows these steps:
- Retrieve the data needed for the merge action into memory.
- Construct all the necessary documents or emails needed by the merge action.
- Carry out all the actions required by the merge action:
- If the merge action generates emails, send any emails needed, along with any necessary attachments;
- Attach the documents to data records, if needed;
- Update any fields that should be updated;
- Create any necessary tasks.
- Send a confirmation email to the owner of the merge action, with the results of the merge action attached. These results will be the same as the download available if the merge action were to be run interactively via the browser.
- If a single document is generated, it will be emailed to tne owner.
- If multiple documents in are generated in a zip file, the zip file will be emailed to the owner.
- If emails are generated and sent by the merge action, the resuls CSV file (which would be available for download in interactive mode) will be emailed to the owner.
Note, however, that the results attachment is limited to 5 MB. If the generated results file exceeds this size, the confirmation email will still be sent, but the attachment will not be included.
It is worth pointing out that the data retrieved from your Salesforce org is never stored anywhere on the server, not even temporarily. It is only available in volatile memory and only during the document/email generation period. It is completely erased from memory immediately after the merge action processing is completed.
Managing scheduled jobs #
If you click Reporting tools – Scheduled Jobs in Apsona, the screen shows the scheduled jobs in your org, with a list on the left and a detail panel on the right. Clicking a row in this list shows the details for that schedule, and in a child tab, it shows a list of all the previous runs of the schedule. See screenshot below.

Some things to note:
- The
Item Typefield shows the type of item being scheduled: either a Doc/Email Gen (merge action), a Report, or a Multi-step Report. - You can use the usual Apsona filter feature at the top of the list to find specific jobs.
- The detail area on the right of the list includes a “Delivery” panel that shows the delivery options that the user selected for reports and multi-step reports, showing the email subject and the recipients of the scheduled report. This panel is not applicable to merge actions, so it won’t appear when a merge action’s details are shown.
- If you are an administrator, the list will contain the schedules set up by all the users in your org. If you are not an administrator, you will see only your own schedules.
You can use this list to find particular schedules (via the filter mechanism), update or delete them. If you delete a schedule, the corresponding report or merge action will of course no longer be run on a scheduled basis, but the report or merge action itself will be unaffected.
Changing the schedule #
Currently in Apsona, you cannot change the frequency of a scheduled job, or the day of week or month it recurs. If you need to adjust those details, we recommend deleting the job and then re-creating it. You can still edit the Preferred Start Time, Start Date, and End Date of the job within Apsona.
What happens when the owner of a job leaves? #
The scheduler runs by logging into your org using the Salesforce OAuth credentials you enabled, then identifying what scheduled jobs should run based on what is 1) active, 2) owned by you, 3) needs to be run at the current time. Since the credentials are tied to your Salesforce instance and not to Apsona, if you remove a user from Apsona but not from your org, their Salesforce OAuth credentials are still valid. Therefore, Scheduler will continue to run their scheduled jobs. If you do not want this:
- If you want to stop running a scheduled job, you have a few options:
- you can un-check the “Active” field on the job record
- you can modify the “End Date” field to be a date before today, or another date to reflect when you want the job to stop running
- you can delete the job record
- If you want to transfer ownership of the job, for example if someone leaves your company, you can do this by changing the Owner field of the job record to the new owner. In this case, you do not need to change the Owner of the job’s underlying report or merge action – just the Owner of the scheduled job.
Schedule run results #
The child tab at the bottom right of the Scheduled Jobs view shows a list of run results for the selected Scheduled Job. Each Run Result record in this child tab includes the time of the run, the result of the run, and the Generated Item Count. This number is always 1 for reports and multi-step reports, but for merge actions it shows the number of documents or emails generated by that specific run of the merge action. The screen shot below shows an example detail area and the Run Results child tab.

You can also access the list of all Run Result records by clicking Reporting Tools – Scheduled Job Runs. This lets you inpect the entire list of scheduler runs for your org, so that you can view and manage the scheduler usage for your org. The Item Count field for these records indicates the number of items generated by each run, and is used for calculating the costs for which you will be billed.
How many runs do I have left? #
One question many customers have is how to determine how many runs they have left in their current Scheduler package. There are two ways we provide that information:
- To view your run usage at any time, you can create a report against the “Generated Item Count” field of the “Apsona Schedule Run Result” object. You will need to find the sum of the “Generated Item Count” field since you last purchased Scheduler runs. For ease of use, we have attached a downloadable report here that you can import and use for determining the number of remaining runs you have (you will need to modify it based on the date you last purchased Scheduler runs).
- Note: If you had not used up your old runs when you last purchased Scheduler runs, then those old runs will still be usable, so you may see that you have generated more items since the date of last purchase than the number of runs you last purchased. For example, if you purchased 500 runs on 1/1/20, used 400 runs and purchased another 500 runs on 6/1/20, then after 6/1/20 you will have a total of 600 runs available to you (500 – 400 + 500 = 600).
- If your Scheduler quota is below 100, we send an automated email to the Primary Contact of your Salesforce organization, so that you can replenish your run quota.
To access the “Apsona Schedule Run Result” object, go to Reporting tools – Scheduled Job Runs:

What counts as a run? #
The number of runs used per scheduled job is based on how many items are generated – i.e., the “Generated Item Count” field of the “Apsona Schedule Run Result” object. Here are some examples:
- if you are generating emails that are sent to 50 users, then that is 50 emails generated and therefore 50 runs.
- if you are running an email and document merge that sends an email with a document attached, and this is sent to 50 contacts (or 50 leads), then that is still 50 emails generated and therefore 50 runs (1 email and document merge is considered 1 generated item, not 2).
- a single generated document, regardless of the number of records used to generate that document, is 1 generated item. For example, in your merge action, if you are using the “Single file with page breaks” option against a report of 20 records, it will still only generate one document and therefore will count as 1 run.
- if you are using the Scheduled Reports package, then you’ll only be generating one report at a time (regardless of the number of people you email it to). Therefore, each scheduled report run only uses 1 run.
Frequently asked questions #
I don’t see the scheduler menu items in my Apsona menu bar.
Please see the Troubleshooting section below.
Are my user credentials (user name/password) stored in the Apsona servers outside Salesforce?
No, we do not store your credentials. Apsona’s scheduler uses Salesforce’s Oauth 2.0 capability to run your reports for you. This ensures that your credentials are not stored anywhere outside Salesforce.
Will changing my password affect scheduled reports?
No, because Apsona’s scheduler uses Salesforce-issued Oauth security tokens to access your data. Your scheduled reports will continue to work even if you change your password.
Is the data in my Salesforce org copied into an external data store for reporting?
No. When the report must be executed, the scheduler queries your Salesforce database directly, extracts only the necessary data, constructs and formats the report and sends off the email messages. The data is never stored anywhere on our servers, not even temporarily.
What are the limits on report sizes for the scheduler?
The total size of the HTML email body, HTML attachment or CSV attachment cannot exceed 20 MB. If your email body or attachment exceeds that limit, the email you receive will include an error message indicating the size of the generated attachment, so that you can tweak your report to reduce the attachment size.
What email provider does the scheduler use for sending its email?
The scheduler sends its emails through your Salesforce org. So these messages count against your message quota, which is usually at least 1,000 messages a day.
Troubleshooting #
Please ensure that:
- The package is installed: The Apsona Scheduler package is installed in your org – you can get it from our AppExchange listing.
- The license is valid: Your org has a license for the Scheduler add-on. Please click Settings – Manage licenses in Apsona to verify the license. Read more about this.
- Objects are accessible: Your Salesforce user profile has full read/write access to the two Scheduler objects, Apsona Schedule (API name apsona_sched__Schedule__c) and Apsona Schedule Run Result (API name apsona_sched__Schedule_Run_Result__c), as well as all of their fields.
- Email permissions are set: If you have integrations with other email providers such as Office 365, each user who uses the scheduler should have their email delivery provider set to “Salesforce”. See this article on Salesforce’s website for details. If this is not done, scheduled report delivery will fail with errors such as “Missing refresh token. User might not have been authorized.”
- Owner is set correctly: The Owner field of your Scheduled Report records is set to your user id. The Apsona Scheduler runs only those Scheduled Reports whose Owner is the same as the user who is authenticated to run the Scheduled Report record, so of those two aren’t the same, the Scheduled Report will not be executed.